
-
Modelers Alliance has updated the forum software on our website. We have migrated all post, content and user accounts but we could not migrate the passwords.
This requires that you manually reset your password.
Please click here, http://modelersalliance.org/forums/login to go to logon page and use the "Forgot your Password" option.
You are using an out of date browser. It may not display this or other websites correctly.
You should upgrade or use an alternative browser.
You should upgrade or use an alternative browser.
Maddog Manufacturing Open in 2021
- Thread starter Duke Maddog
- Start date
Duke Maddog
Well-known member
Thank you James! Trying to get some things finished for the Nationals.
Duke Maddog
Well-known member
Well, here it is about three weeks after the Nationals. After coming back, I'd been super busy and so was only able to build a little here and there. Then Hobby Day came, and I was able to really move forward. This will be a long tour so please forgive me if it gets too boring. I do have a lot to show.
That being said, this post will have to be broken into three or four parts.
Now let’s get to it. All aboard the trams for this latest tour of Maddog Manufacturing. We’ll begin in the Aircraft Hanger.
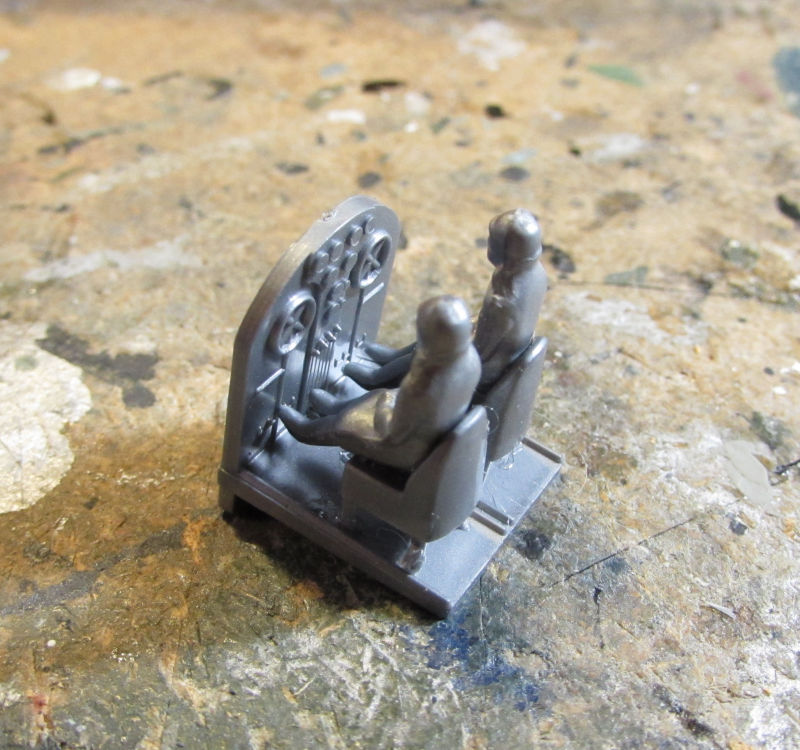
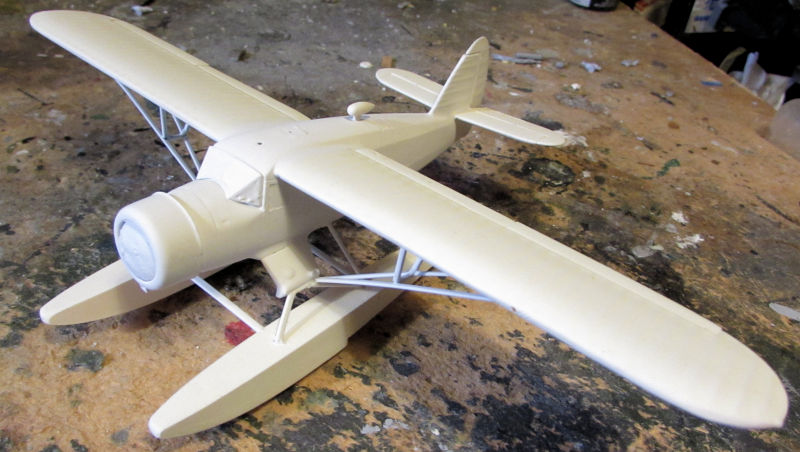
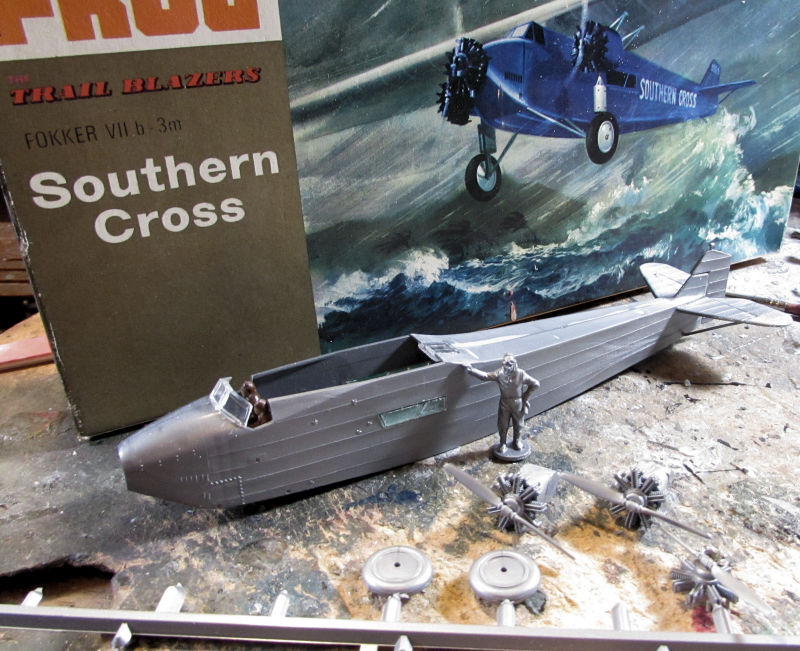
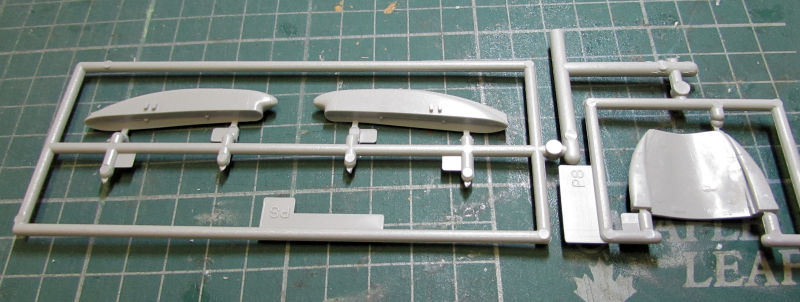
At the Nationals, I picked up the FROG Southern Cross trimotor and I’ve been wanting to start it since bringing it home. First chance I got I popped it open. Naturally, I started with the “cockpit”.
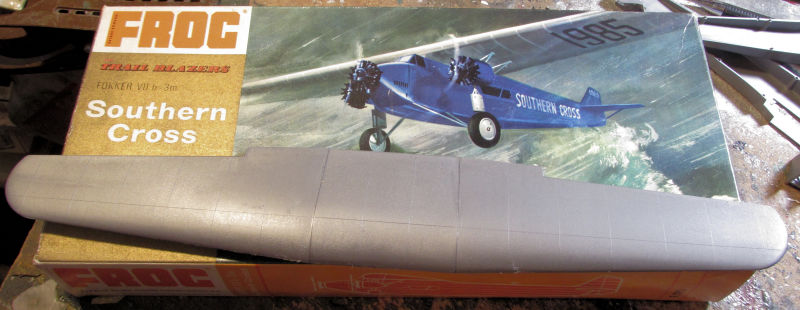
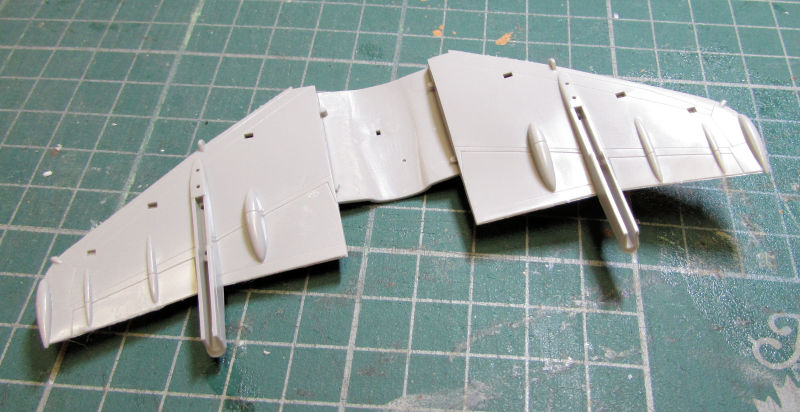
Then I built the wing. It is fatter than I expected! Here it is on the original box:
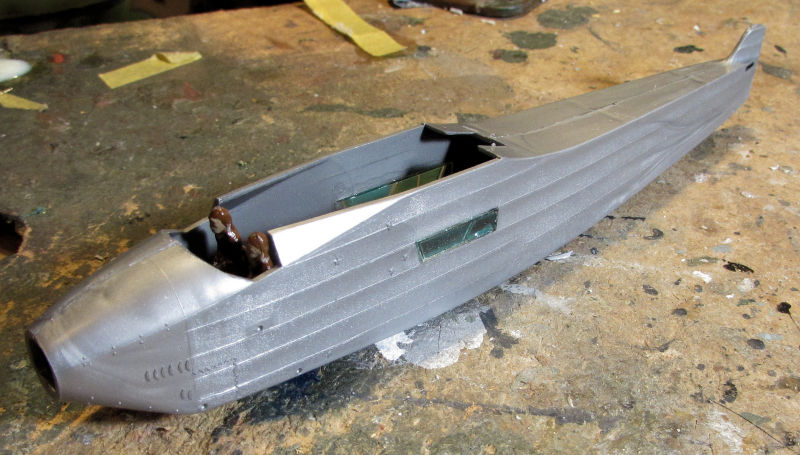
I then painted the crew and closed them up inside the fuselage:
Just for fun I then dry-fit the wing on the fuselage. It looks like it’s crushing the fuselage:
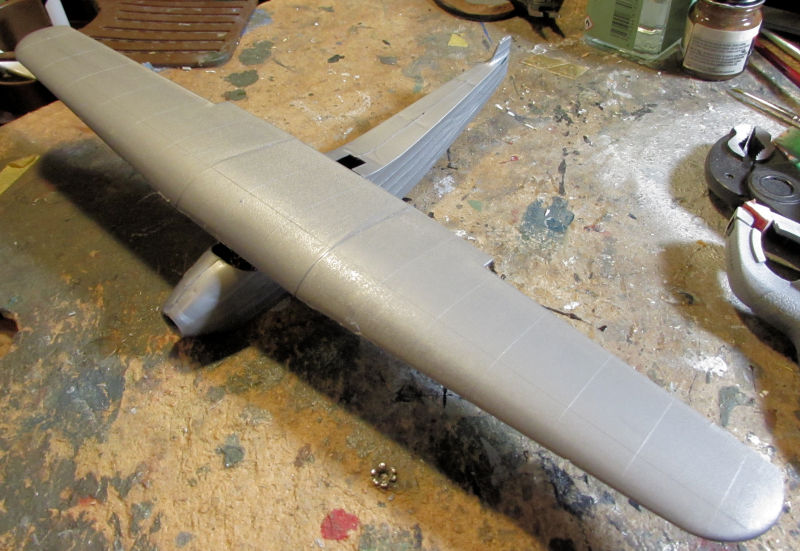
I’ll keep them apart until I finish painting the wing and fuselage.
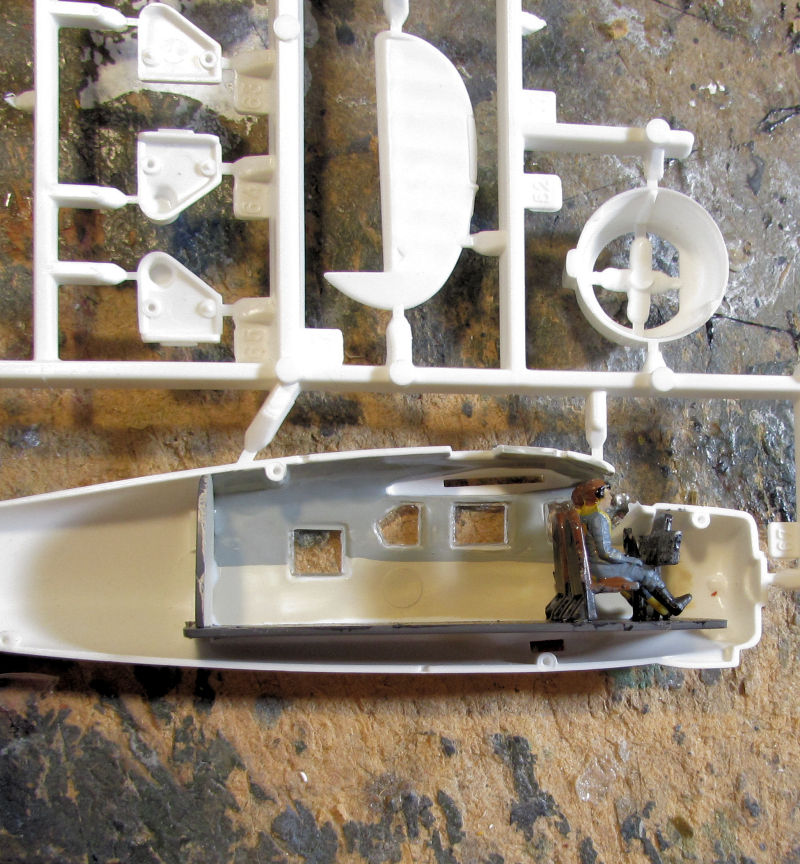
Moving on to the next one. I painted the interior of the Norseman, including the pilots:
Here is what the interior looks like inside the fuselage:
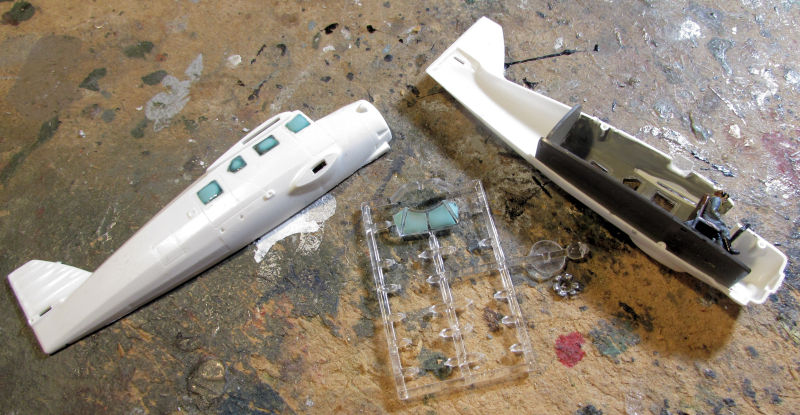
Before closing it up, I added the center top window and started masking some of the windows and windscreen:
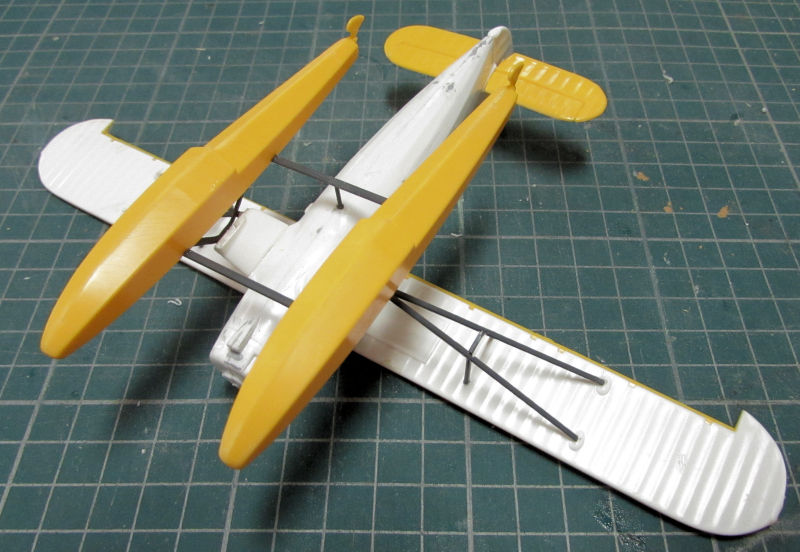
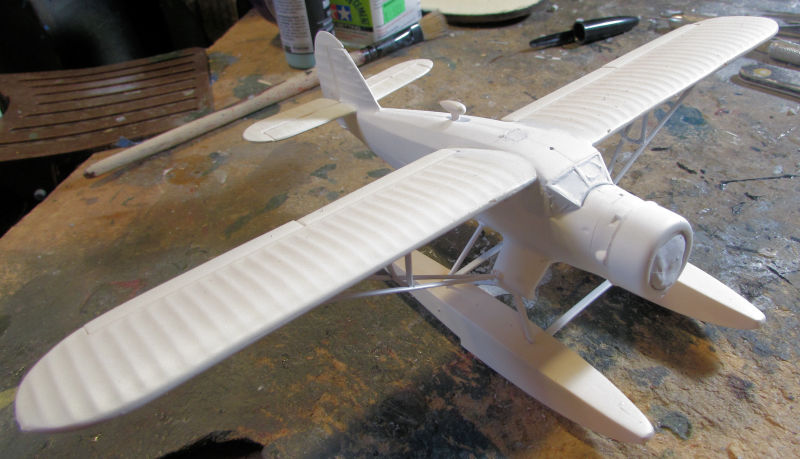
I then closed it up, filled and sanded it down and then added the wings and tail:
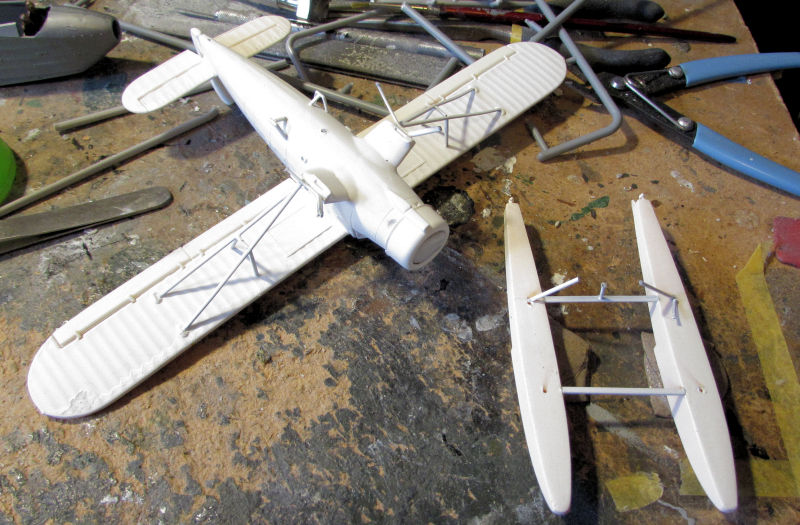
Next came the basic float assembly. This was a delicate assembly to do:
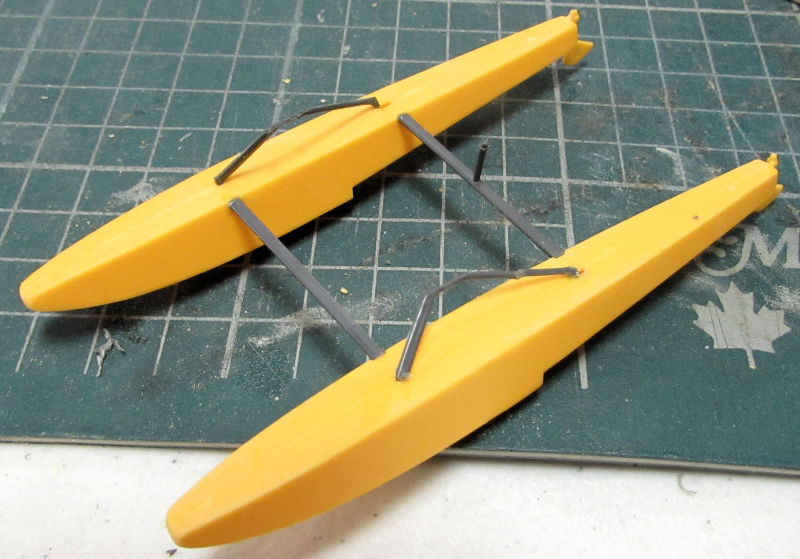
Once they had dried sufficiently, I installed them on the plane:
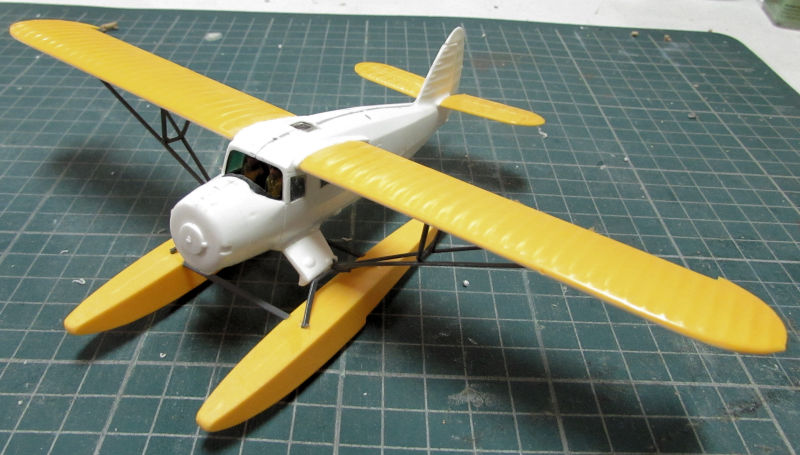
I then moved ahead, adding the windscreen and flaps to the wings and tail. I also finished masking the rest of the windows. You can see where I also re-filled the wing joints with more putty:
The putty was sanded smooth again, the engine was painted and I added some more struts to the floats that I’d forgotten to install earlier:
Out came the Silly Putty which went over the engine, and then I pressed the cowl over the Silly Putty so I could shoot paint on this:
And then I shot the first white coat on it to see what additional imperfections I missed:
Looked good, but there were a few imperfections that needed sanding out, as well as some dust and debris that stuck to it, so I started to re-sand it for the next coat. Of course, I naturally was doing too well so my hands stopped working and dropped the plane making it break into pieces. Here it is after I started to repair it; I placed the floats on some Silly Putty to hold them in place, re-glued the struts and am waiting for them to dry before attempting to re-attach the floats:
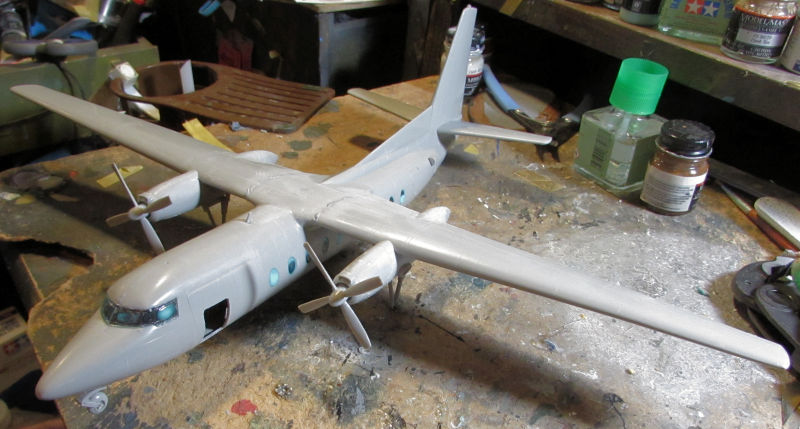
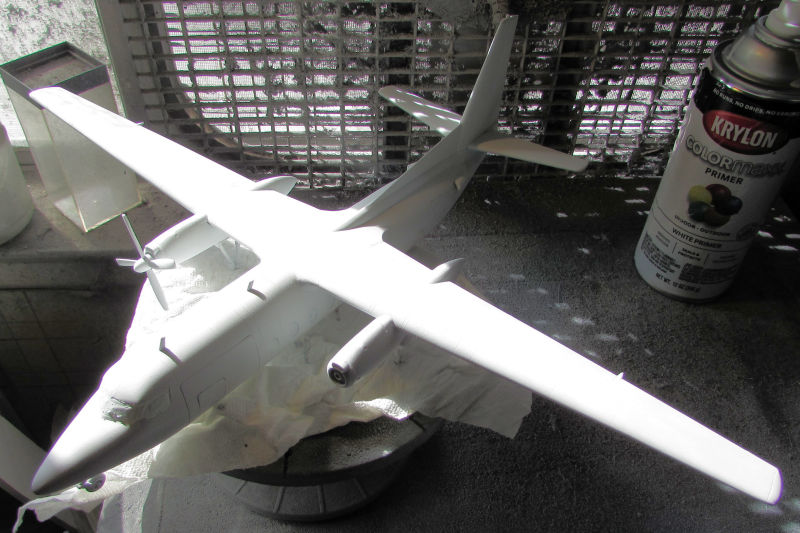
Enough of that! I moved on to something I felt I could do better on. Out came the Fokker F-27 Friendship again. I started by painting the interior:
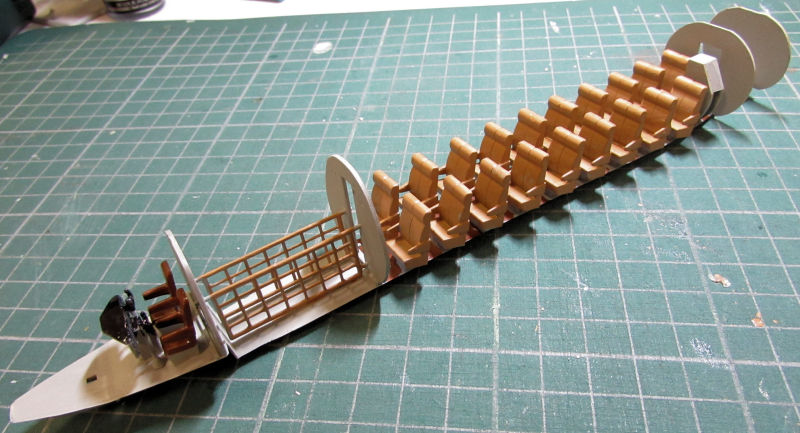
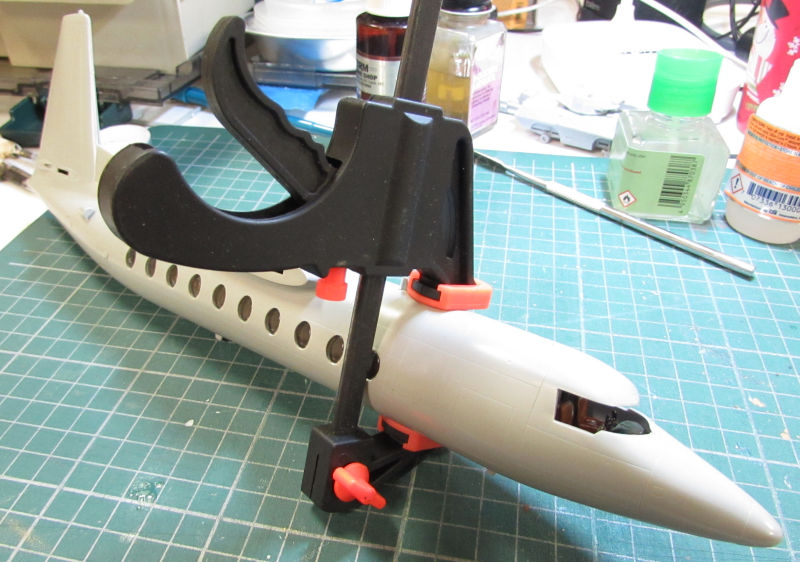
Fuselage went together next, I clamped it to remove a step in the forward fuselage:
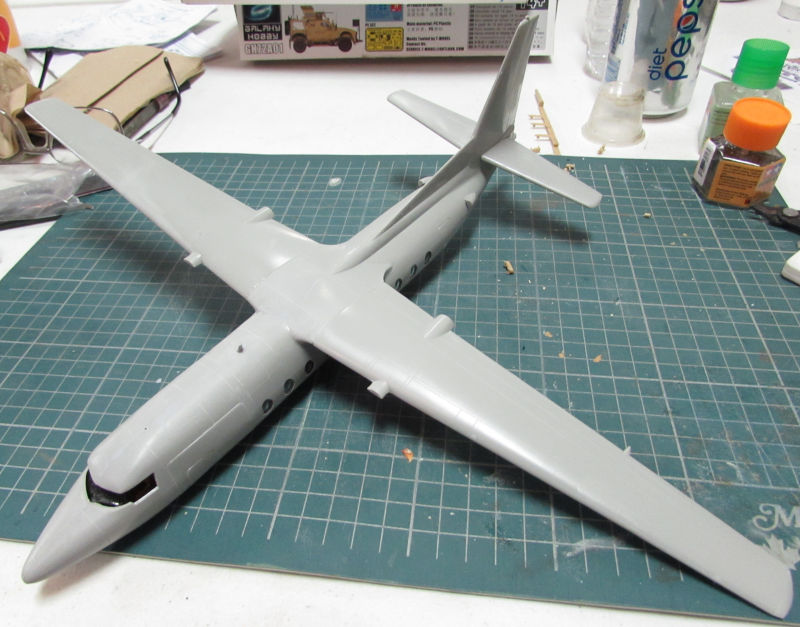
Wings and tail next went on:
Part II coming up....
That being said, this post will have to be broken into three or four parts.
Now let’s get to it. All aboard the trams for this latest tour of Maddog Manufacturing. We’ll begin in the Aircraft Hanger.
At the Nationals, I picked up the FROG Southern Cross trimotor and I’ve been wanting to start it since bringing it home. First chance I got I popped it open. Naturally, I started with the “cockpit”.
Then I built the wing. It is fatter than I expected! Here it is on the original box:
I then painted the crew and closed them up inside the fuselage:
Just for fun I then dry-fit the wing on the fuselage. It looks like it’s crushing the fuselage:
I’ll keep them apart until I finish painting the wing and fuselage.
Moving on to the next one. I painted the interior of the Norseman, including the pilots:
Here is what the interior looks like inside the fuselage:
Before closing it up, I added the center top window and started masking some of the windows and windscreen:
I then closed it up, filled and sanded it down and then added the wings and tail:
Next came the basic float assembly. This was a delicate assembly to do:
Once they had dried sufficiently, I installed them on the plane:
I then moved ahead, adding the windscreen and flaps to the wings and tail. I also finished masking the rest of the windows. You can see where I also re-filled the wing joints with more putty:
The putty was sanded smooth again, the engine was painted and I added some more struts to the floats that I’d forgotten to install earlier:
Out came the Silly Putty which went over the engine, and then I pressed the cowl over the Silly Putty so I could shoot paint on this:
And then I shot the first white coat on it to see what additional imperfections I missed:
Looked good, but there were a few imperfections that needed sanding out, as well as some dust and debris that stuck to it, so I started to re-sand it for the next coat. Of course, I naturally was doing too well so my hands stopped working and dropped the plane making it break into pieces. Here it is after I started to repair it; I placed the floats on some Silly Putty to hold them in place, re-glued the struts and am waiting for them to dry before attempting to re-attach the floats:
Enough of that! I moved on to something I felt I could do better on. Out came the Fokker F-27 Friendship again. I started by painting the interior:
Fuselage went together next, I clamped it to remove a step in the forward fuselage:
Wings and tail next went on:
Part II coming up....
Duke Maddog
Well-known member
Part II continued from above...
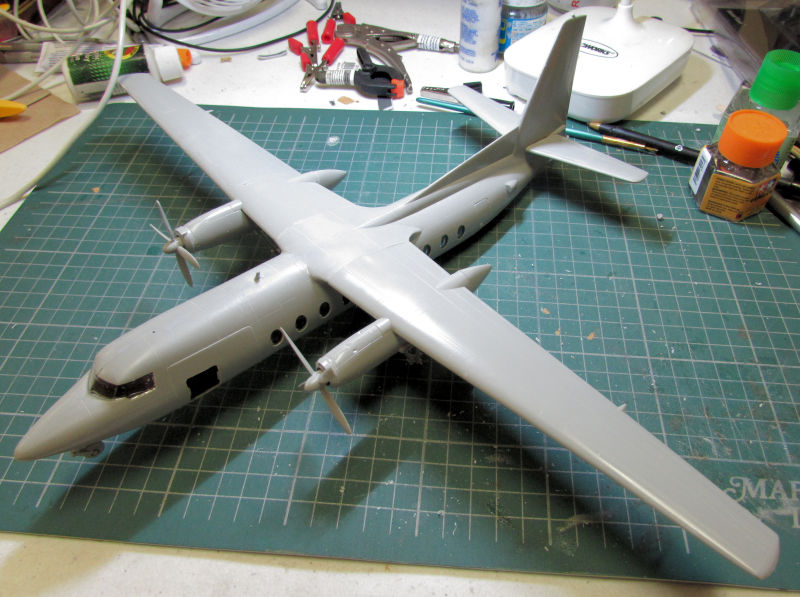
And finally I added the engines and most of the landing gear. You notice I opened one of the small cargo doors on the side. That is because I didn’t have enough weight in the nose:
I also finished masking all the windows on the sides of this plane after adding the windscreen:
I then added the additional weight to keep this on its feet. They fit nicely in the cargo nets! Later I’ll close this up:
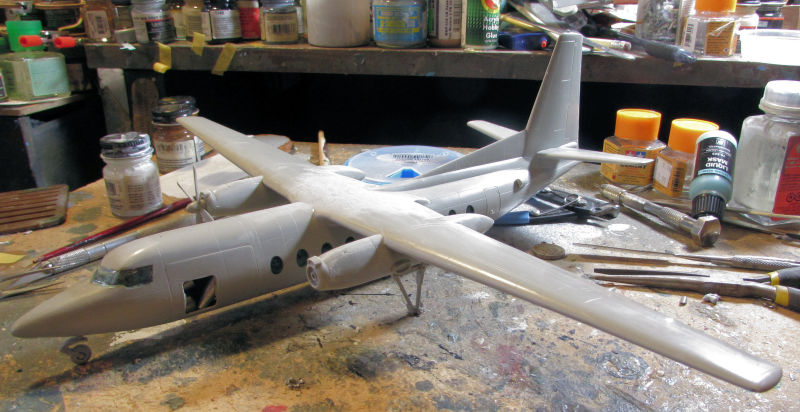
This one then got its first coat of white paint:
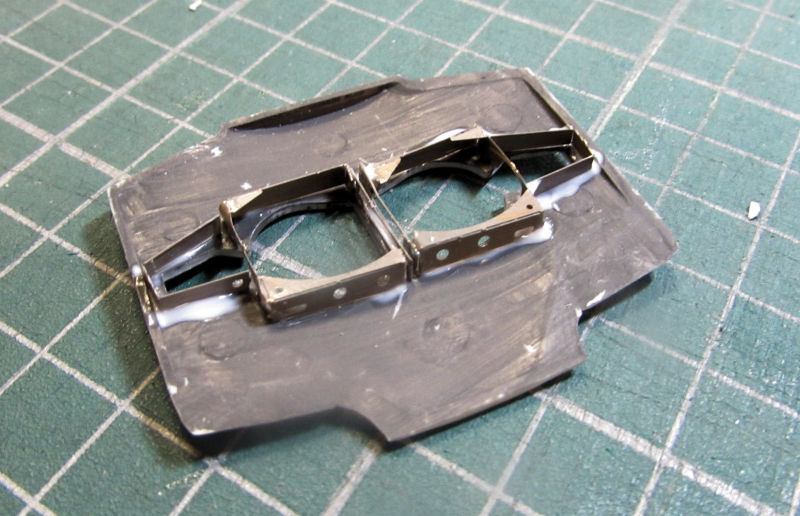
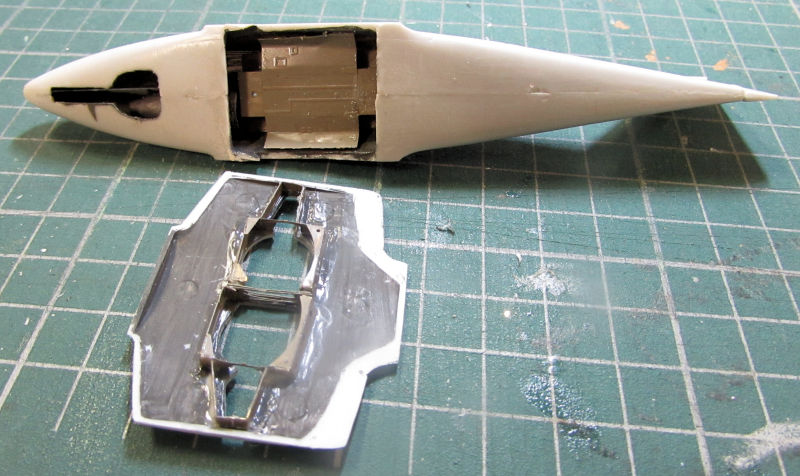
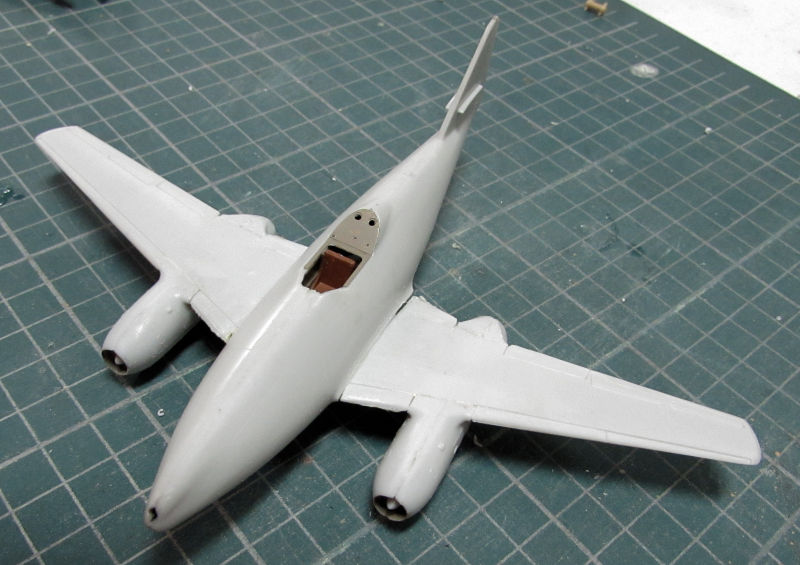
After this, I had noticed an MPM multimedia kit of the Me-262 Swallow; this one sports a rather large gun in the nose. I had gotten it for two bucks at a show from a guy who had started it already. I didn’t think It would be an issue, so I pulled it out and started it too. I built the rather basic cockpit and then closed it up inside the fuselage. I then added the photo-etch plate to the top of the cockpit opening. The joint looked good:
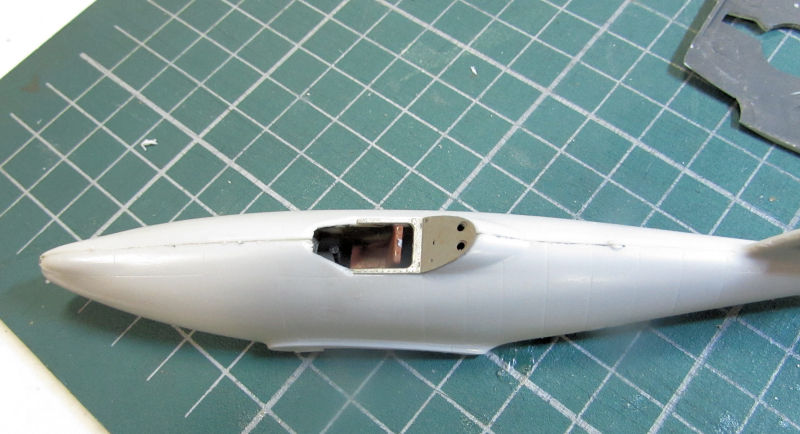
The landing gear bay had photo etch to frame it, so I added that:
When I went to test fit the wing section to see how the photo etch looked and fit, I found out why this guy stopped and sold the kit:
The instructions said I needed to cut sections off that center section so I did, not realizing that the measurements they gave were off:
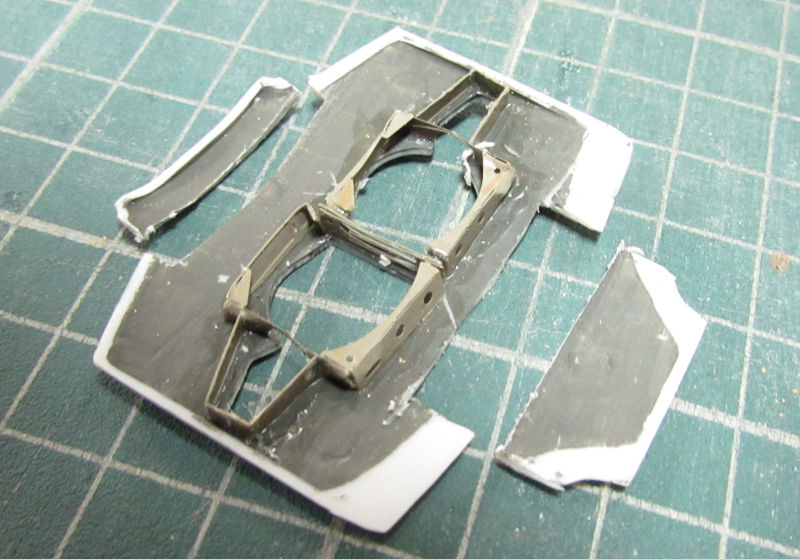
While I took time to figure out how to fix that, I went ahead and assembled the upper wings and engine pods:

Later I glued the whole wing assembly together and here it is dry-fit to the fuselage assembly. I also need to find the tail feathers for this too as they are lost:
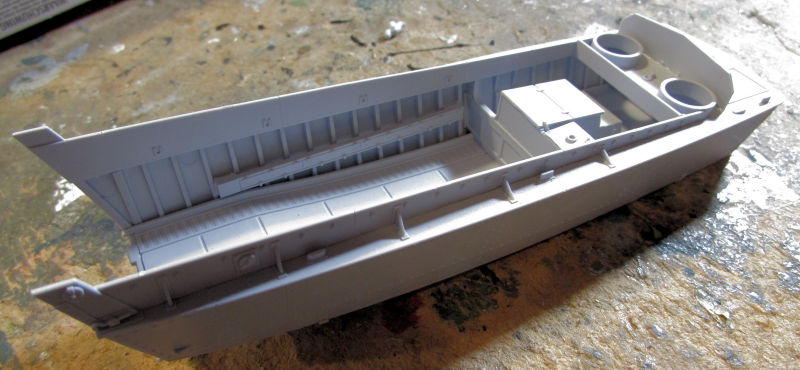
Those were quite the fight so far so I pulled out something completely different and supposedly much easier. This is the new Airfix Higgins Boat in 1/72 scale. I started with the crew station in the back:
I did clean up that mess later after I took the pic. And to show you how easy this was, I got this far before I realized I had forgotten to take pics:
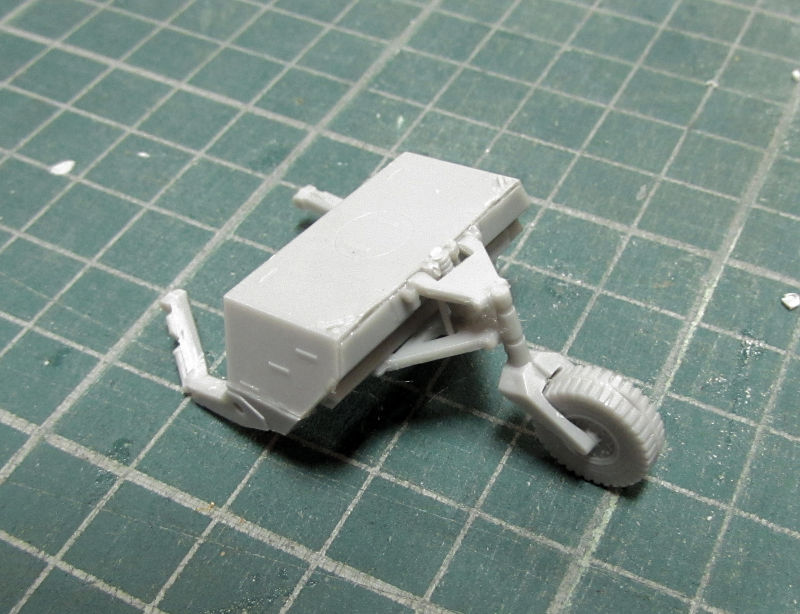
Just for fun, I noticed this little trailer in my Centurion Mk.5 LR kit that goes behind a British Centurion used in the Suez Crisis. Even though I wasn’t going to use it, I went ahead and assembled it:
That is a nice little transition into my Motor Pool division of Maddog Manufacturing where I have a number of projects going, including at least one that I started. I’ll begin with that one.
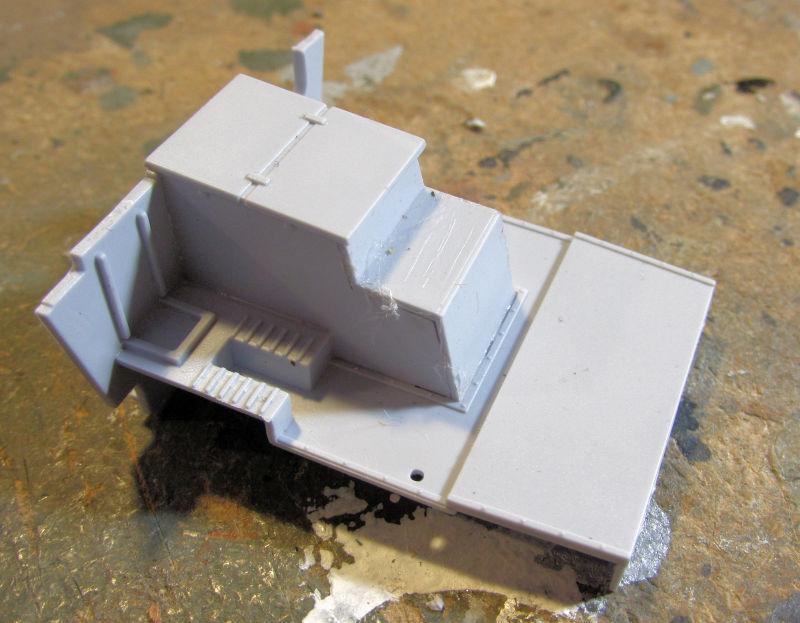
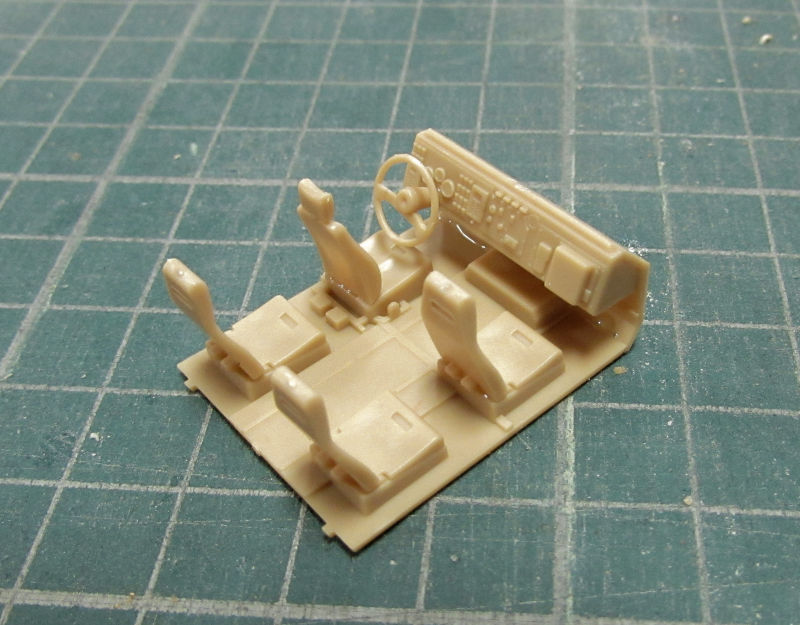
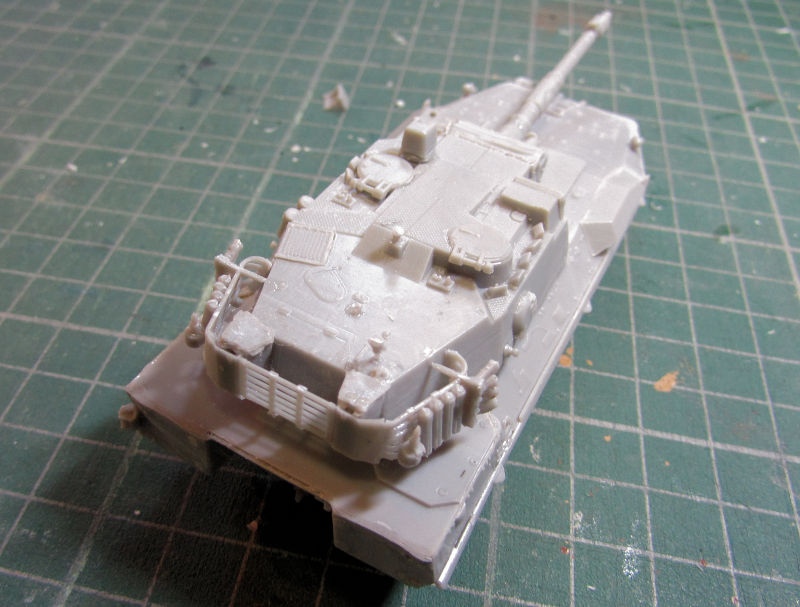
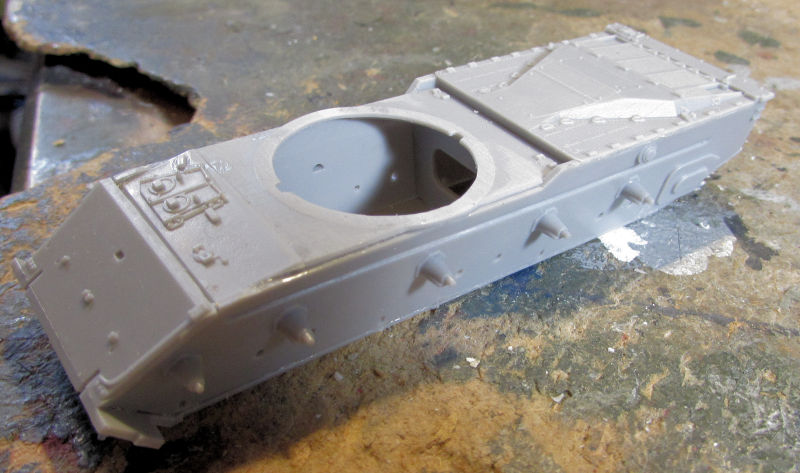
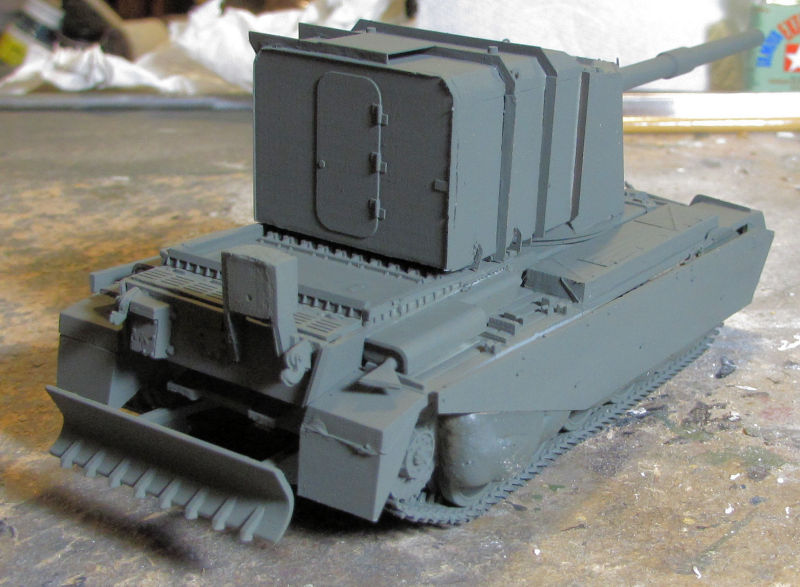
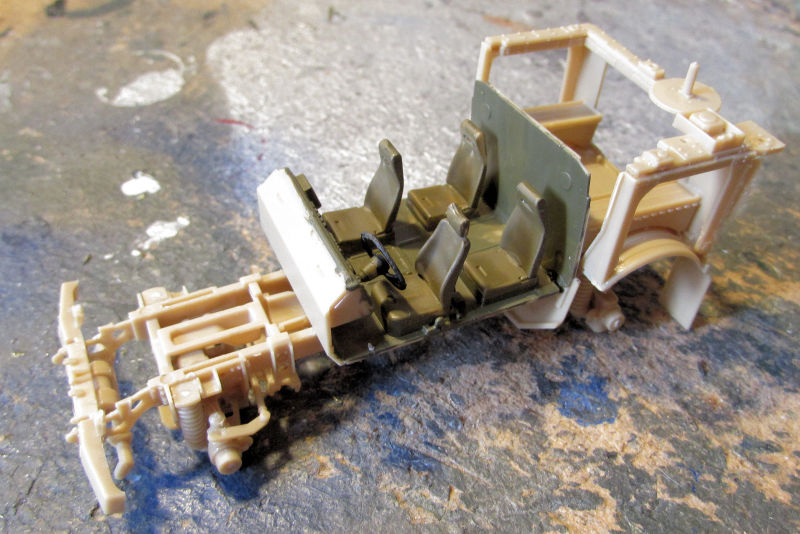
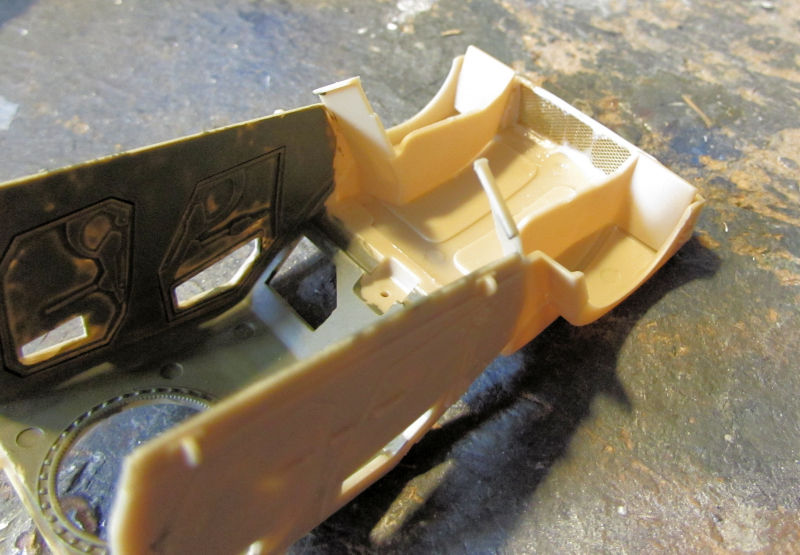
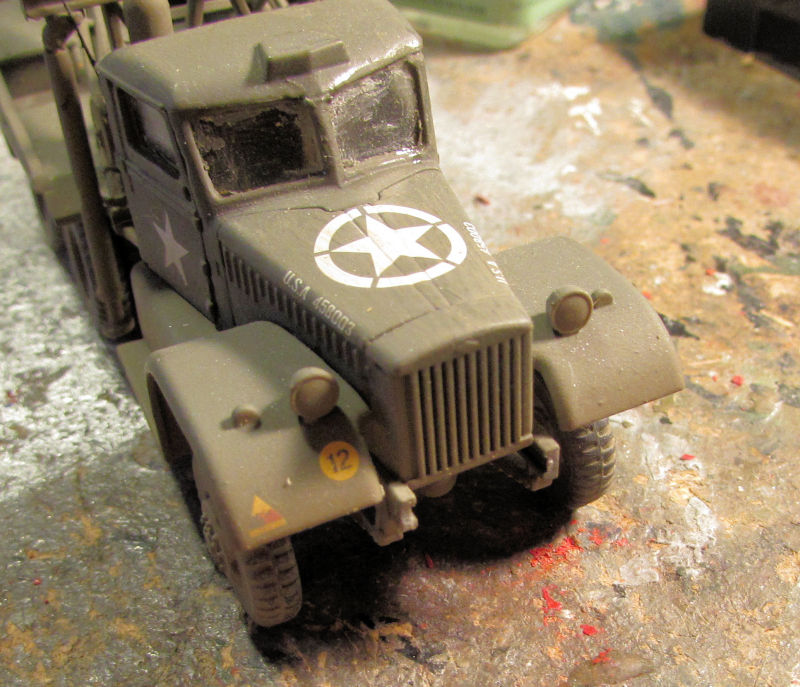
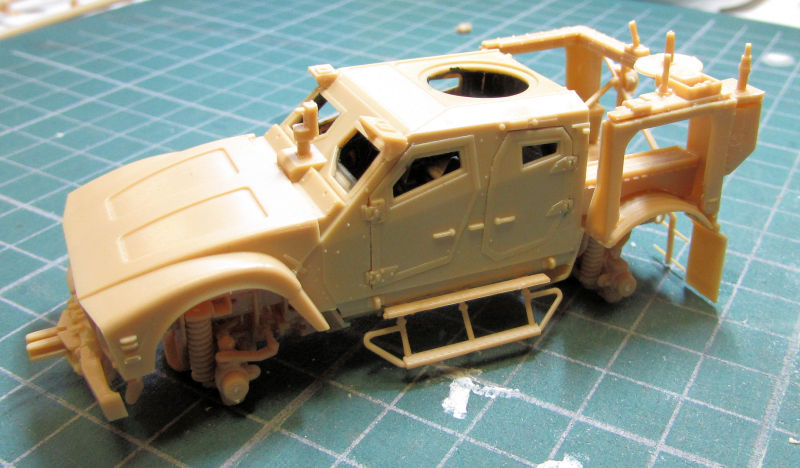
This is my M-1240 M-ATV that I got at the Nationals as well and I’ve been eager to get started on it. I should have waited. Here is the chassis; it was more delicate and difficult to build than I expected. There are several pieces left off that which were too much effort to add so they are not on here:
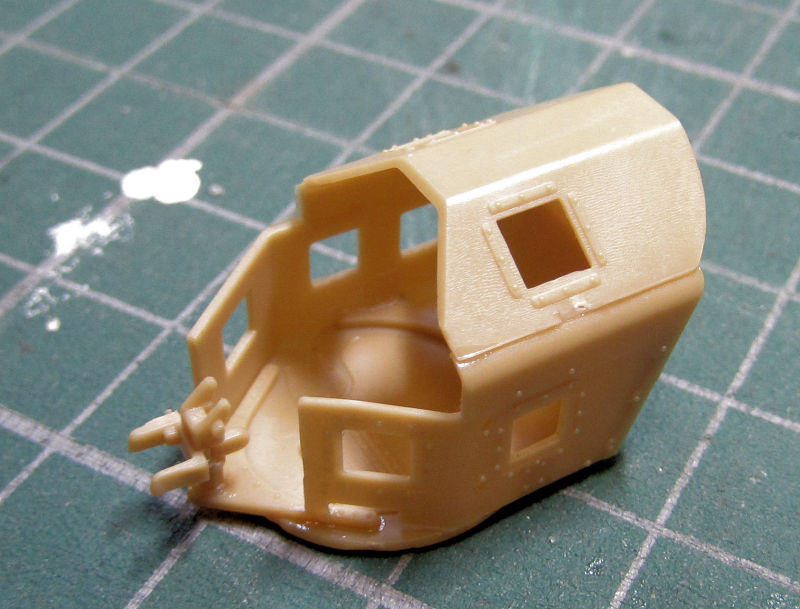
Next I built the interior of the main cabin:
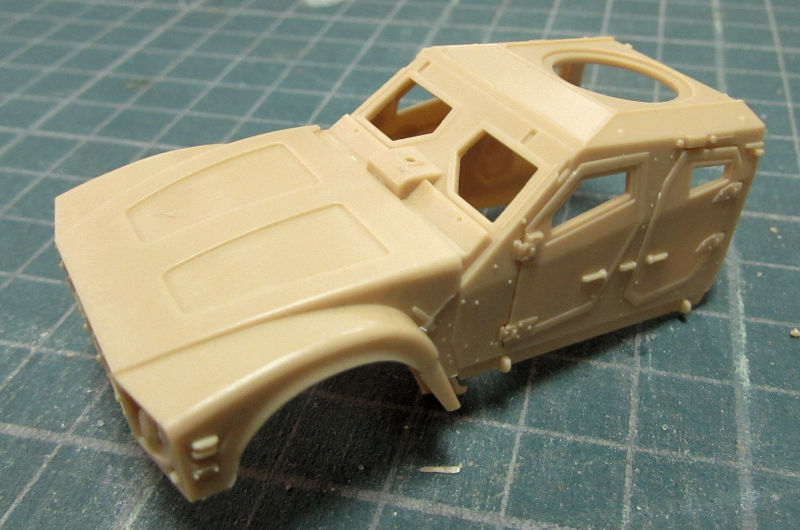
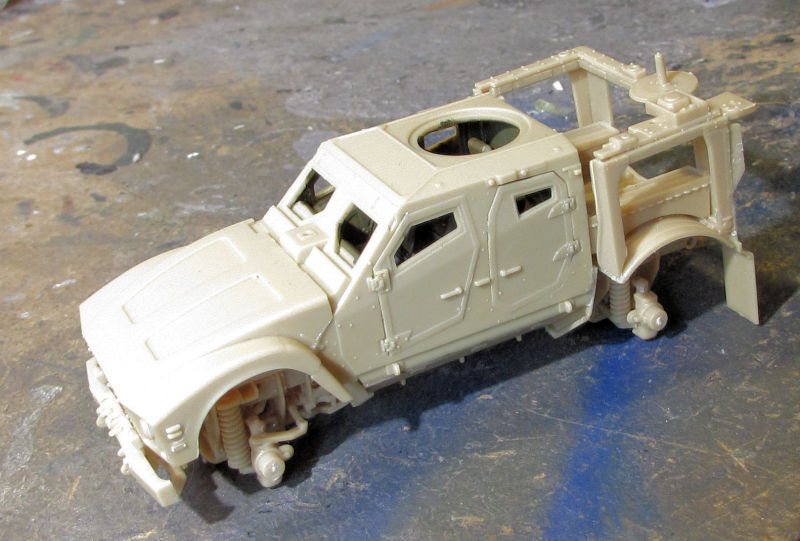
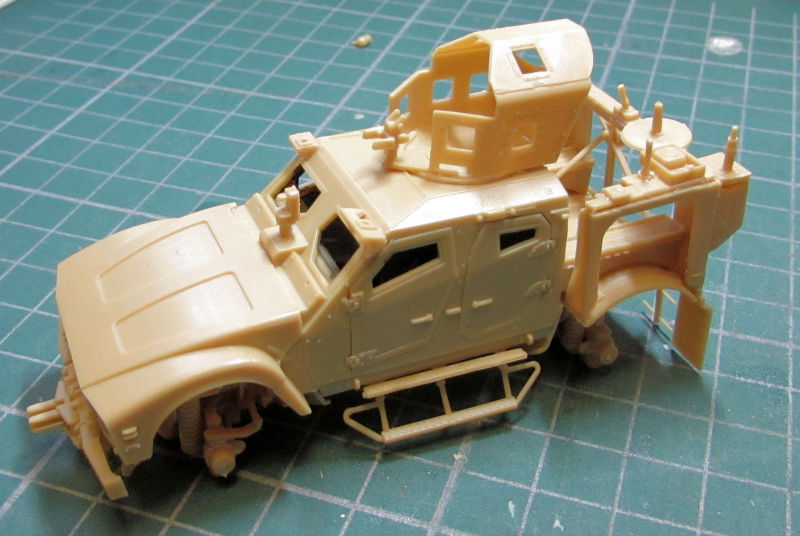
Then I assembled the main cab and hood:
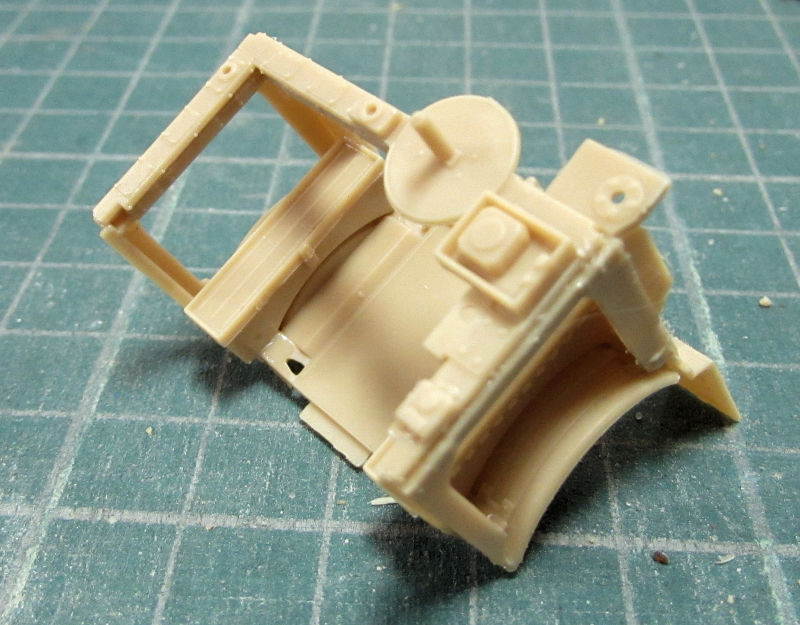
And finally, I assembled the rear cargo compartment:
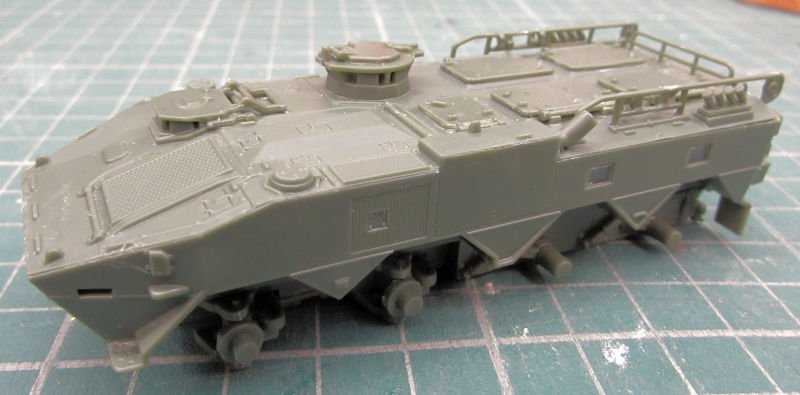
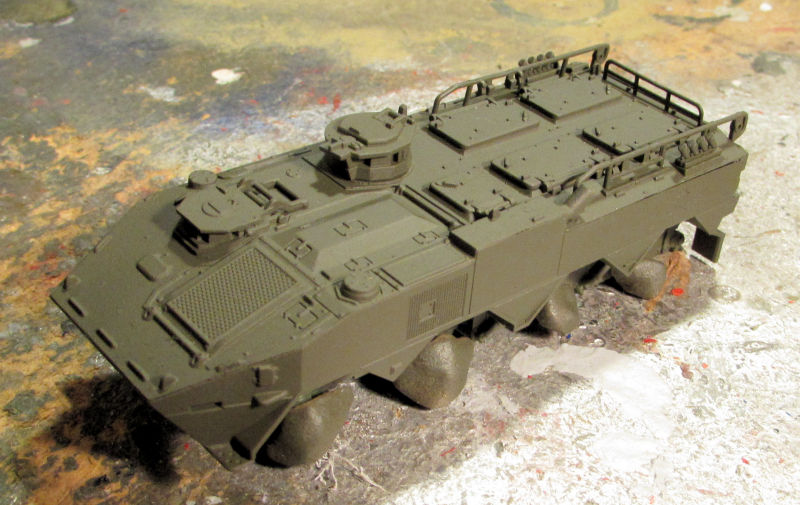
After that I’d had enough of that! Out came the two Japanese APC’s which needed an interior painting. I painted the interior white and then the benches a dark, leather brown:
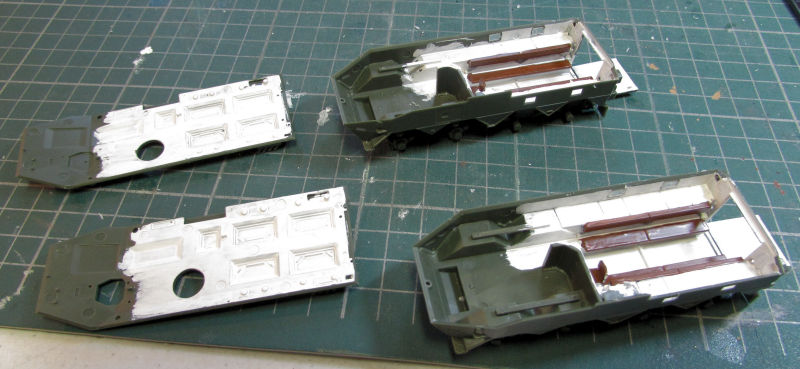
Not much will be seen once these get closed up:
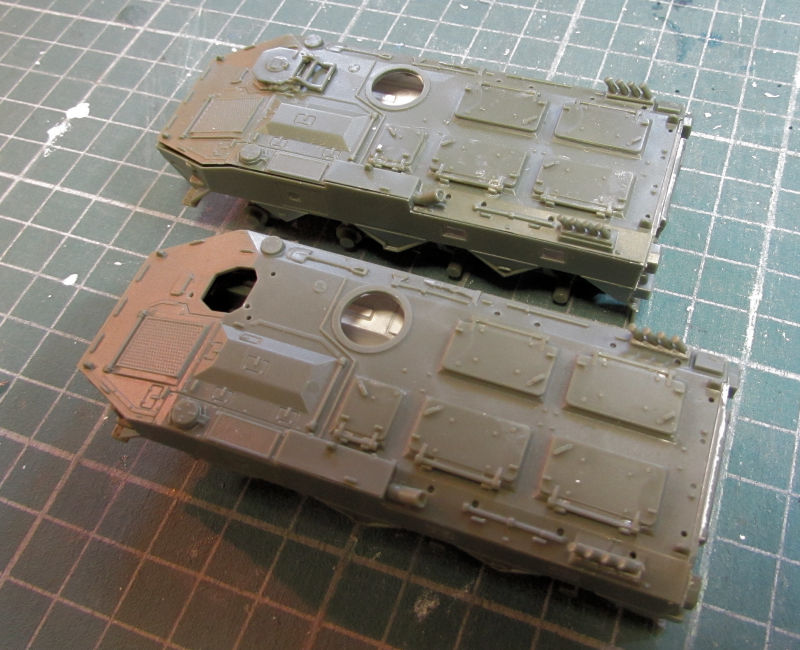
Easy peasy!
Part III coming up.....
And finally I added the engines and most of the landing gear. You notice I opened one of the small cargo doors on the side. That is because I didn’t have enough weight in the nose:
I also finished masking all the windows on the sides of this plane after adding the windscreen:
I then added the additional weight to keep this on its feet. They fit nicely in the cargo nets! Later I’ll close this up:
This one then got its first coat of white paint:
After this, I had noticed an MPM multimedia kit of the Me-262 Swallow; this one sports a rather large gun in the nose. I had gotten it for two bucks at a show from a guy who had started it already. I didn’t think It would be an issue, so I pulled it out and started it too. I built the rather basic cockpit and then closed it up inside the fuselage. I then added the photo-etch plate to the top of the cockpit opening. The joint looked good:
The landing gear bay had photo etch to frame it, so I added that:
When I went to test fit the wing section to see how the photo etch looked and fit, I found out why this guy stopped and sold the kit:
The instructions said I needed to cut sections off that center section so I did, not realizing that the measurements they gave were off:
While I took time to figure out how to fix that, I went ahead and assembled the upper wings and engine pods:
Later I glued the whole wing assembly together and here it is dry-fit to the fuselage assembly. I also need to find the tail feathers for this too as they are lost:
Those were quite the fight so far so I pulled out something completely different and supposedly much easier. This is the new Airfix Higgins Boat in 1/72 scale. I started with the crew station in the back:
I did clean up that mess later after I took the pic. And to show you how easy this was, I got this far before I realized I had forgotten to take pics:
Just for fun, I noticed this little trailer in my Centurion Mk.5 LR kit that goes behind a British Centurion used in the Suez Crisis. Even though I wasn’t going to use it, I went ahead and assembled it:
That is a nice little transition into my Motor Pool division of Maddog Manufacturing where I have a number of projects going, including at least one that I started. I’ll begin with that one.
This is my M-1240 M-ATV that I got at the Nationals as well and I’ve been eager to get started on it. I should have waited. Here is the chassis; it was more delicate and difficult to build than I expected. There are several pieces left off that which were too much effort to add so they are not on here:
Next I built the interior of the main cabin:
Then I assembled the main cab and hood:
And finally, I assembled the rear cargo compartment:
After that I’d had enough of that! Out came the two Japanese APC’s which needed an interior painting. I painted the interior white and then the benches a dark, leather brown:
Not much will be seen once these get closed up:
Easy peasy!
Part III coming up.....
Duke Maddog
Well-known member
Part III continue from above....
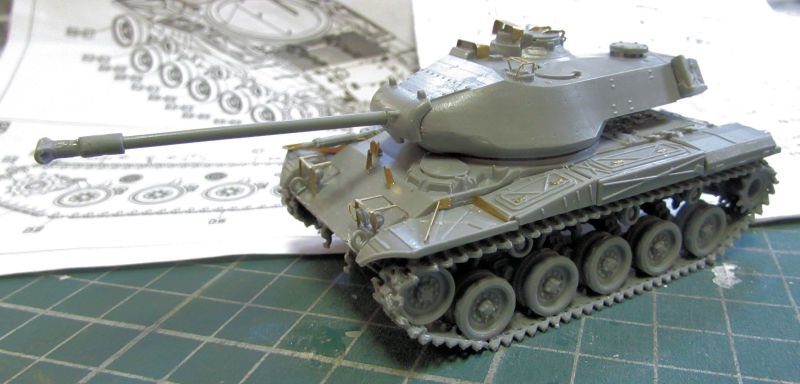
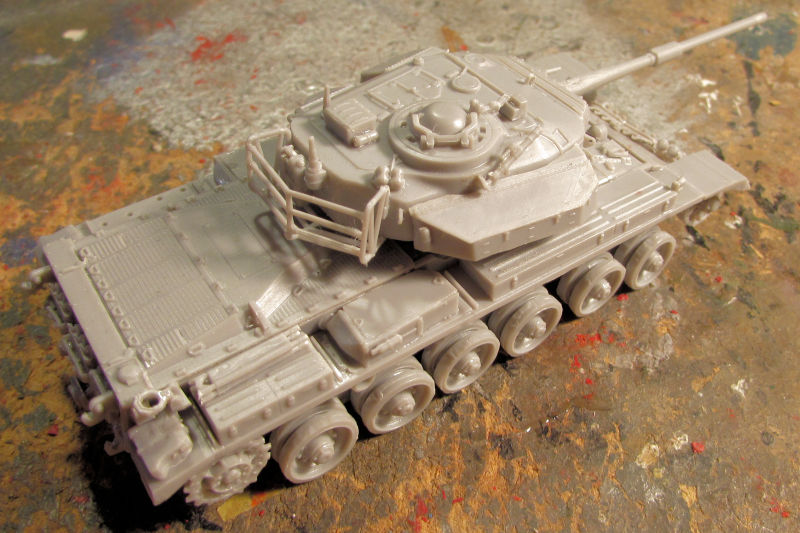
Next it was time to move forward on another project that had been languishing; my M-41 Walker Bulldog. All it really needed was the P/E and tracks. I started with the P/E, adding most of what was included:
Afterward I added the tracks. This one is ready for paint:
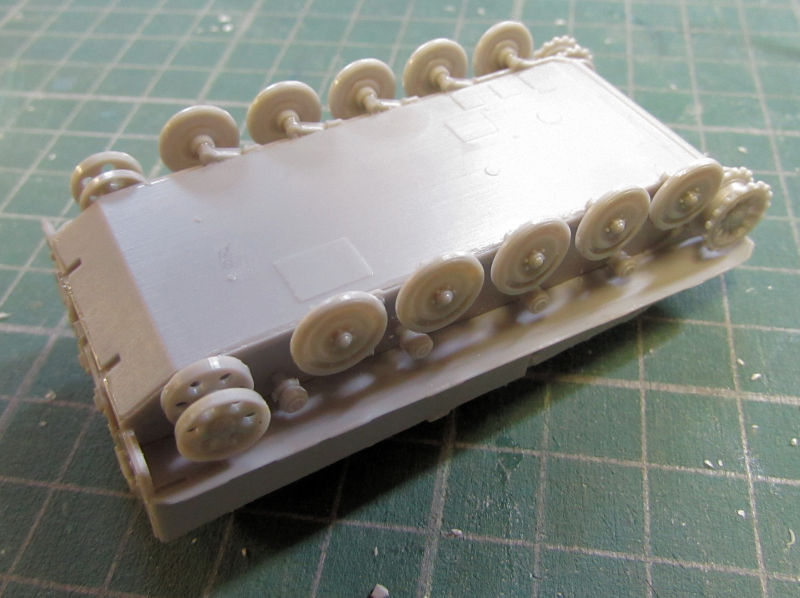
Another easy one (or at least fast) was my French APC. Since I got the tracks for it, I added the wheels in preparation for installing the tracks:
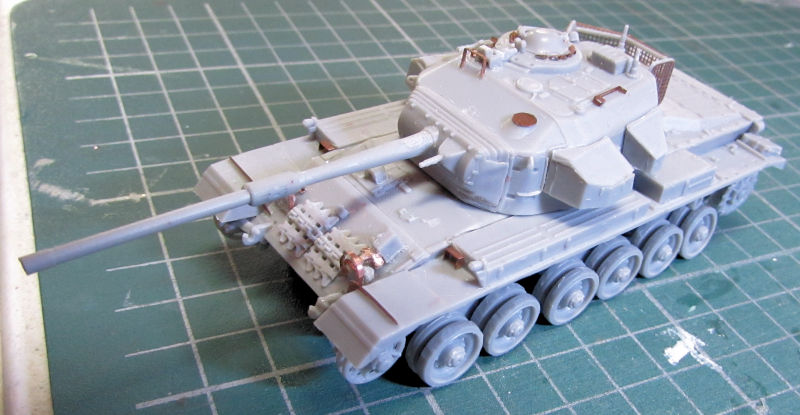
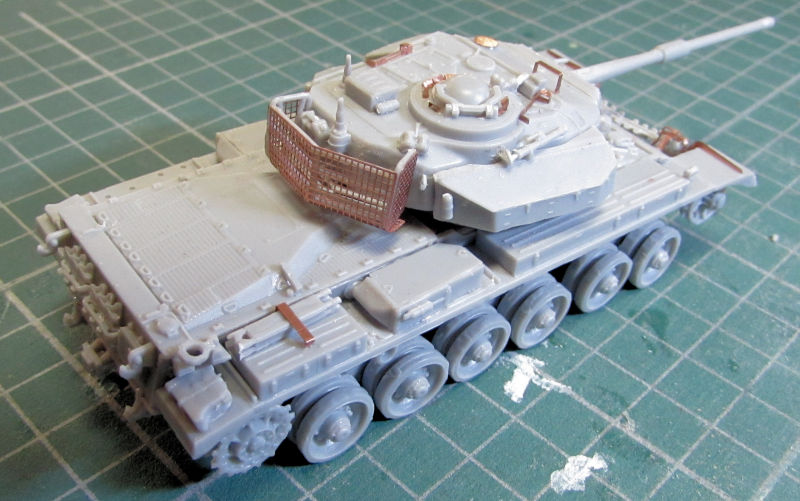
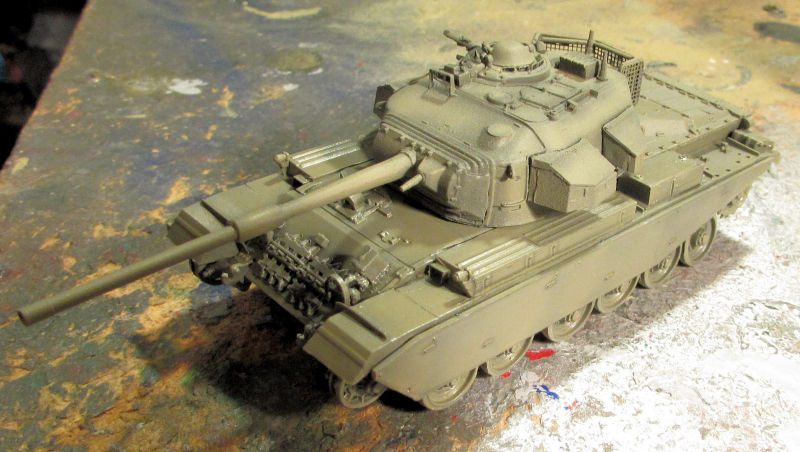
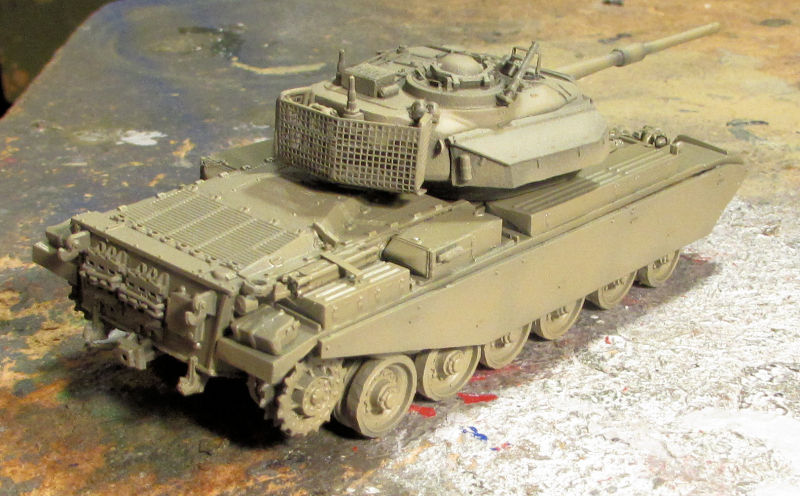
Next I went back to adding P/E to tanks. I started with my Australian Centurion Mk.5 LR, finishing off the photo-etch:
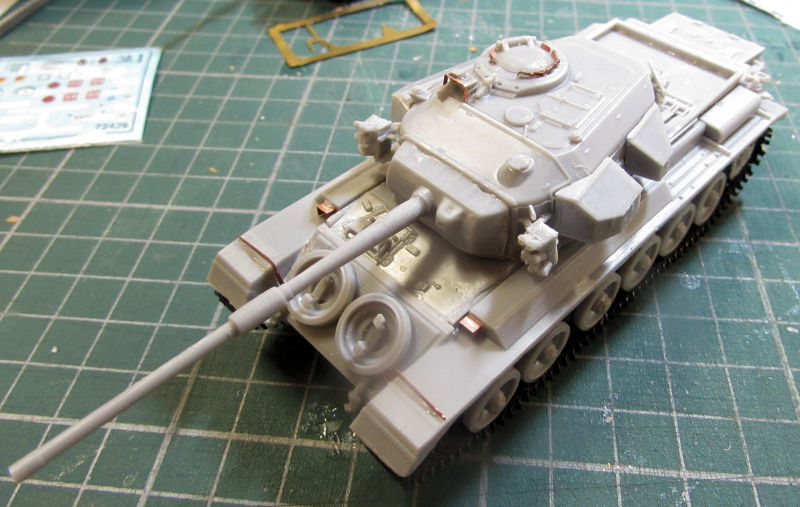
I did the same to the British Mk.5 tank since I was doing the same thing:

After that I added the final parts to these Centurions: the turret rings above the vision blocks. Here you can see it on the British Centurion:
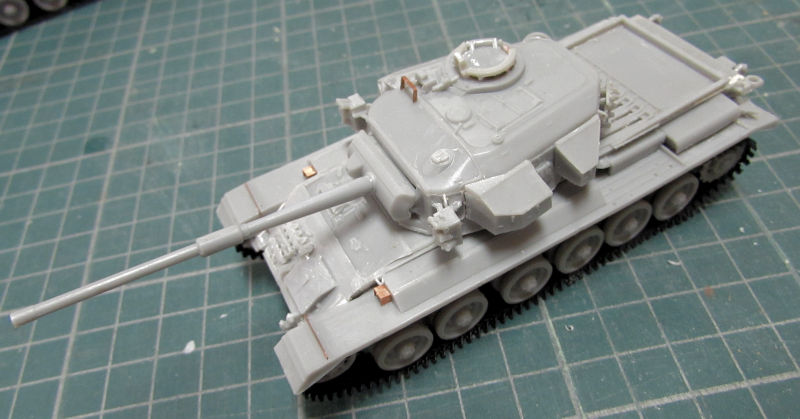
These two Centurions are ready for paint now.
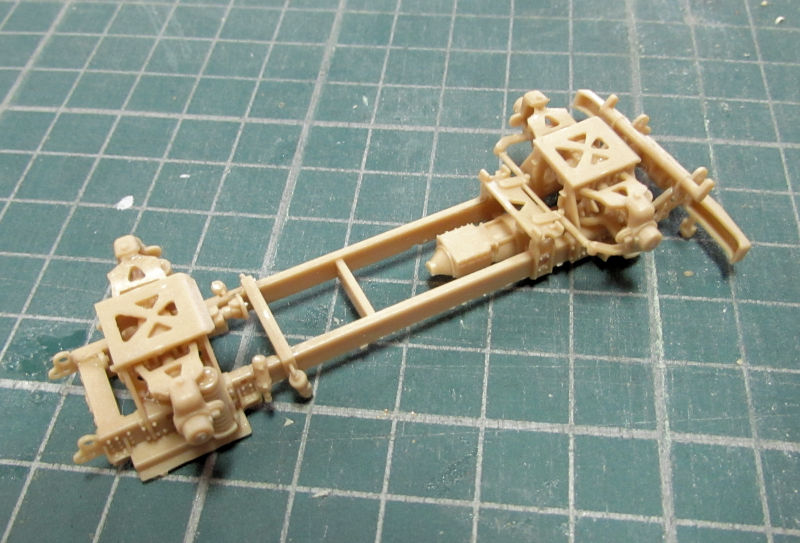
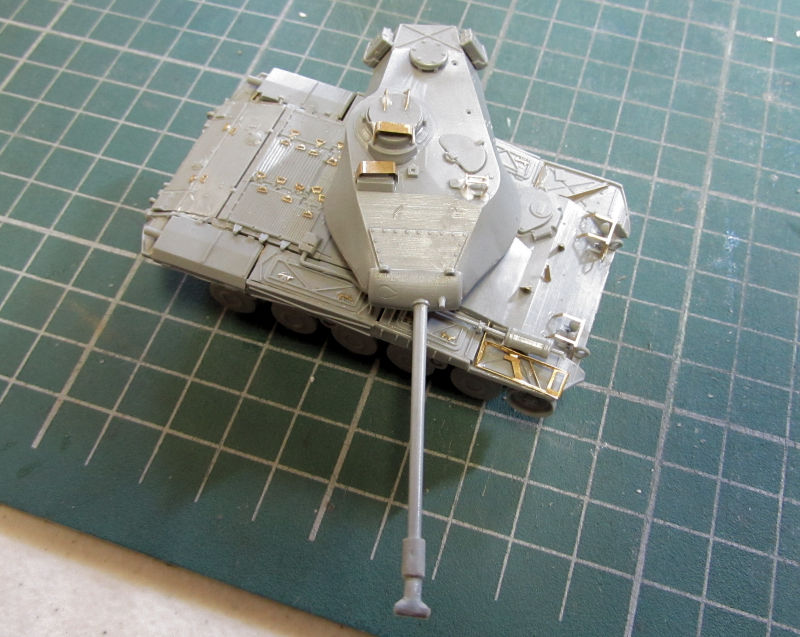
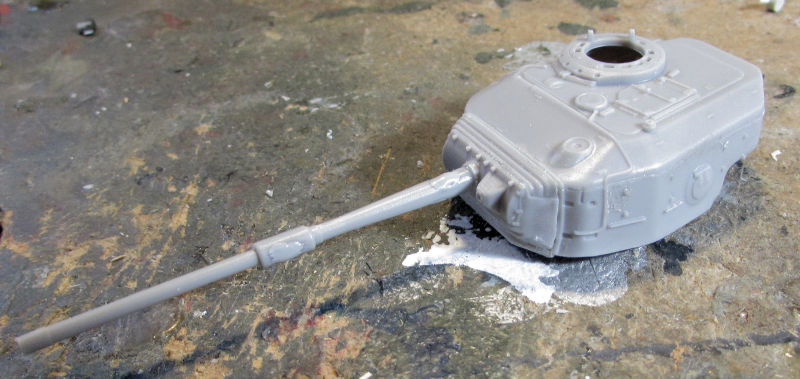
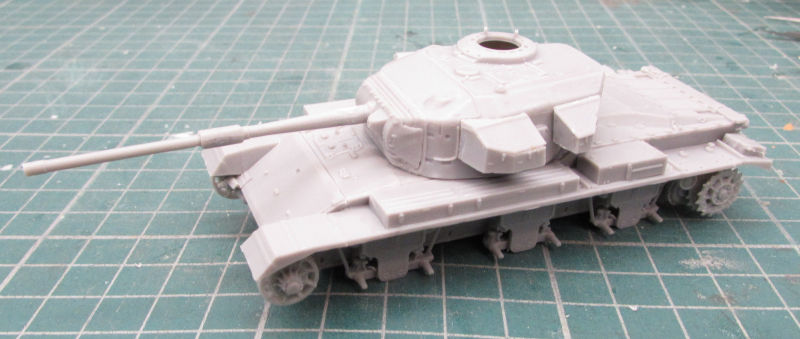
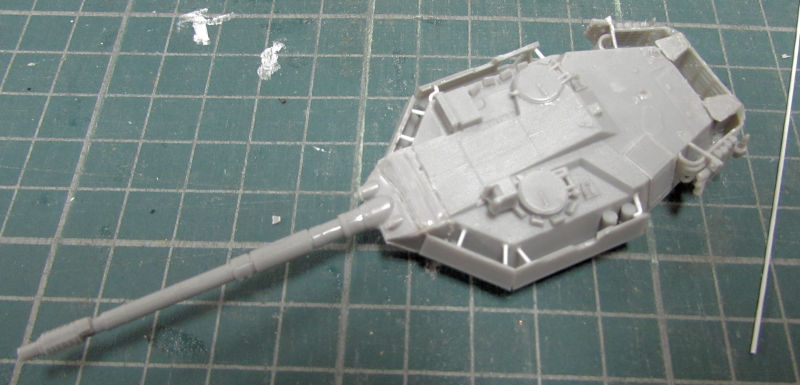
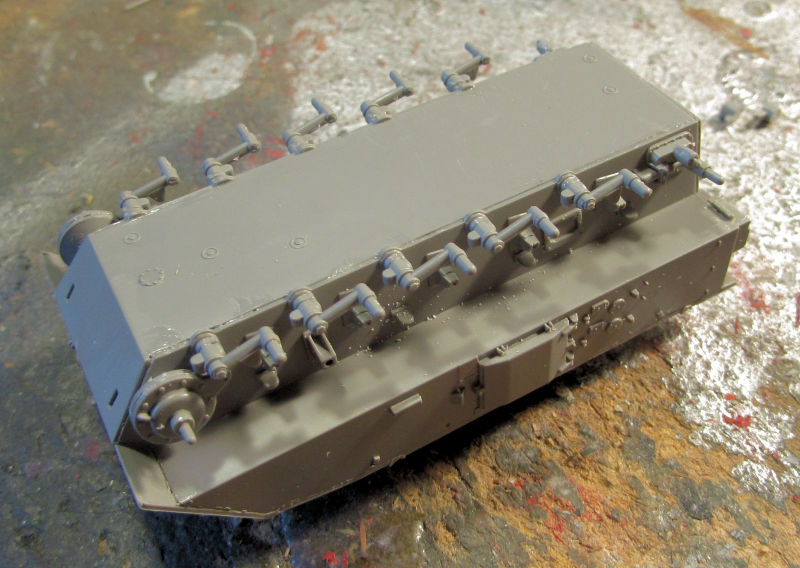
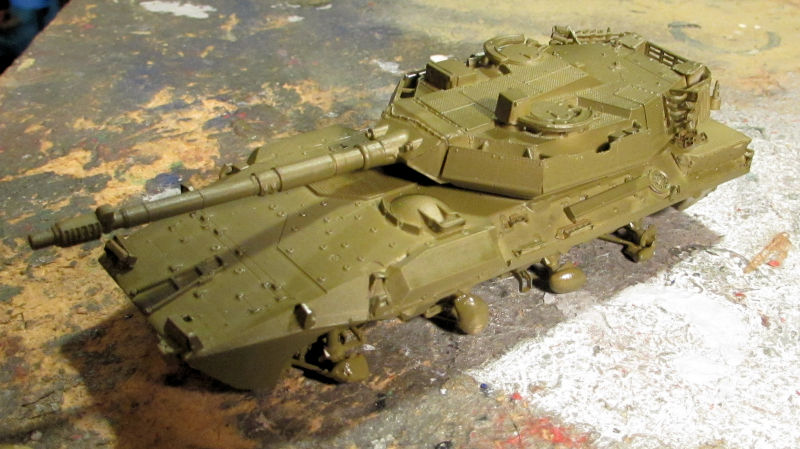
Next I started on another model that had been languishing: my Italian B1T Centauro. It needed the suspension on the bottom to start with:
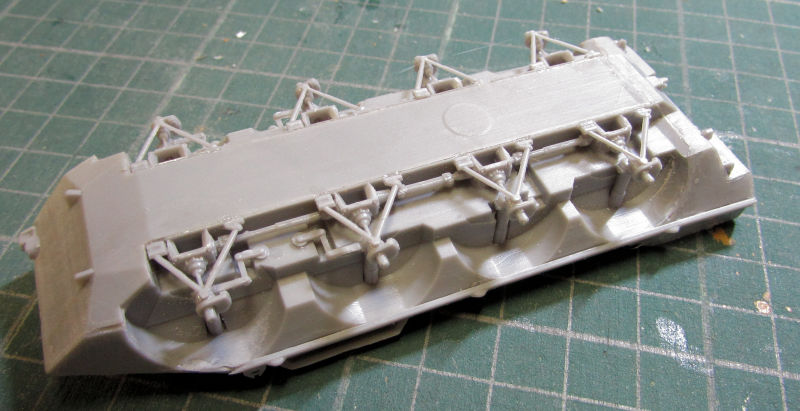
Next I finished the turret as best I could. There are a number of brackets that are too short shot to use so I’ll need to fabricate them from styrene rods before I can add the outer armor. Here is the turret all assembled and sitting on the hull:
This is a better shot of the turret basket:
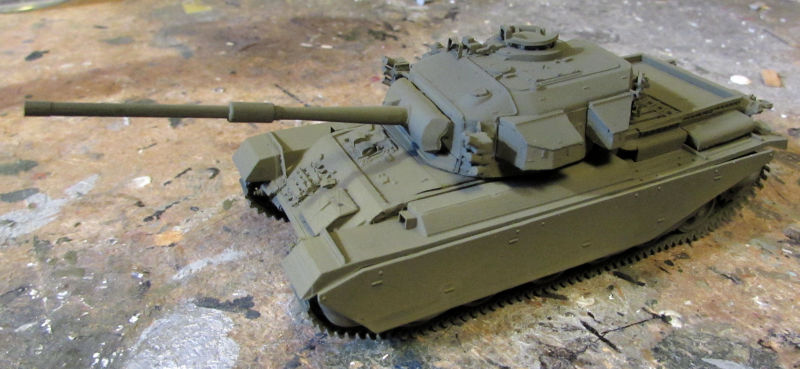
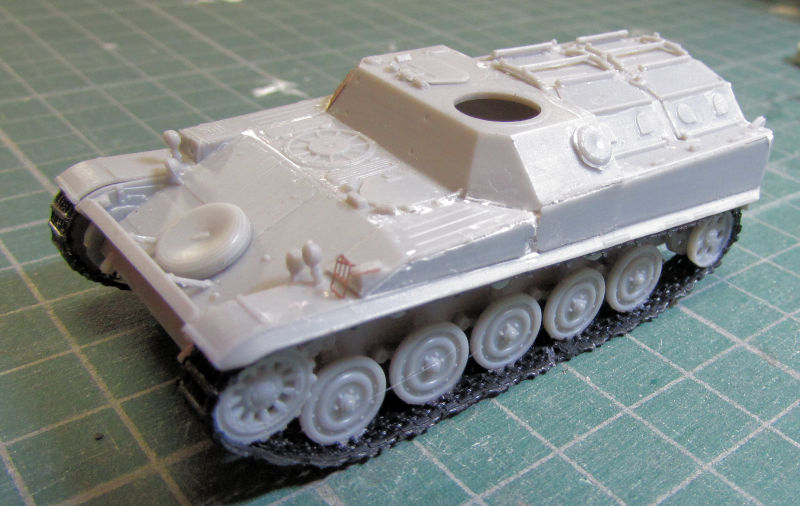
Now to wrap up this tour with the final model that I was able to start. Since the replacement parts came in for my Israeli Centurion Sho’t Kal Alef, I got started on it right away. First was the basic hull:
Followed by the turret as I wanted to make sure it would turn in the turret ring:
Part IV continued below...
Next it was time to move forward on another project that had been languishing; my M-41 Walker Bulldog. All it really needed was the P/E and tracks. I started with the P/E, adding most of what was included:
Afterward I added the tracks. This one is ready for paint:
Another easy one (or at least fast) was my French APC. Since I got the tracks for it, I added the wheels in preparation for installing the tracks:
Next I went back to adding P/E to tanks. I started with my Australian Centurion Mk.5 LR, finishing off the photo-etch:
I did the same to the British Mk.5 tank since I was doing the same thing:
After that I added the final parts to these Centurions: the turret rings above the vision blocks. Here you can see it on the British Centurion:
These two Centurions are ready for paint now.
Next I started on another model that had been languishing: my Italian B1T Centauro. It needed the suspension on the bottom to start with:
Next I finished the turret as best I could. There are a number of brackets that are too short shot to use so I’ll need to fabricate them from styrene rods before I can add the outer armor. Here is the turret all assembled and sitting on the hull:
This is a better shot of the turret basket:
Now to wrap up this tour with the final model that I was able to start. Since the replacement parts came in for my Israeli Centurion Sho’t Kal Alef, I got started on it right away. First was the basic hull:
Followed by the turret as I wanted to make sure it would turn in the turret ring:
Part IV continued below...
Duke Maddog
Well-known member
Part IV continued here as the last two pics here would not show in the post above. In thi9s post I had to "insert Image".
It turns well:

Later on I added the suspension before starting the wheels:

That is where I stopped.
Now this tour of Maddog Manufacturing is over. Feel free to browse the gift shop or check out the snack bar as you leave.
Thanks all for coming in, comments are welcome.
It turns well:
Later on I added the suspension before starting the wheels:
That is where I stopped.
Now this tour of Maddog Manufacturing is over. Feel free to browse the gift shop or check out the snack bar as you leave.
Thanks all for coming in, comments are welcome.

Gator
Well-known member
Very nice work Mark. I highly recommend reading Andrew Higgins' biography. He was a very shrewd businessman. Sold his tunnel drive boats to the moonshiners because they couldn't out run the revenuers' boats. Then sold boats to the revenuers because they couldn't catch the moonshiners. Also, when asked by a US Navy liaison why the landing craft he was making for the Brits was cheaper than the ones he was making for the Navy, he replied "because the Brits don't tell me how to build my boats."
Heavens Eagle
Well-known member
WOW MARK! You really have a lot going on. I sometimes wonder how you manage to keep track of what you are working on and doing.

Duke Maddog
Well-known member
Thank you Chris! I'm trying to.
Thank you Bruce! You are very kind to say so.
Thank you Kenny! Yeah, I did read some history on Andrew Higgins; he was quite the character and crazy smart too! I love his response to the Navy! I'll be sure to pick up his biography and read some more.
Thank you Paul! One technique I have is to replace all the sprues from a model back into it's original box when I move on to another one. I also will mark off the part number on the instruction sheet when I add it to the model so I know where I stopped. That also helps to remind me of plans I made for some of my projects too. Sometimes certain parts and such don't make it back to the box or they fall out of an end-opening box and I have to slow down on some. That is the case with my FV-4005; as the P/E fret disappeared. Hopefully I can find it soon.
Did I mention that I hate end-opening boxes?
Heavens Eagle
Well-known member
A solution for end opening and boxes in poor condition: Go get some large zip-lock bags. I have plenty of the quart size and have used many gallon, 1 1/4 gallon and 2 gallon sized bags. Keeps parts and sprues where I want them and not falling out.
Duke Maddog
Well-known member
Good idea Paul. It's time to start looking into getting that done.
Duke Maddog
Well-known member
It's been a pretty productive week for me so far so here's my latest progress on what I've been working on. Time once again to board the trams to see the latest tour...
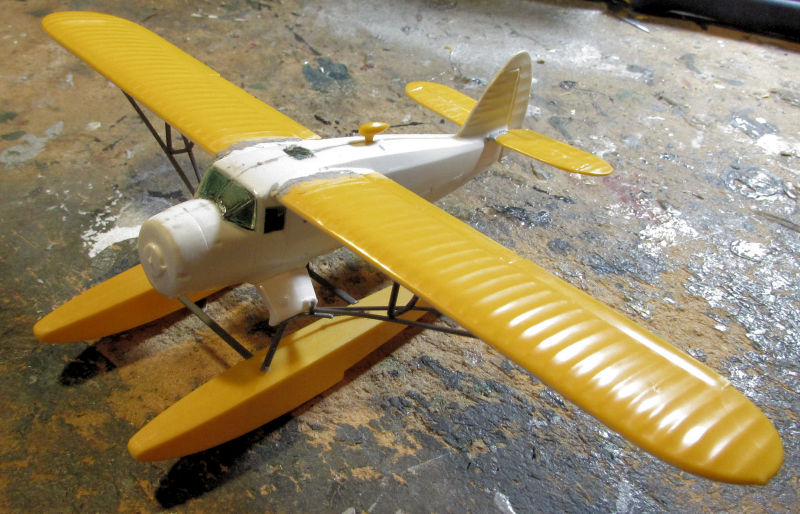
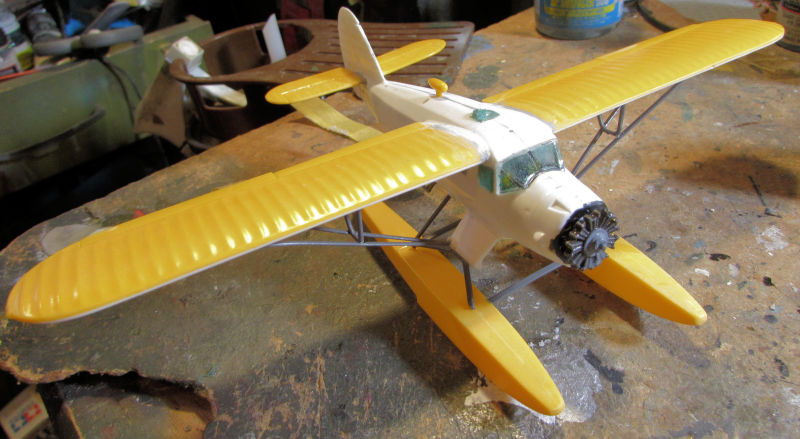
Starting in the hanger portion of my plant, here is the latest, starting with my Norseman. I got the floats back on and managed to get another coat of white over it. There's a few blemishes to take care of but this bird is almost ready for the second color:
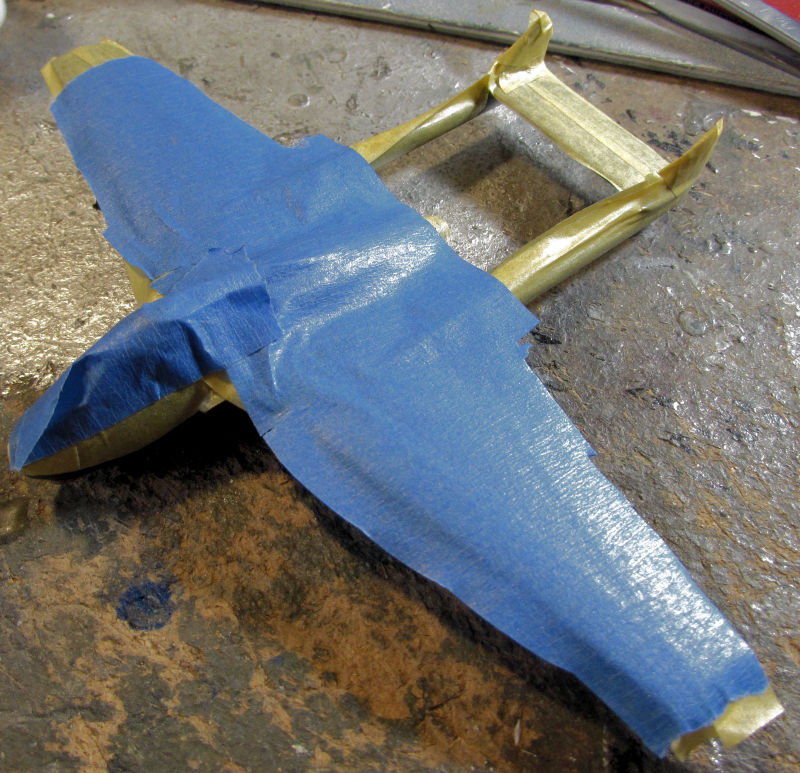
Next I felt it was time to move forward on my Swedish Vampire. I shot a green topcoat on it first:
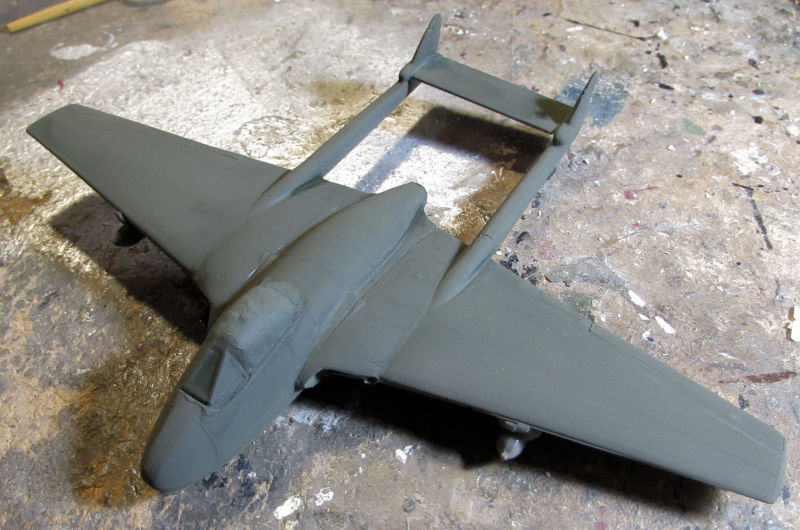
Then when that was dry, I masked off the top to make this ready for the grey underside:
That is as far as I got in this. I wanted to get more done on my Southern Cross next.
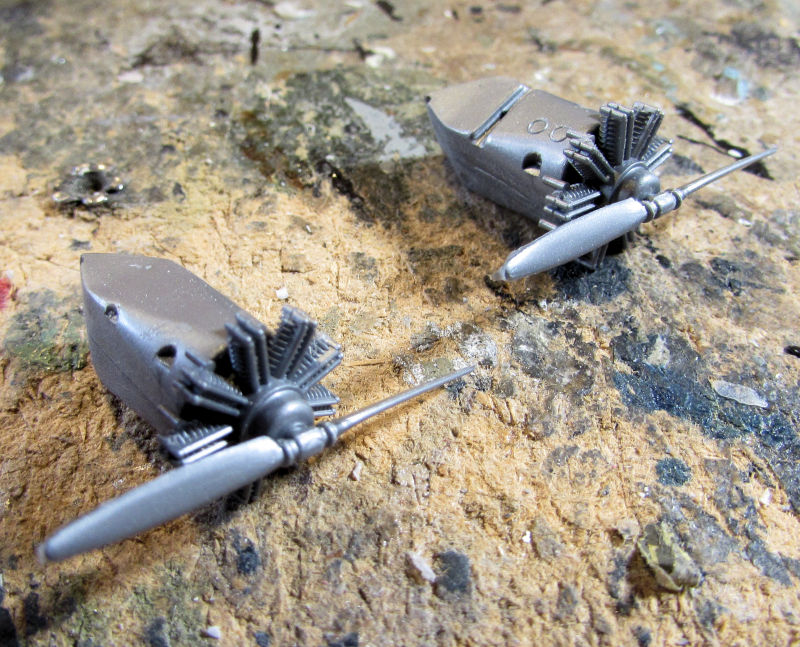
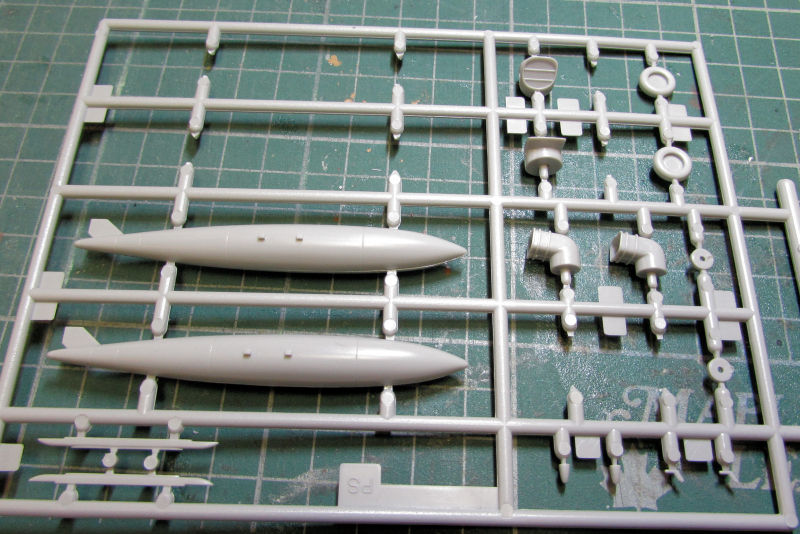
I started by building the two outboard engine pods and sanding the seams:
I then added the last of the clear parts to the fuselage and later masked them with a liquid masking agent:
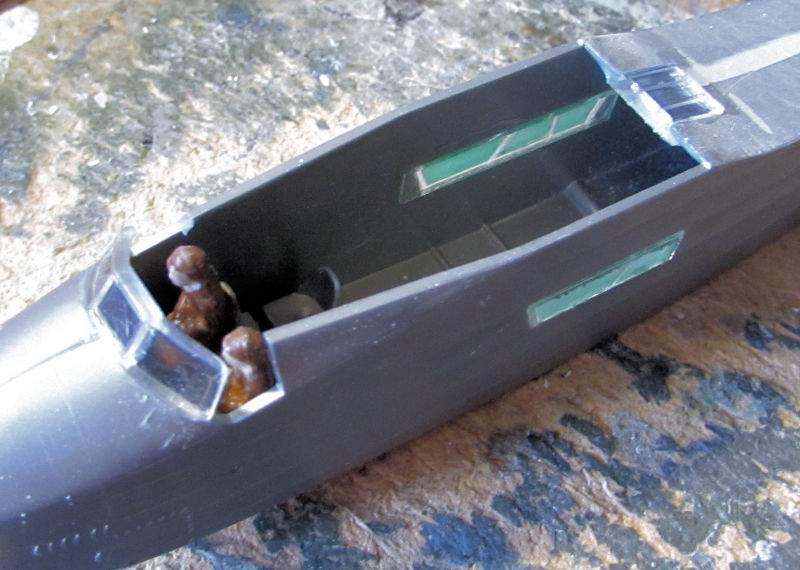
I'm guessing they had the side windows open during flight; there were no side windows included in the kit. It is a 1920's design after all.
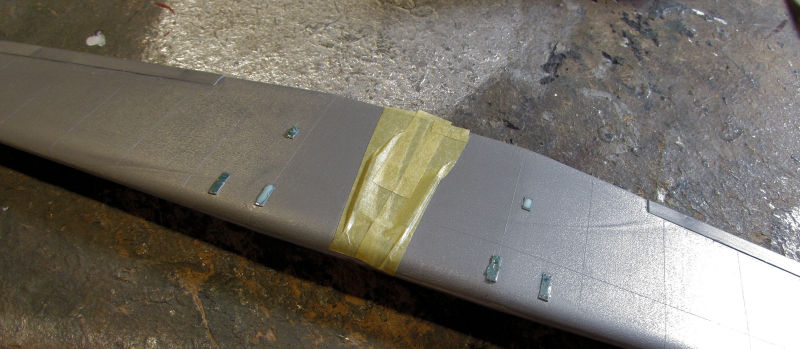
Next I masked off the underside of the wing assembly to be ready to shoot an aluminum color on the wings:
So now I finished off building the third engine and adding the tail feathers to the back of the fuselage. I saw the pilot figure inside the box and thought it would be fun to pose him with his partially built plane:
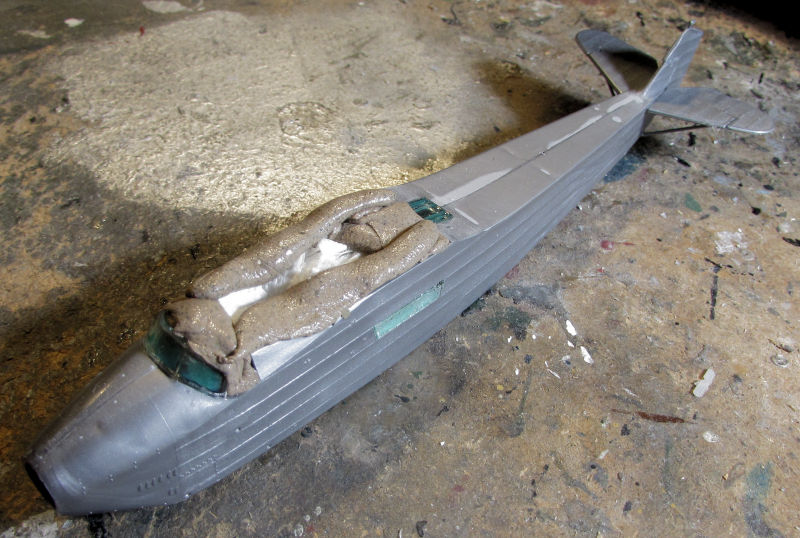
Later on I added paper towel and Silly Putty to the big cavernous opening in the fuselage to mask it off for painting:
Since the channel on one side of the engine pods needed to remain paint free so they would glue onto the main wheel struts, I decided to temporarily glue in a plastic rod about the same diameter to both hold the engine pods for painting as well as mask the channel. I then shot the blue over the fuselage and engine pods:

Yeah, you can see where one engine fell off the front of the pod. Easy fix.
Well that's everything going on in the hanger portion of my plant; let's see what's happening in the Motor Pool side...
End of Part One...
Starting in the hanger portion of my plant, here is the latest, starting with my Norseman. I got the floats back on and managed to get another coat of white over it. There's a few blemishes to take care of but this bird is almost ready for the second color:
Next I felt it was time to move forward on my Swedish Vampire. I shot a green topcoat on it first:
Then when that was dry, I masked off the top to make this ready for the grey underside:
That is as far as I got in this. I wanted to get more done on my Southern Cross next.
I started by building the two outboard engine pods and sanding the seams:
I then added the last of the clear parts to the fuselage and later masked them with a liquid masking agent:
I'm guessing they had the side windows open during flight; there were no side windows included in the kit. It is a 1920's design after all.
Next I masked off the underside of the wing assembly to be ready to shoot an aluminum color on the wings:
So now I finished off building the third engine and adding the tail feathers to the back of the fuselage. I saw the pilot figure inside the box and thought it would be fun to pose him with his partially built plane:
Later on I added paper towel and Silly Putty to the big cavernous opening in the fuselage to mask it off for painting:
Since the channel on one side of the engine pods needed to remain paint free so they would glue onto the main wheel struts, I decided to temporarily glue in a plastic rod about the same diameter to both hold the engine pods for painting as well as mask the channel. I then shot the blue over the fuselage and engine pods:
Yeah, you can see where one engine fell off the front of the pod. Easy fix.
Well that's everything going on in the hanger portion of my plant; let's see what's happening in the Motor Pool side...
End of Part One...
Duke Maddog
Well-known member
Part Two begins here...
Over here in the Motor Pool, we have a couple tanks that made it to the paint stage. This first one is my British Centurion Mk.5 base painted with Humbrol Bronze Green:
It's actually showing quite light in that pic; not sure why.
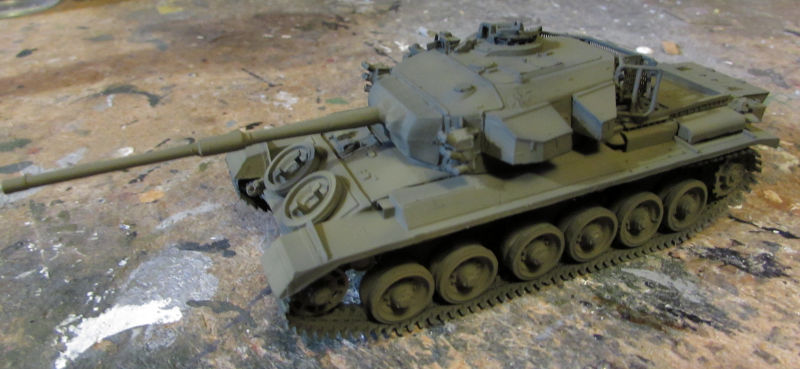
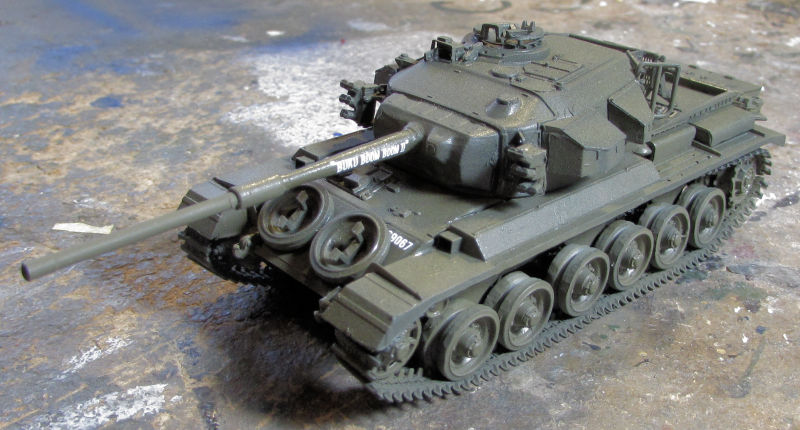
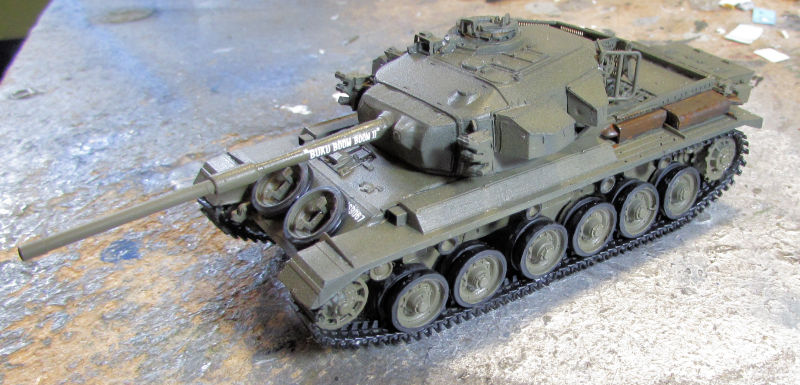
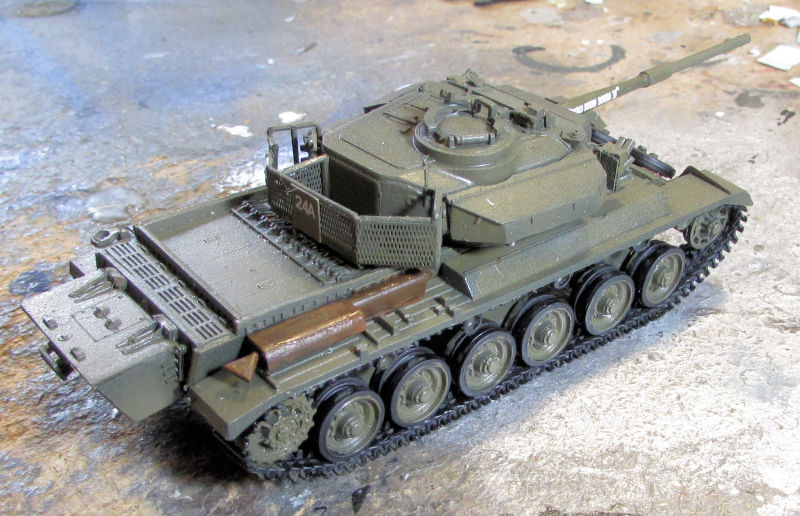
The next tank I shot was the Australian Centurion Mk. 5LR, first basing it with the Humbrol Bronze Green and modulating it with Humbrol Olive Drab:
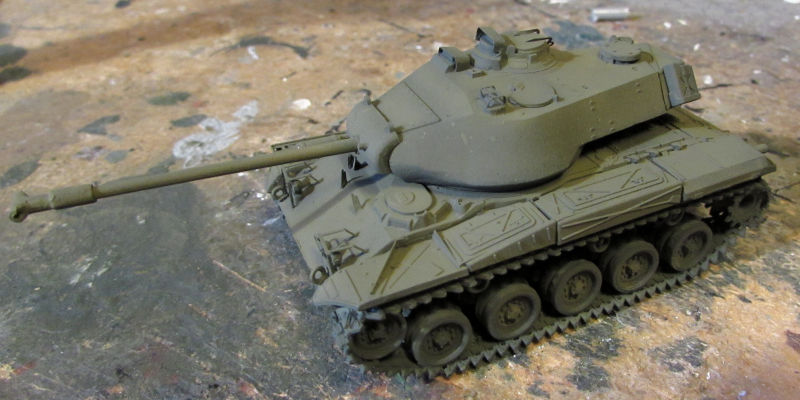
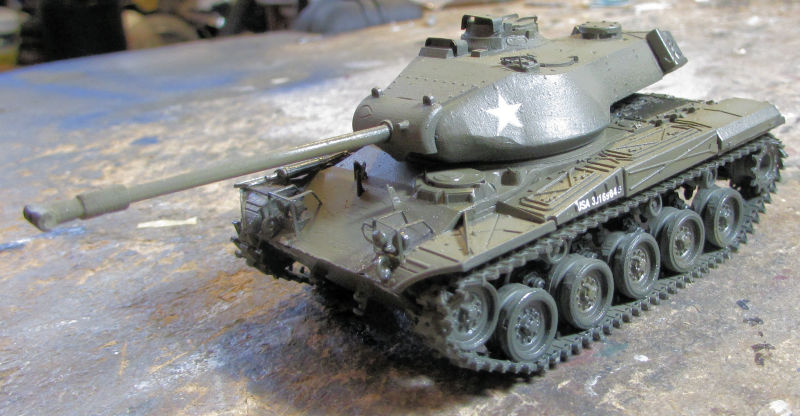
I did the same thing on my US Army M-41 Walker Bulldog:
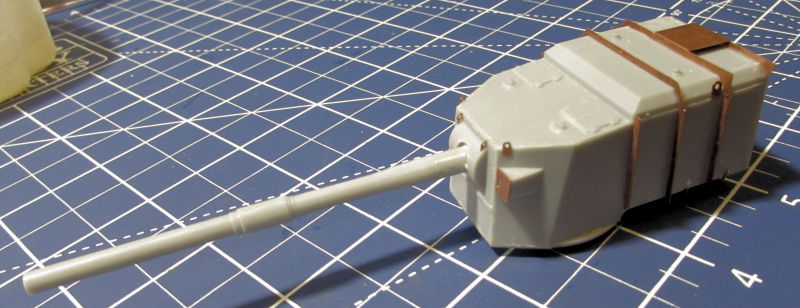
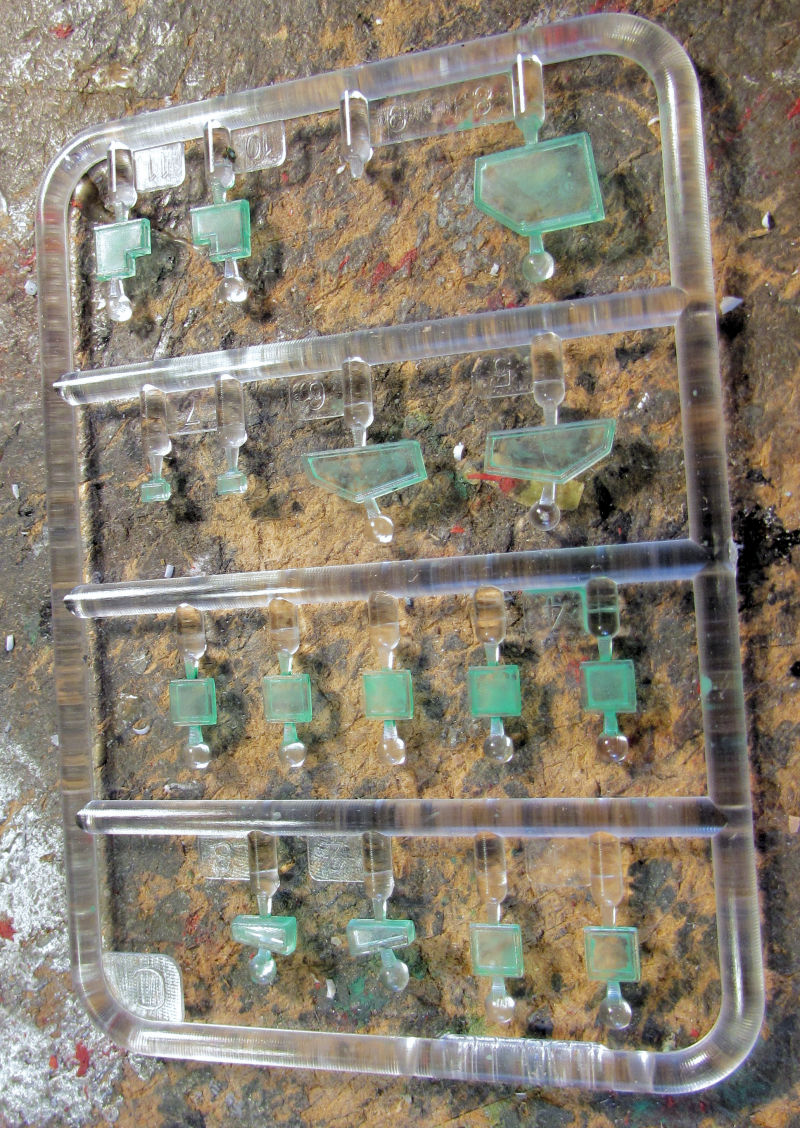
After that, I found the P/E fret for the British FV-4005 and so started adding the photo-etch to it.
First the turret:
Then the hull:

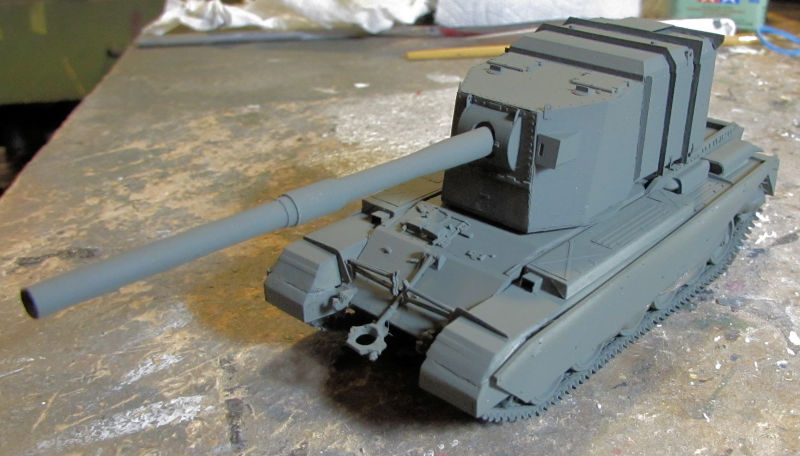
I then checked the turret for ability to turn and fixed a couple minor sticking points. This beastie is now ready for paint:

Since I was already painting everything with Humbrol Bronze Green I shot this one too:
Yeah, that blob sticking out from under the skirts is the Silly Putty holding the skirts in place for painting. This does look more like the Bronze Green is supposed to look.
Afterward, I shot a gloss coat over all these and applied the decals, starting with the M-41 Walker Bulldog:
Then the Australian Centurion:

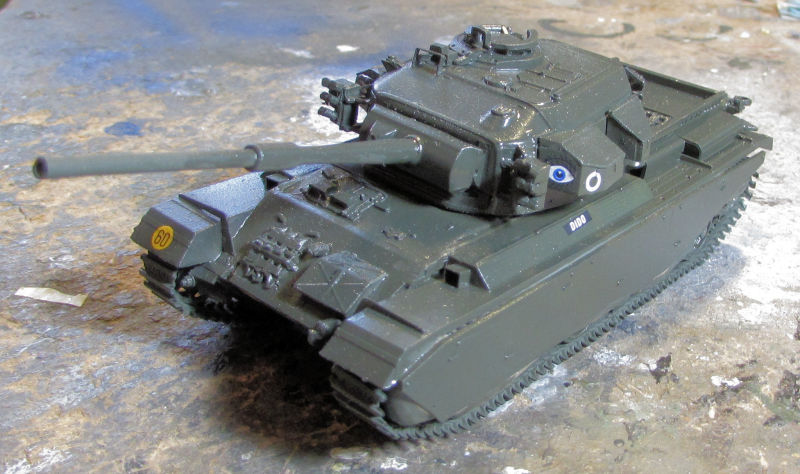
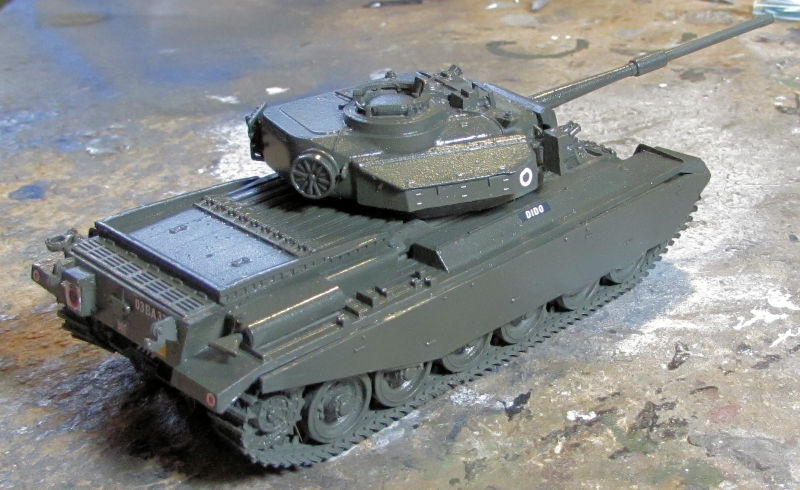
Then I did the British Centurion:
...and finally the British FV-4005:
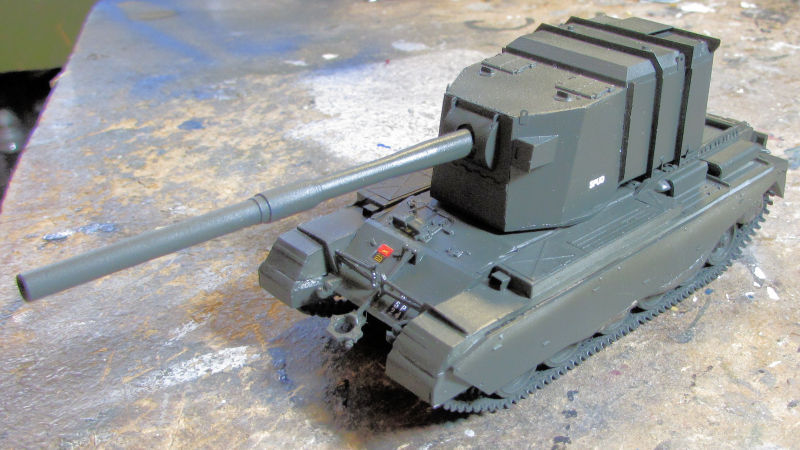
That last one had very minimal markings. I will also lightly weather that since it didn't see much service.
As for all these tanks; all that's left is adding the tools and other detail parts; dull coating them and weathering them and they will be done. The next time you see them will be in the Finished Armor Forums.
And that ends another tour of Maddog Manufacturing; I hope you enjoyed it. Feel free to check out the gift shop and snack bar on your way out. As always, comments are always welcome.
Over here in the Motor Pool, we have a couple tanks that made it to the paint stage. This first one is my British Centurion Mk.5 base painted with Humbrol Bronze Green:
It's actually showing quite light in that pic; not sure why.
The next tank I shot was the Australian Centurion Mk. 5LR, first basing it with the Humbrol Bronze Green and modulating it with Humbrol Olive Drab:
I did the same thing on my US Army M-41 Walker Bulldog:
After that, I found the P/E fret for the British FV-4005 and so started adding the photo-etch to it.
First the turret:
Then the hull:
I then checked the turret for ability to turn and fixed a couple minor sticking points. This beastie is now ready for paint:
Since I was already painting everything with Humbrol Bronze Green I shot this one too:
Yeah, that blob sticking out from under the skirts is the Silly Putty holding the skirts in place for painting. This does look more like the Bronze Green is supposed to look.
Afterward, I shot a gloss coat over all these and applied the decals, starting with the M-41 Walker Bulldog:
Then the Australian Centurion:
Then I did the British Centurion:
...and finally the British FV-4005:
That last one had very minimal markings. I will also lightly weather that since it didn't see much service.
As for all these tanks; all that's left is adding the tools and other detail parts; dull coating them and weathering them and they will be done. The next time you see them will be in the Finished Armor Forums.
And that ends another tour of Maddog Manufacturing; I hope you enjoyed it. Feel free to check out the gift shop and snack bar on your way out. As always, comments are always welcome.
sharkman
Master at Arms
Amazing progress Mark!
Glad to hear you were able to repair the Norseman! what sort of livery are you planning? I built one up years ago in a Swedish rescue scheme (Orange) as seen here
Glad to hear you were able to repair the Norseman! what sort of livery are you planning? I built one up years ago in a Swedish rescue scheme (Orange) as seen here
Duke Maddog
Well-known member
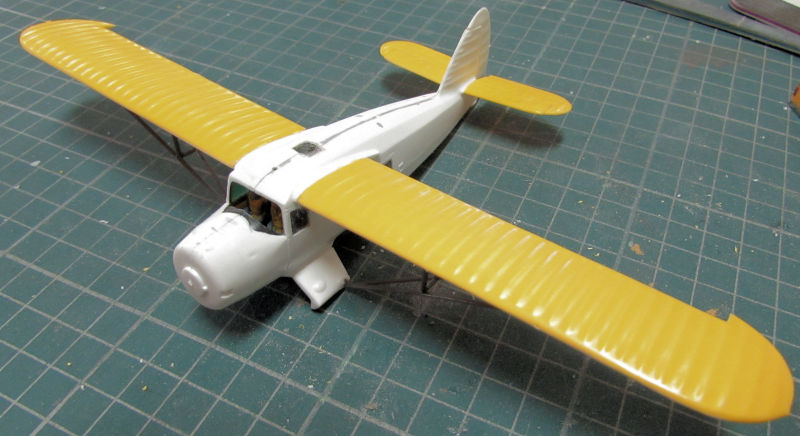
Thank you Sharkman! That is an attractive plane, but I'll be doing mine as a civilian bird in white and yellow as offered by the kit. I don't really have the decals for that one, so I'm keeping it simple.
Duke Maddog
Well-known member
Time for another update tour; this one is a small one given how little time I got to spend on the workbench. Fortunately, I did manage to finish four models; you'll see them in the finished forums.
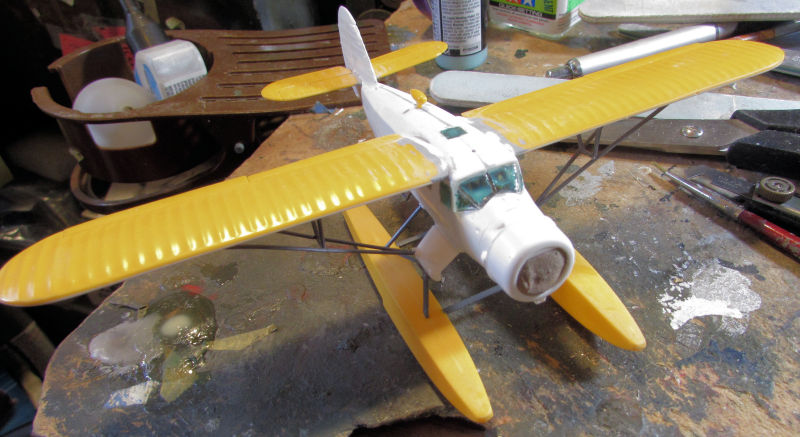
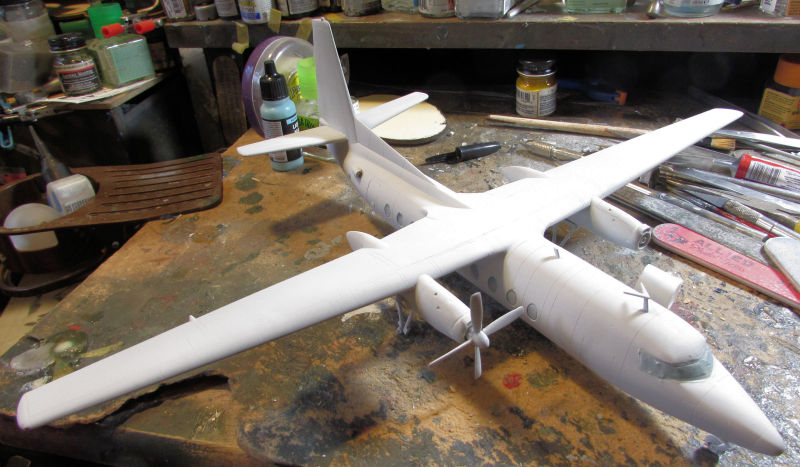
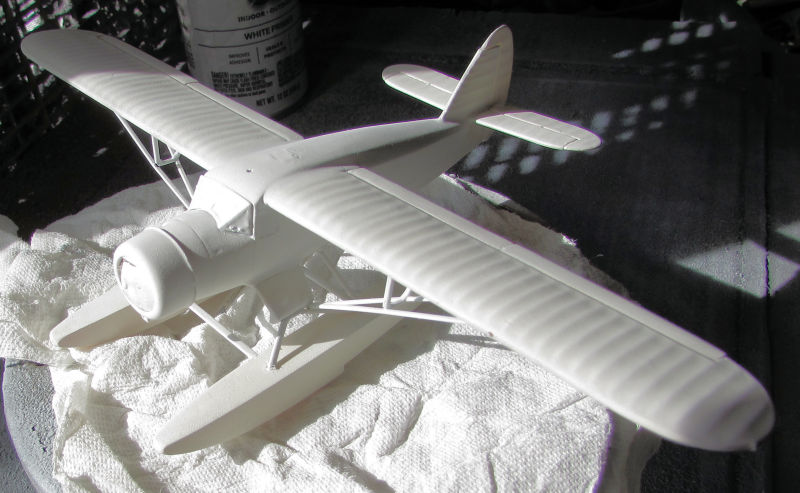
I'll start with my aircraft, since all I did was to shoot another coat of white on them after fixing a few blatant blemishes. First was the Norseman:
And then the Fokker F-27:
My apologies for the pics there; they were taken in my 'spray booth'. Barring any unforeseen additional blemishes, I'll be gloss coating these soon.
Now on to my armor, and another apology: I said I wouldn't have any more pics of my Centurions here, but then I realized I still had a ways to go on my Australian one. To start with, I'd forgotten to put the outer return rollers on the one side. Kinda need them since this tank has no skirts:

After that I figured with all the moisture in South Vietnam where this operated; I would rust out the exhaust covers a bit:
Moving on, I wanted to get some more progress done on another Centurion; this time the Israeli Sho't Kal Alef. I added the turret storage bins, the fenders and storage bins on them as well:
After that, I re-started another two projects that I'd been neglecting, why; I don't know. They are so close to paint now so I finished up adding all the extra parts and adding the "open" hatch to the Type 89B:
Type 89A:
Type 89B:
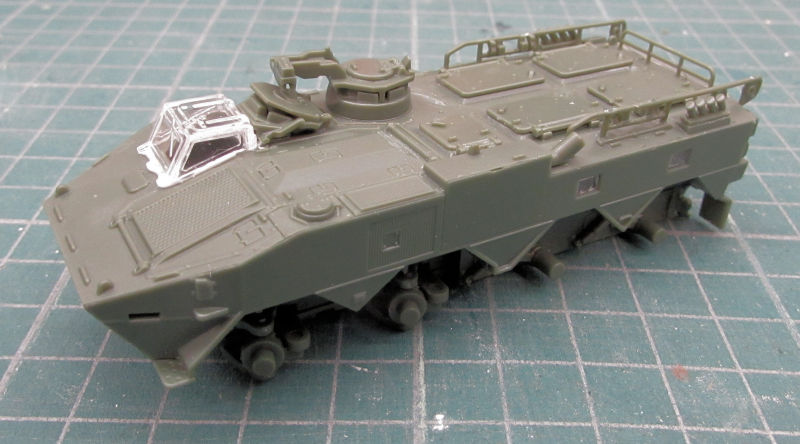
There are more detail parts to add later but they would break off during painting and handling so I am leaving them off till last.
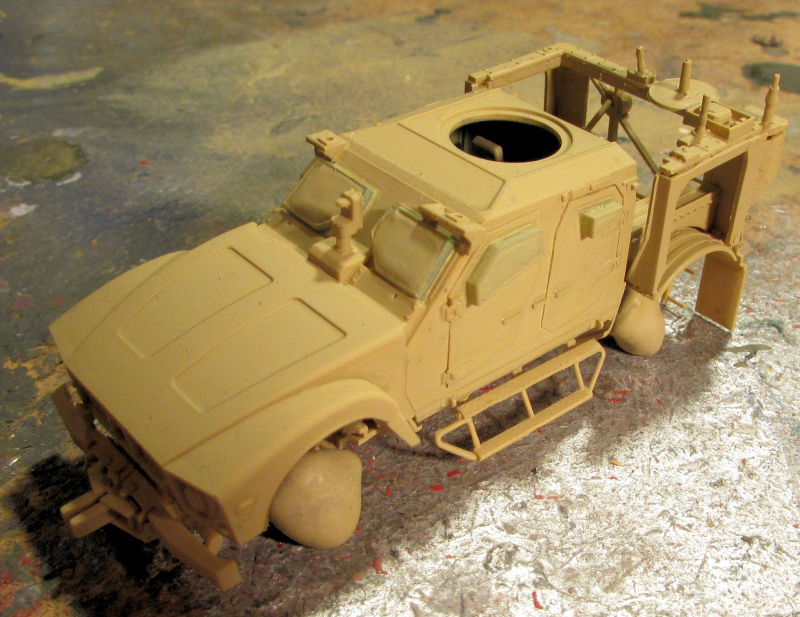
And finally, this last model that has been annoying me by being in the way all the time: my M-ATV. I cemented the interior to the chassis and then finished painting the interior so I could close this up:
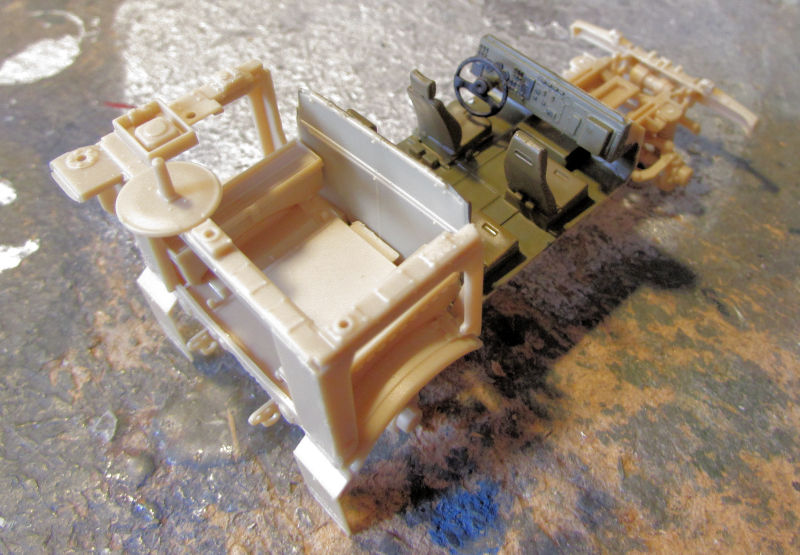
Before I could close it up, I had to add the photo-etch grill screen on the front of the hood:
Finally, this beastie is all closed up and the rear bed is attached as well:
I realized later that there was a photo-etch assembly that needed to be added to the interior. Oh well, it wouldn't have been seen anyway inside this thing with such tiny windows so I'm not bothered.
Now to finish the upper turret, add the windows and some other detail parts before painting.
That's it for now. Stay tuned as I hope to have more to show later.
Thank you all for looking in, comments are welcome.
I'll start with my aircraft, since all I did was to shoot another coat of white on them after fixing a few blatant blemishes. First was the Norseman:
And then the Fokker F-27:
My apologies for the pics there; they were taken in my 'spray booth'. Barring any unforeseen additional blemishes, I'll be gloss coating these soon.
Now on to my armor, and another apology: I said I wouldn't have any more pics of my Centurions here, but then I realized I still had a ways to go on my Australian one. To start with, I'd forgotten to put the outer return rollers on the one side. Kinda need them since this tank has no skirts:
After that I figured with all the moisture in South Vietnam where this operated; I would rust out the exhaust covers a bit:
Moving on, I wanted to get some more progress done on another Centurion; this time the Israeli Sho't Kal Alef. I added the turret storage bins, the fenders and storage bins on them as well:
After that, I re-started another two projects that I'd been neglecting, why; I don't know. They are so close to paint now so I finished up adding all the extra parts and adding the "open" hatch to the Type 89B:
Type 89A:
Type 89B:
There are more detail parts to add later but they would break off during painting and handling so I am leaving them off till last.
And finally, this last model that has been annoying me by being in the way all the time: my M-ATV. I cemented the interior to the chassis and then finished painting the interior so I could close this up:
Before I could close it up, I had to add the photo-etch grill screen on the front of the hood:
Finally, this beastie is all closed up and the rear bed is attached as well:
I realized later that there was a photo-etch assembly that needed to be added to the interior. Oh well, it wouldn't have been seen anyway inside this thing with such tiny windows so I'm not bothered.
Now to finish the upper turret, add the windows and some other detail parts before painting.
That's it for now. Stay tuned as I hope to have more to show later.
Thank you all for looking in, comments are welcome.
Duke Maddog
Well-known member
Despite the serious beating my mojo took this past couple weeks, I was able to make some good progress on a number of kits and started a couple more, one of which is a commission build. More on that later. Lets start this latest tour in the Hanger again. All aboard the trams now and remember to keep you hands and feet inside the trams at all times...
Having gotten the Revell Aircraft of Desert Storm set, I decided to start the one plane I didn't start back when I first had this set. the A-6 Intruder. Later I'll start the F-117 from this set to replace the one that was stolen. For now, this is what I got done...
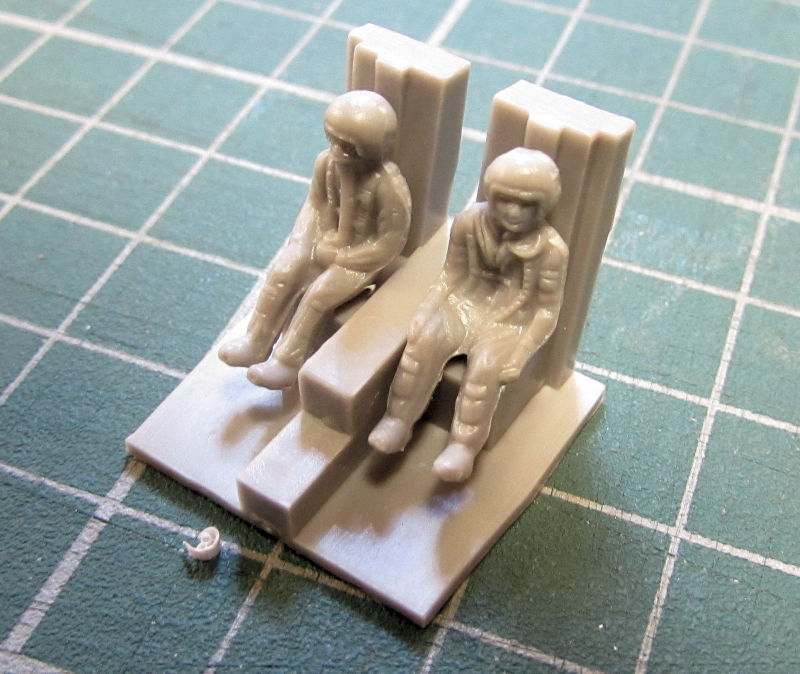
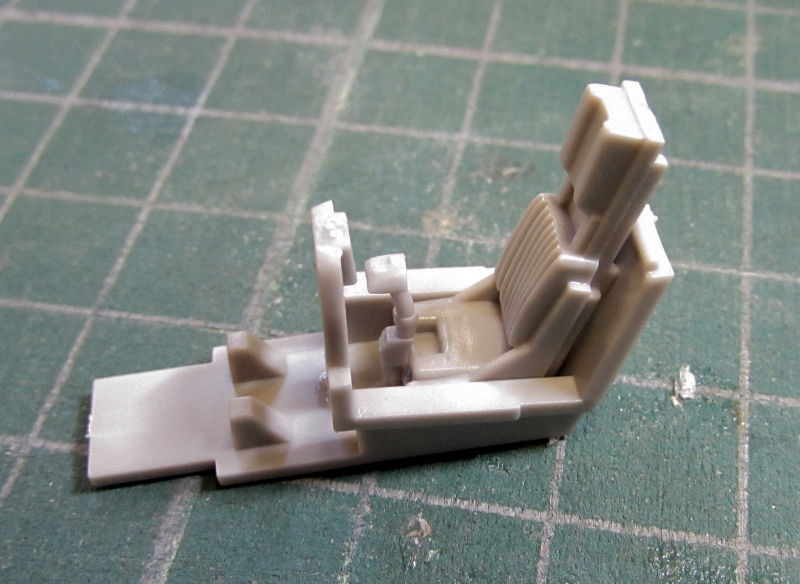
First was the basic cockpit. It is very basic so I added the pilots to give something to look at. Here is Mutt and Jeff sitting in their seats now waiting for the rest of the plane to get built::
Next I assembled the fuselage around them. Fortunately the nose cone gets to be left off till later so I can add sufficient weight in the nose area. I had also added the engine intakes and the tail feathers:
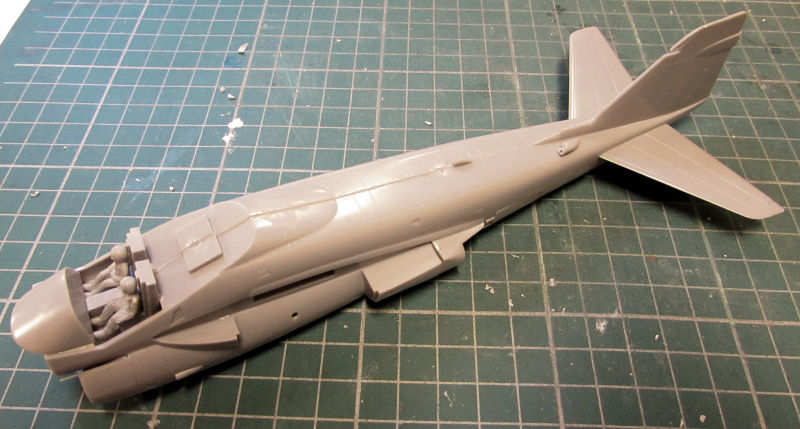
After that I assembled the two wings:
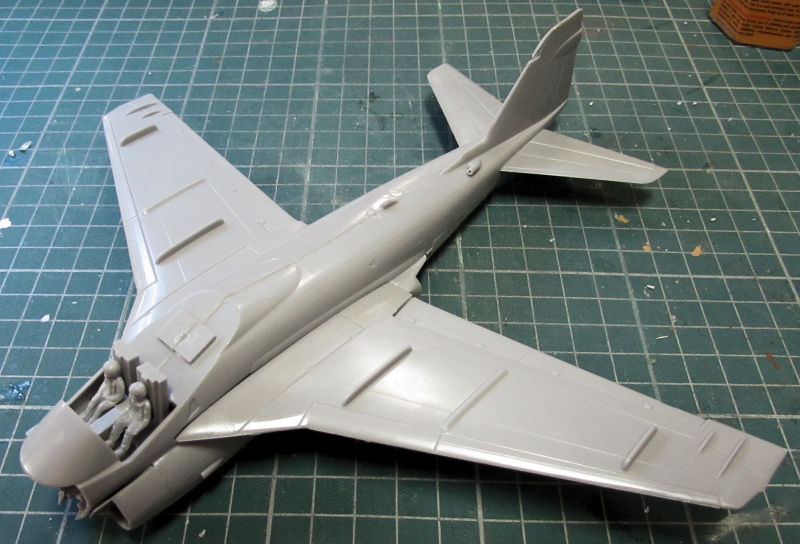
Here it is all mocked up ready for sanding and filling:
And in this part of the hanger we have an aircraft I'm building for a Group Build on another Forums called the "Cherry Poppers" Group Build, or, "what have you never, ever built before?" Well, I'd never done a Marine Corps AV-B Harrier so this bird is started as well. Again, we start with the cockpit:
Then I went through the kit, assembling all the parts that had been molded in two halves such as...
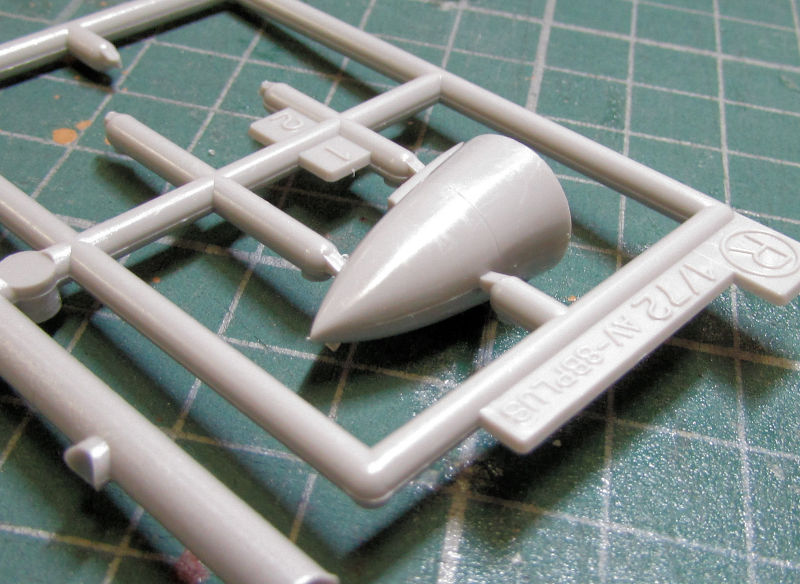
the nose cone:
...the gun pods too, and while I was at it, I added the panels to the underside of the part to the right:
... the engine nozzles and drop tanks, even though I expect I'll be leaving those tanks off:
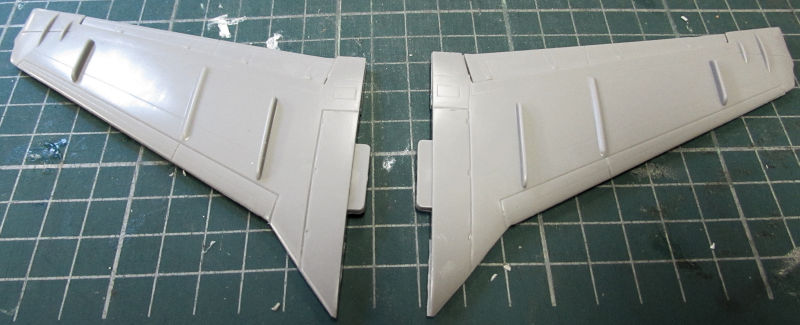
...and the wings:
After that I built the engine intake interior:
Finally, I added the engine intakes, blast panels and flare dispenser to each side of the fuselage so there's less to add later on:

That's as far as I got on these aircraft.
Moving on to my shipyards, I started a commission build for a friend who's always wanted one built. It is this Revell SMS Emden kit:
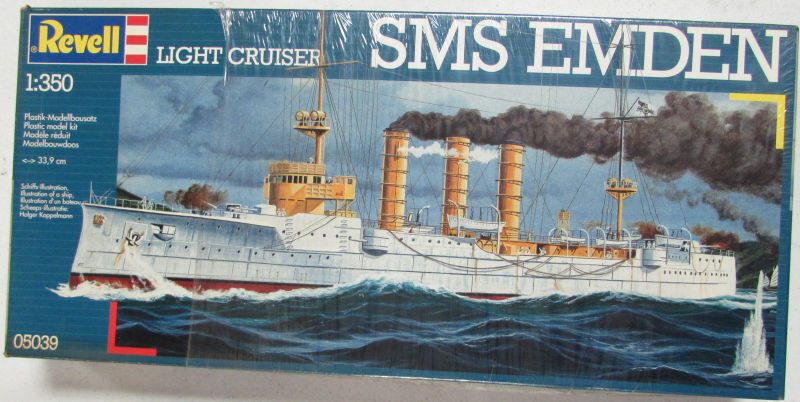
He got it from a friend's apartment when the guy passed away and he paid me with a Revell S-100 Schnellboot. So, naturallly I got started on it for him, laying down the keel and building the main deck and superstructure parts:
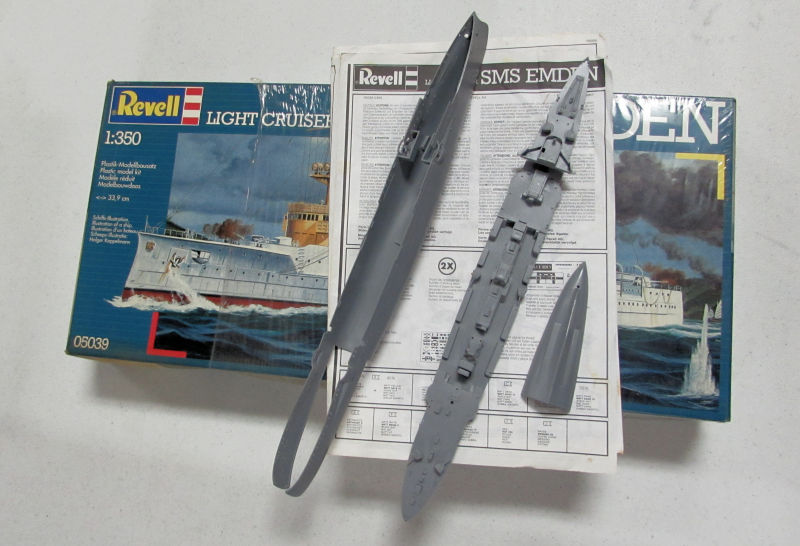
You can see that the hull was warped; what you can't see is how badly it was warped! That took some careful finessing on the main hull as well as the rear part that was molded in two separate parts(?!)
Here is how it looked when I finally got it finessed into place:
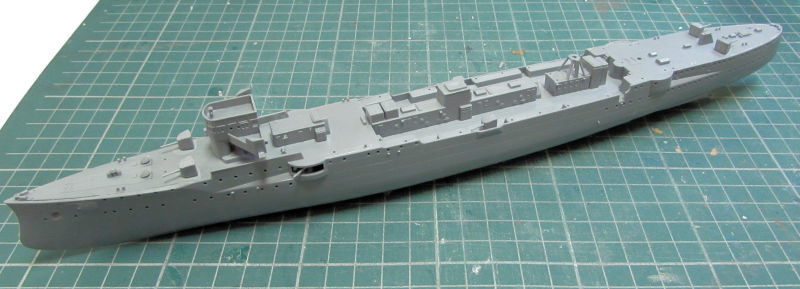
Later I'll add more detail parts and then get started on painting it. He wants it done in the pre-war white and 'gold' paint job.
Now the tour will continue in the Motor Pool workshop where a number of new projects got started and old projects got a little more work done on them.
I'll start with a kit that has been frying my eggs for months now, possibly even a year or two! I finally found some hooks to replace the one that had pinged off into oblivion. So, I pulled this Shelf Queen down and added the hooks to it:
Later when they were painted, I hooked them onto those steps there. After that, I saw that in the process of moving this stupid thing around, the front fender had broken off and disappeared:
I search for a few hours and finally got so fed up with this that I found an old M-3 Halftrack and snipped the front fender off it and added it to the front of this beastie! It ain't accurate, but it's DONE!!
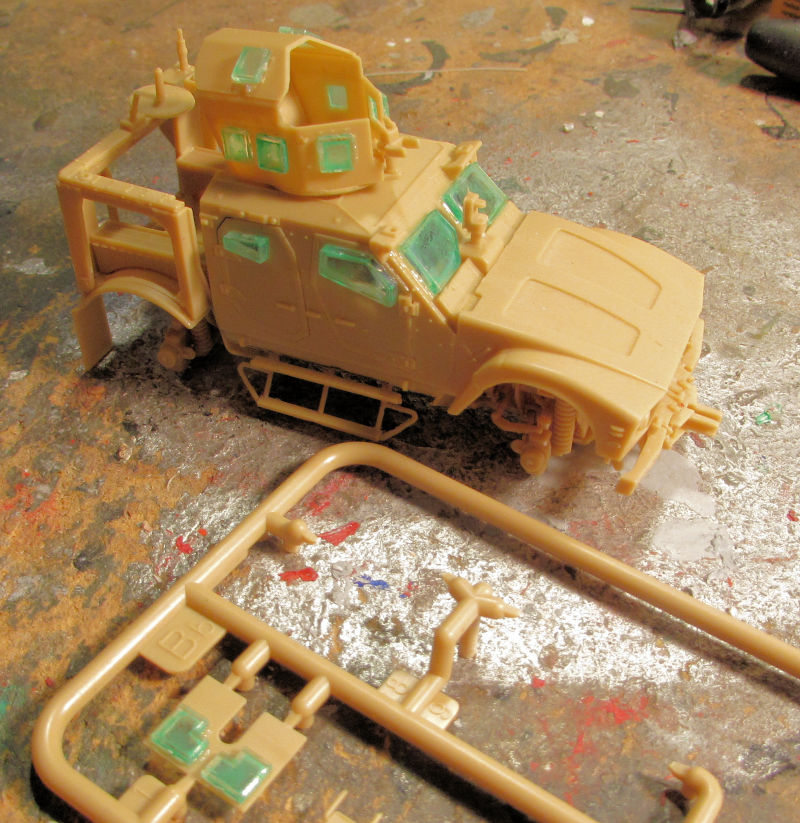
Moving on, I continued with another kit that had been burning my eggs as well. This Galaxy Models M-ATV got all of the plastic detail parts on the body that I felt I could add that wouldn't be broken off during handling:
There's still a few more parts that go on that, but I'm gonna install the windows first, then paint it after masking the windows, and then I'll add the last pieces.
Meanwhile, as that was drying, I assembled the machine gun 'turret' that goes on the top of this truck. sans machine gun. That will go on last after painting too:
Here it is all mocked up:
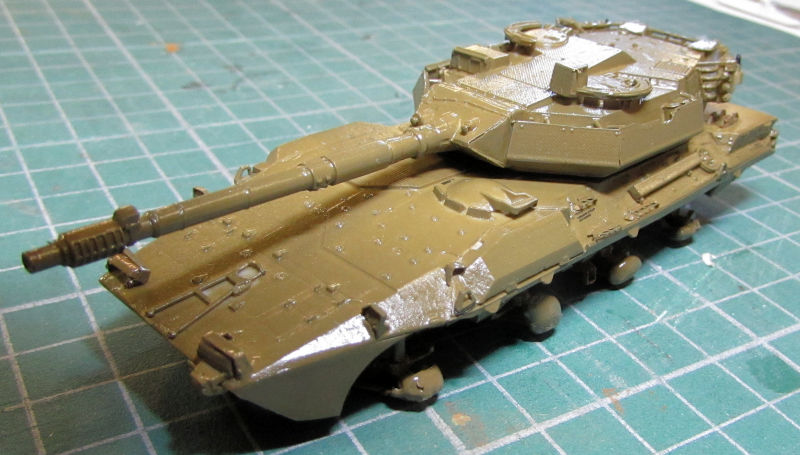
Another annoying little project that had been beating up the mojo was this Italian B1T Centauro. The small rods that were supposed to hold the outer turret shields were short shot. I finally pulled out a small rod of styrene, cut it to length and also bent the ones that needed it and added them to the turret. Afterward, I added the shields while the glue was still soft so I could position them properly:
I wasn't as successful as I'd hoped, but at least they are on. I might adjust them later if I get a mind to.
My little French AMX APC was also bothering me so I pulled it out and added the tracks. I also started adding the photo etch parts to this until I tried to bend the headlight guards into shape. The thing was so delicate that it tore! This little beats is NOT getting headlight guards!
I'm thinking that this is ready for paint now, then I can assemble the machine gun turret and add it later:
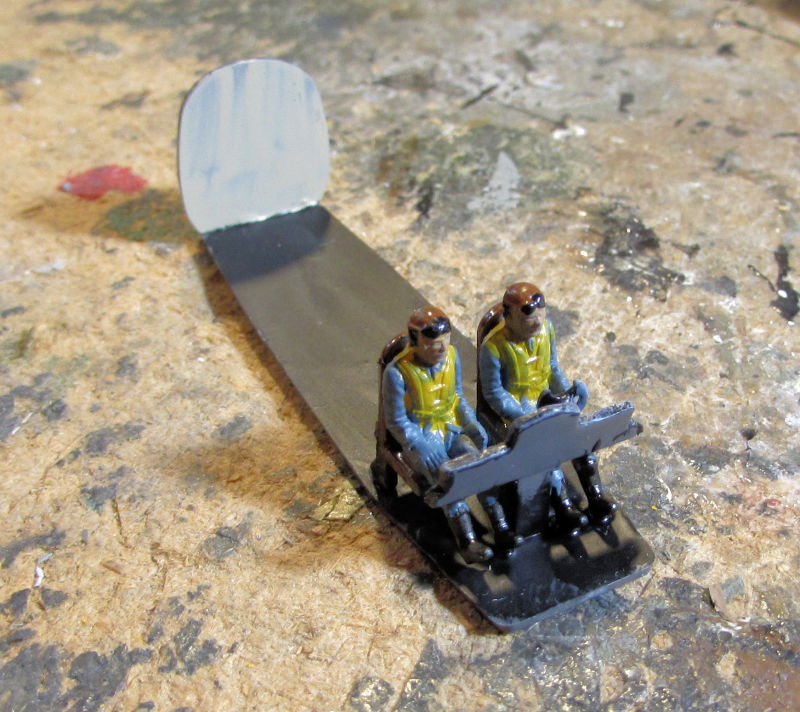
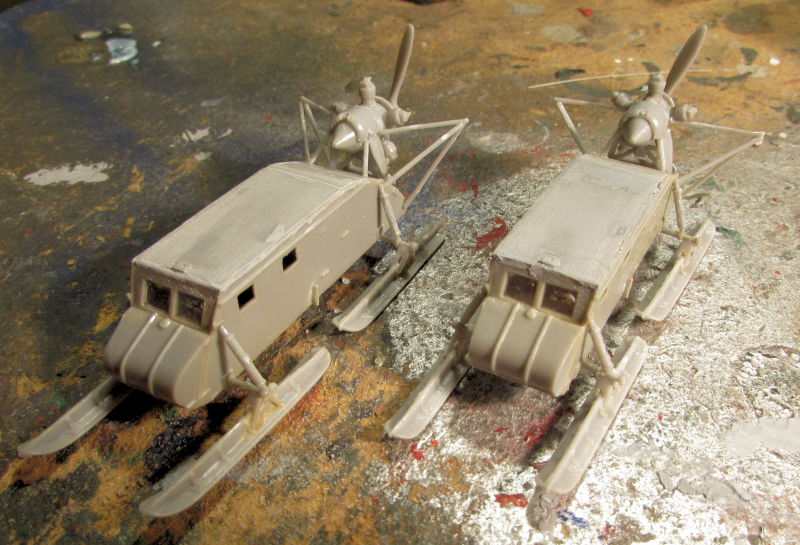
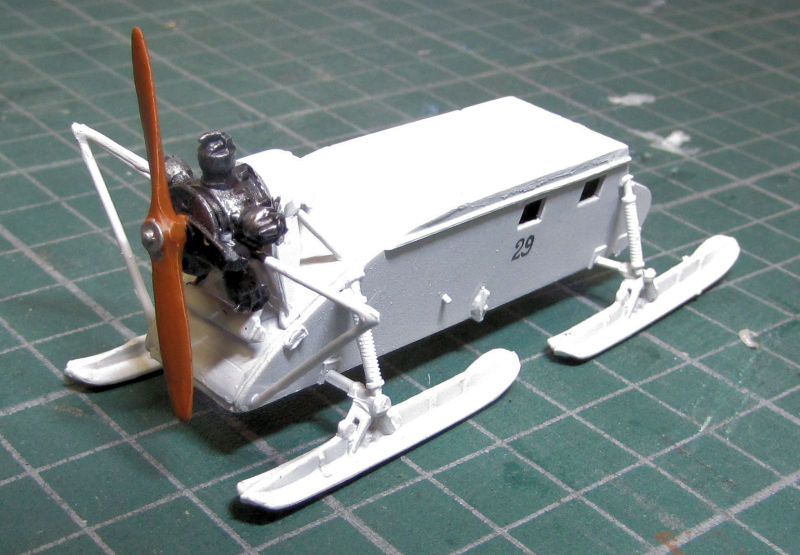
My friend Harmon had been asking me to build my Aerosans for the Treasure Train game we are planning to do so I got another one assembled:
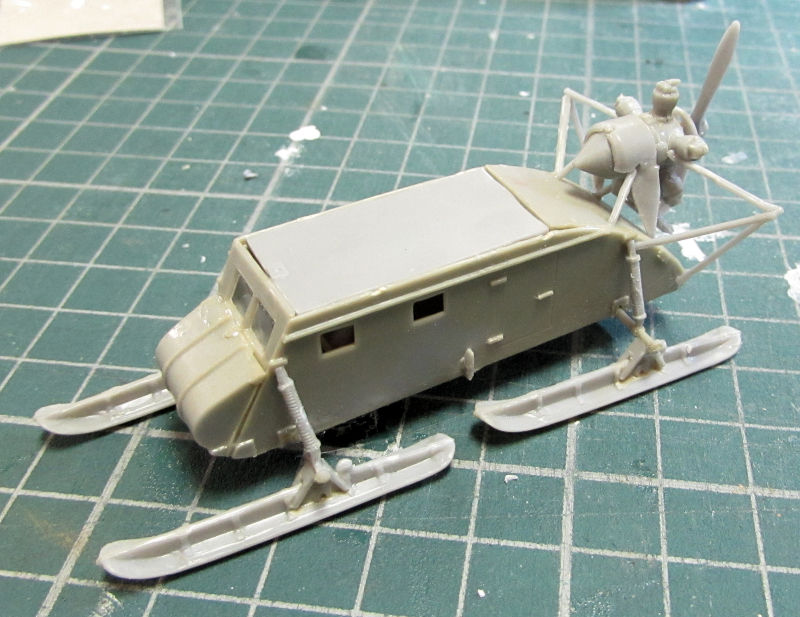
That had been started by another person who'd offered to help but later got wrapped up with other projects and couldn't continue. So I'll be filling the gaps and later on I'll paint this white.
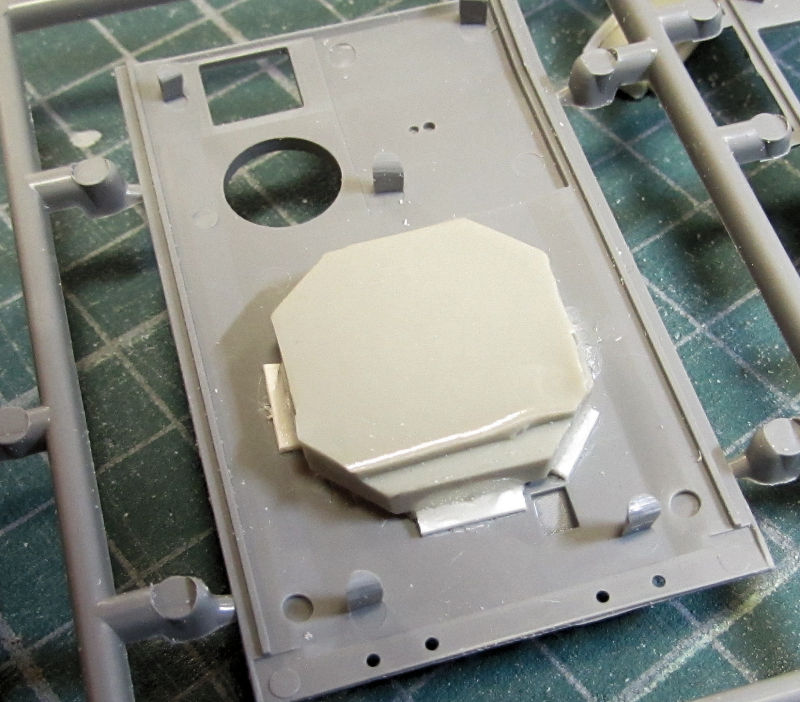
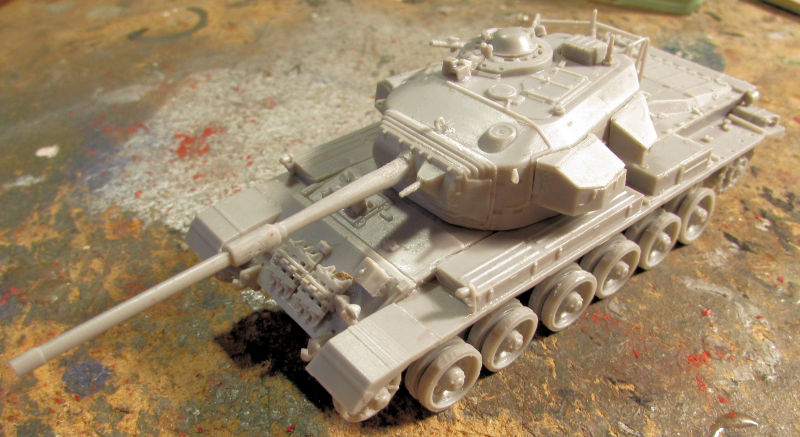
Finally I got to a couple models that started to be fun! This first one is the FV-432 with the Rarden 30mm gun turret on it. I started the resin turret conversion part first, adding the smoke dischargers and the metal barrel:
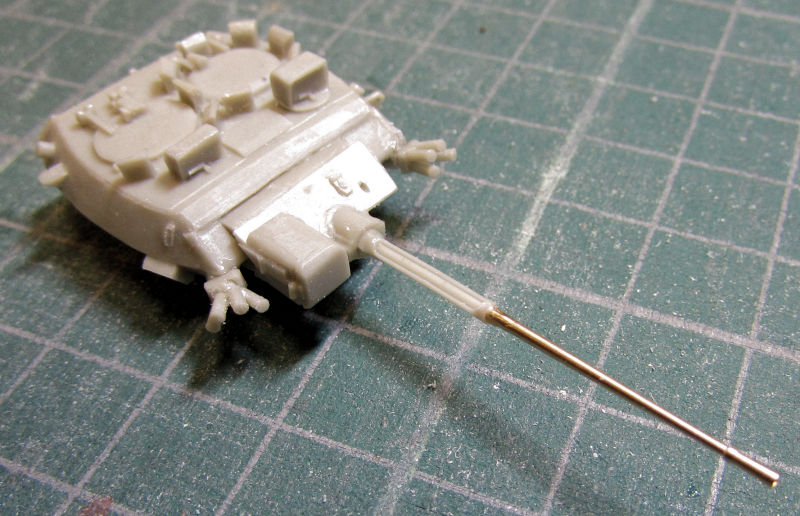
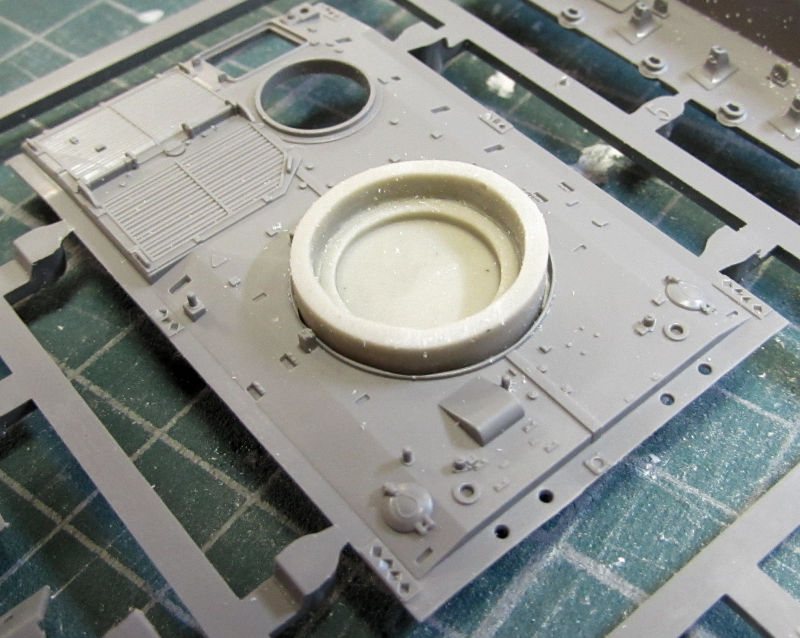
Afterward I added the new raised turret ring to it that was also in the conversion kit. It seemed a bit too high so I added some thin strips to bring it down a bit. I used the pour stub to glue it into place:
It did look better with the reduced height:
Later on, I assembled the whole hull and dry fit the turret to it:
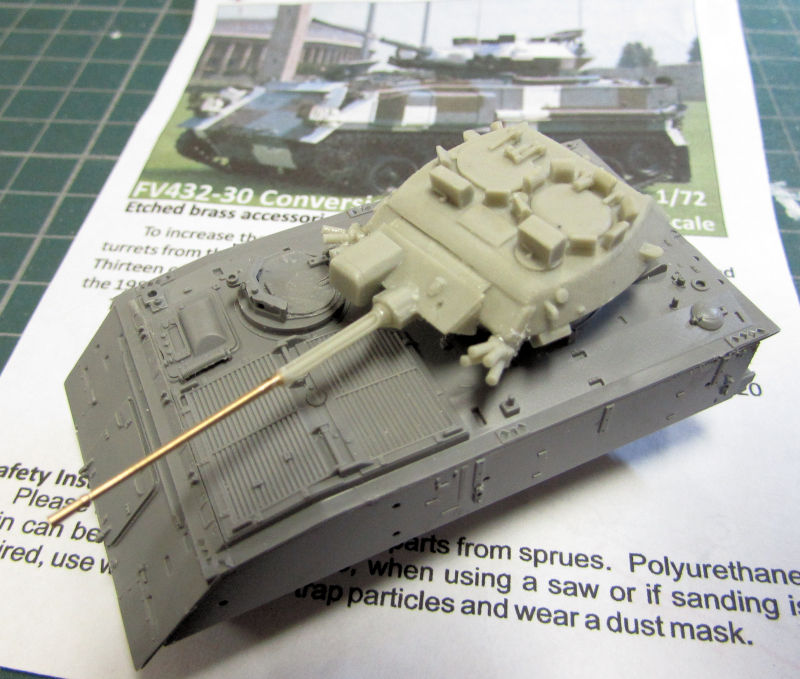
There's more to do, but this is already looking cool!
Finally, I got more done on my Israeli Sho't Kal Alef that had been taking longer than I wanted it to. First I added all the last plastic parts to it that wouldn't break off during handling:
Later on, I added all the photo etch to this tank:
Now that beastie is ready for paint! I can't wait!
And that completes today's tour of Maddog Manufacturing! I hope you enjoyed it. Thanks all for coming in, comments are always welcome.
Having gotten the Revell Aircraft of Desert Storm set, I decided to start the one plane I didn't start back when I first had this set. the A-6 Intruder. Later I'll start the F-117 from this set to replace the one that was stolen. For now, this is what I got done...
First was the basic cockpit. It is very basic so I added the pilots to give something to look at. Here is Mutt and Jeff sitting in their seats now waiting for the rest of the plane to get built::
Next I assembled the fuselage around them. Fortunately the nose cone gets to be left off till later so I can add sufficient weight in the nose area. I had also added the engine intakes and the tail feathers:
After that I assembled the two wings:
Here it is all mocked up ready for sanding and filling:
And in this part of the hanger we have an aircraft I'm building for a Group Build on another Forums called the "Cherry Poppers" Group Build, or, "what have you never, ever built before?" Well, I'd never done a Marine Corps AV-B Harrier so this bird is started as well. Again, we start with the cockpit:
Then I went through the kit, assembling all the parts that had been molded in two halves such as...
the nose cone:
...the gun pods too, and while I was at it, I added the panels to the underside of the part to the right:
... the engine nozzles and drop tanks, even though I expect I'll be leaving those tanks off:
...and the wings:
After that I built the engine intake interior:
Finally, I added the engine intakes, blast panels and flare dispenser to each side of the fuselage so there's less to add later on:
That's as far as I got on these aircraft.
Moving on to my shipyards, I started a commission build for a friend who's always wanted one built. It is this Revell SMS Emden kit:
He got it from a friend's apartment when the guy passed away and he paid me with a Revell S-100 Schnellboot. So, naturallly I got started on it for him, laying down the keel and building the main deck and superstructure parts:
You can see that the hull was warped; what you can't see is how badly it was warped! That took some careful finessing on the main hull as well as the rear part that was molded in two separate parts(?!)
Here is how it looked when I finally got it finessed into place:
Later I'll add more detail parts and then get started on painting it. He wants it done in the pre-war white and 'gold' paint job.
Now the tour will continue in the Motor Pool workshop where a number of new projects got started and old projects got a little more work done on them.
I'll start with a kit that has been frying my eggs for months now, possibly even a year or two! I finally found some hooks to replace the one that had pinged off into oblivion. So, I pulled this Shelf Queen down and added the hooks to it:
Later when they were painted, I hooked them onto those steps there. After that, I saw that in the process of moving this stupid thing around, the front fender had broken off and disappeared:
I search for a few hours and finally got so fed up with this that I found an old M-3 Halftrack and snipped the front fender off it and added it to the front of this beastie! It ain't accurate, but it's DONE!!
Moving on, I continued with another kit that had been burning my eggs as well. This Galaxy Models M-ATV got all of the plastic detail parts on the body that I felt I could add that wouldn't be broken off during handling:
There's still a few more parts that go on that, but I'm gonna install the windows first, then paint it after masking the windows, and then I'll add the last pieces.
Meanwhile, as that was drying, I assembled the machine gun 'turret' that goes on the top of this truck. sans machine gun. That will go on last after painting too:
Here it is all mocked up:
Another annoying little project that had been beating up the mojo was this Italian B1T Centauro. The small rods that were supposed to hold the outer turret shields were short shot. I finally pulled out a small rod of styrene, cut it to length and also bent the ones that needed it and added them to the turret. Afterward, I added the shields while the glue was still soft so I could position them properly:
I wasn't as successful as I'd hoped, but at least they are on. I might adjust them later if I get a mind to.
My little French AMX APC was also bothering me so I pulled it out and added the tracks. I also started adding the photo etch parts to this until I tried to bend the headlight guards into shape. The thing was so delicate that it tore! This little beats is NOT getting headlight guards!
I'm thinking that this is ready for paint now, then I can assemble the machine gun turret and add it later:
My friend Harmon had been asking me to build my Aerosans for the Treasure Train game we are planning to do so I got another one assembled:
That had been started by another person who'd offered to help but later got wrapped up with other projects and couldn't continue. So I'll be filling the gaps and later on I'll paint this white.
Finally I got to a couple models that started to be fun! This first one is the FV-432 with the Rarden 30mm gun turret on it. I started the resin turret conversion part first, adding the smoke dischargers and the metal barrel:
Afterward I added the new raised turret ring to it that was also in the conversion kit. It seemed a bit too high so I added some thin strips to bring it down a bit. I used the pour stub to glue it into place:
It did look better with the reduced height:
Later on, I assembled the whole hull and dry fit the turret to it:
There's more to do, but this is already looking cool!
Finally, I got more done on my Israeli Sho't Kal Alef that had been taking longer than I wanted it to. First I added all the last plastic parts to it that wouldn't break off during handling:
Later on, I added all the photo etch to this tank:
Now that beastie is ready for paint! I can't wait!
And that completes today's tour of Maddog Manufacturing! I hope you enjoyed it. Thanks all for coming in, comments are always welcome.
Duke Maddog
Well-known member
Wow, I was on a roll for a while there and suddenly an avalanche of Life swept me away from my workbench for far longer than I wanted! I was starting to experience withdrawal symptoms! Fortunately, I got my fix and got the Manufacturing plant going again....
All aboard for this next tour, and remember to keep hands and feet inside the trams at all times...
Let's head over to the shipyards first
On another Forums we're starting a War at Sea Group Build, so I pulled out something quick and easy... so far:
You can see there's not much to this kit:
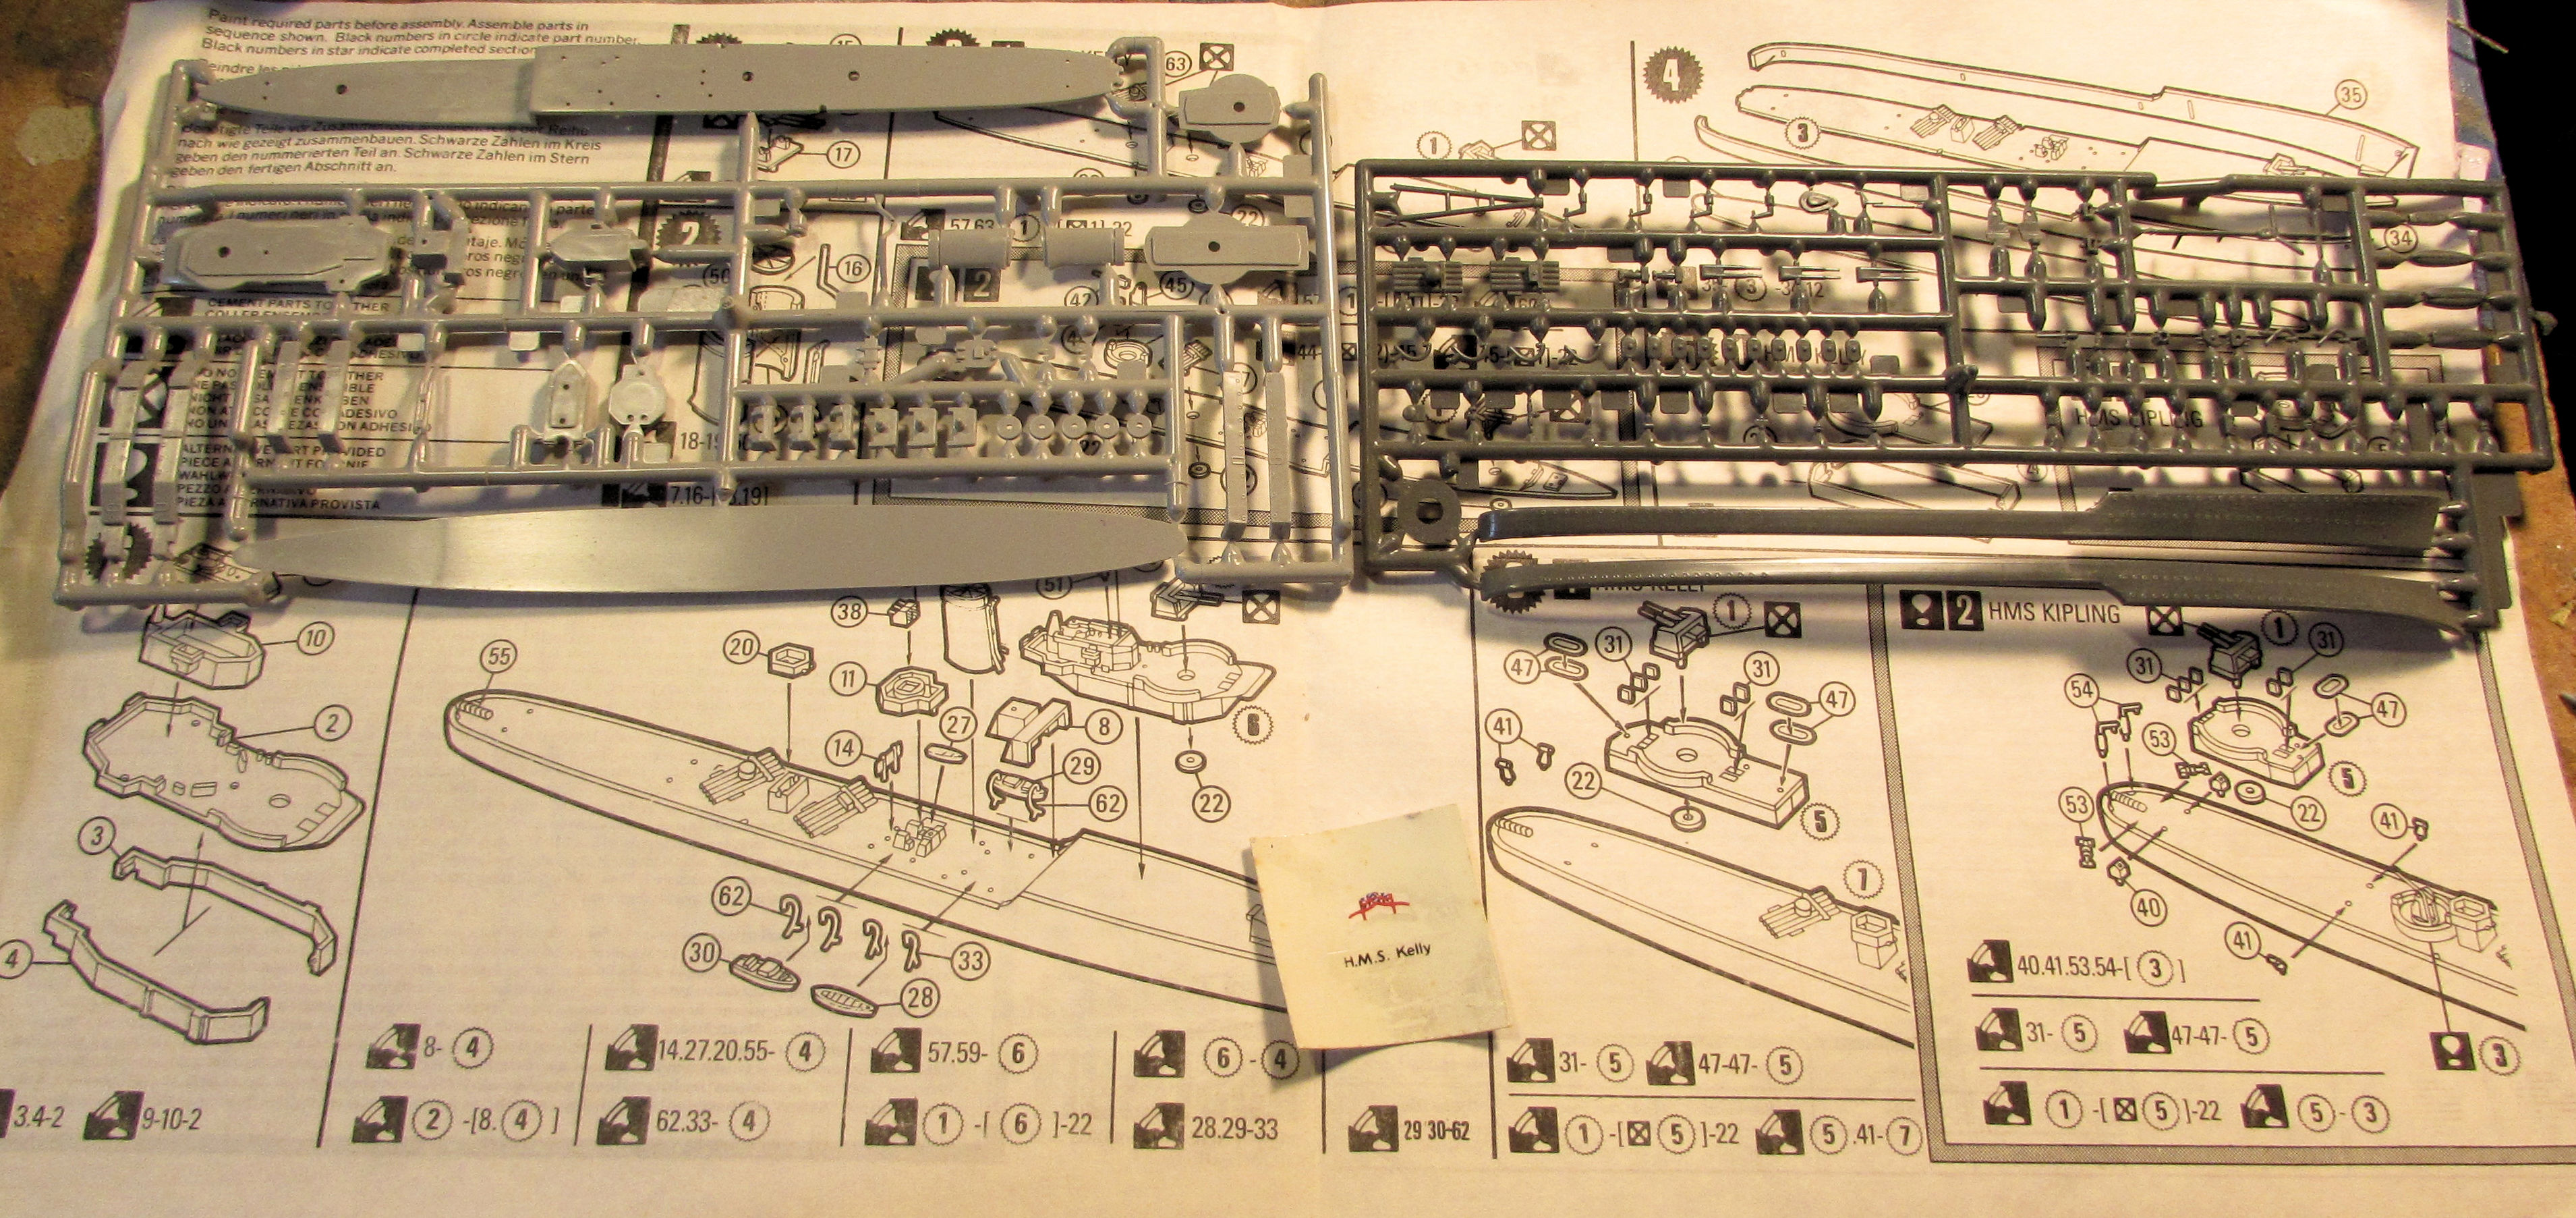
So I got a quick start on it, mostly doing all the subassemblies that I could:
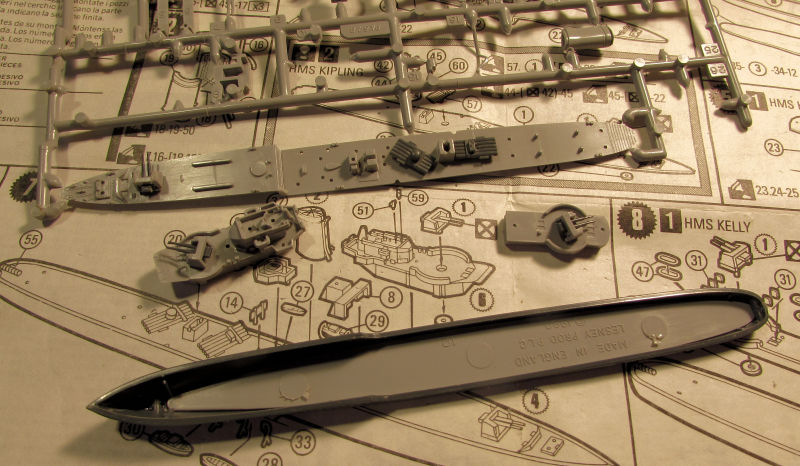
I like how the gun turrets and torpedo launchers turn!
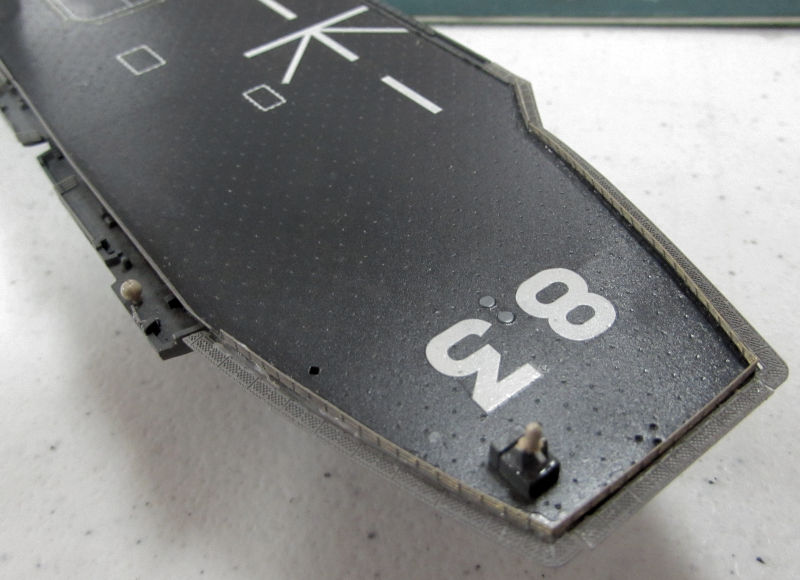
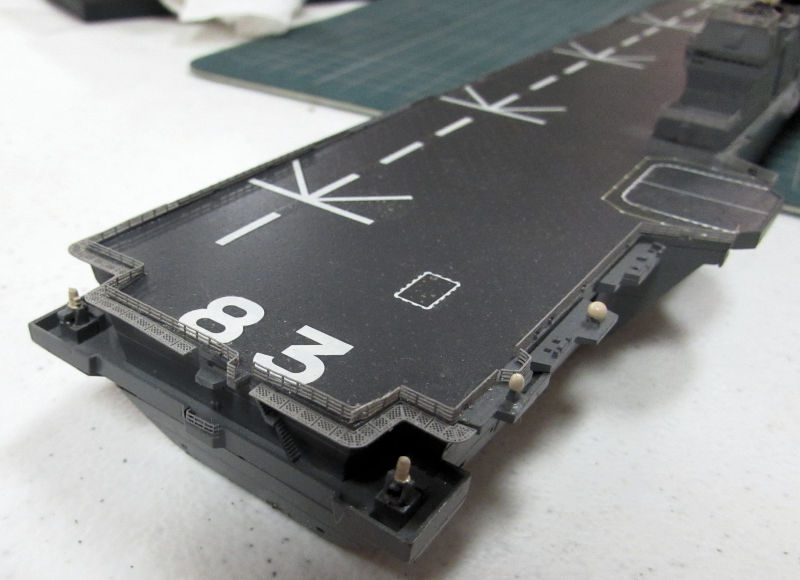
In the next slipway, I have been slowly adding more photo-etch to the JMSDF ship Izumo. It's been a tough job, but fortunately I'm so very close to being done:

I've been slowly working my way around the flight deck, here is a closeup showing the bow:
And the stern:
That's what's happening in the shipyards, so now we move on. Since the hanger has been idle, we'll head over to the Motor Pool.
I've been going a bit slow on the British FV-432; only getting the suspension on right now:
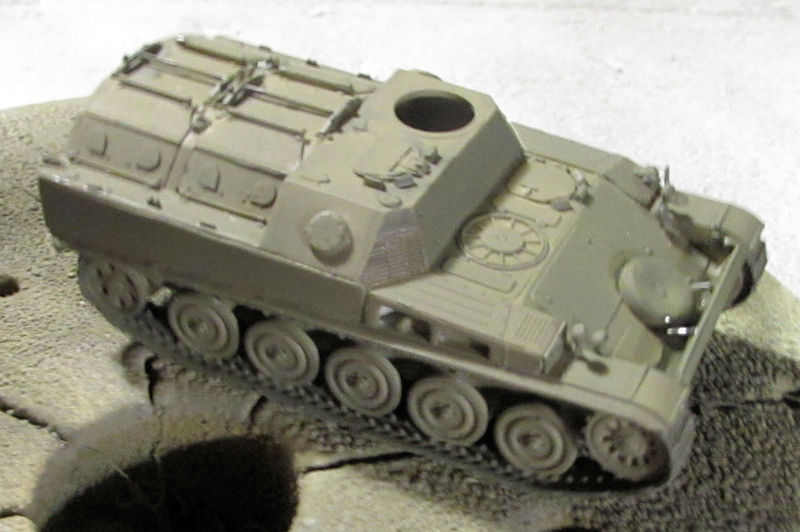
I did get a couple more of the Russian Aerosans closer to being done. First I filled the most grievous gaps with some Mr. Surfacer 500 and sanded them down:
Then I shot white over them after masking the windshields:
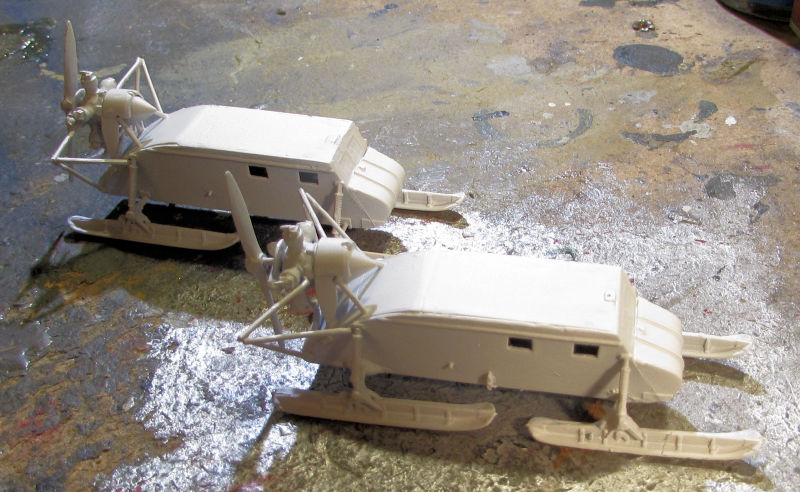
They aren't perfect, but then again, they are for a game...
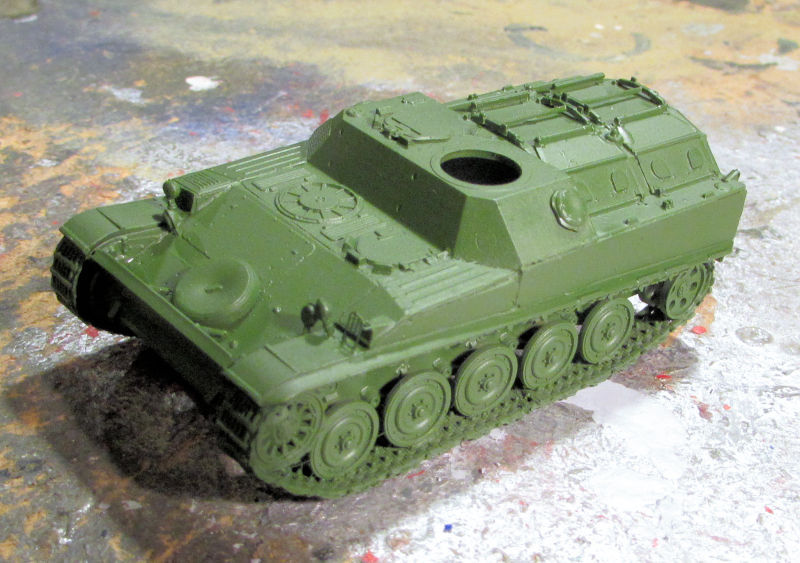
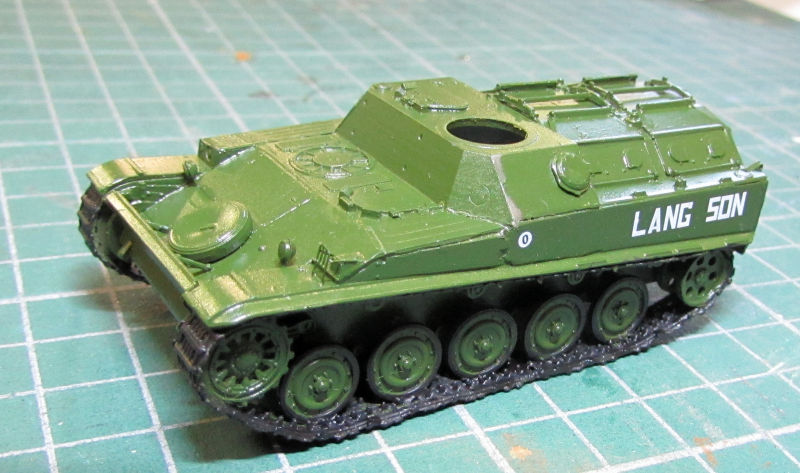
Later I detail painted one of them and added the two decals to it. This is almost done:
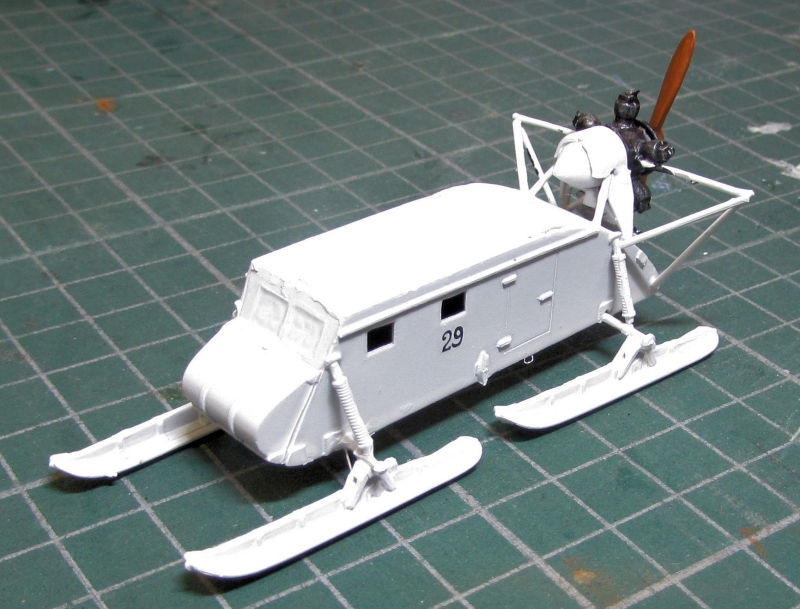
.
Since I was painting, I fired up the airbrush compressor and got started on all the vehicles that have been waiting for color.
First was the French AMX VCI APC. Here it is after the base coat:
Later I added a more medium French Army green to this in an attempt to modulate it:
It didn't work out like I'd hoped but I'm happy with it for now. I then shot a gloss coat on this and added the decals and painted the tracks a basecoat of black:
Next I brought out the M-ATV. I needed to add a clear green to the bulletproof windows all around. Since I lost my Tamiya Clear Green. I improvised with with a mix of Windsor Newton green and Mona Lisa Thinner. It didn't turn out like I hoped again, but it looks good enough from two feet away:
I added them on to the truck after they dried and later I masked them off for paint:
And then it got painted. I used a bottle of Testor's US Army Gulf War Sand color that I found in my collection of paints:
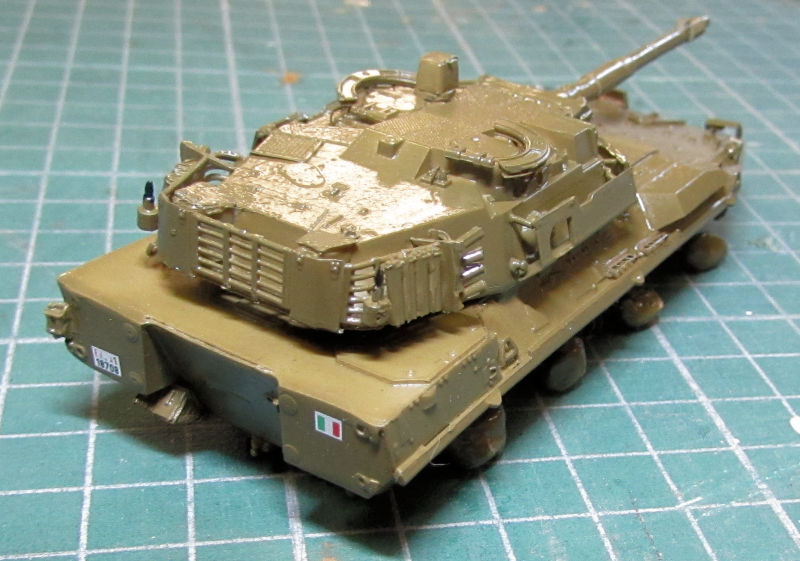
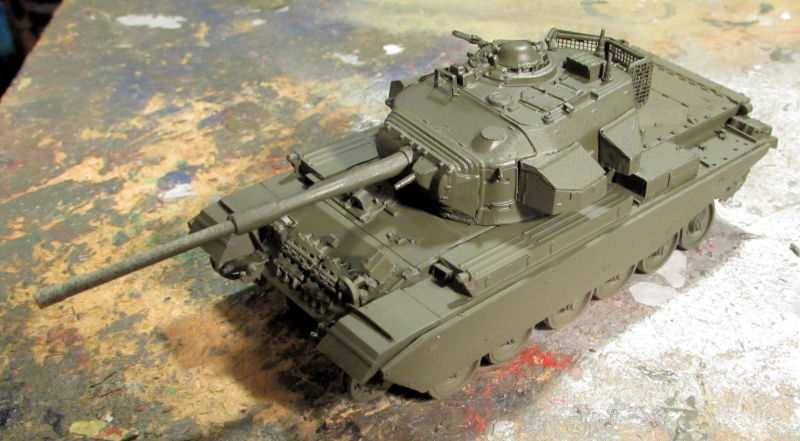
That's where I stopped on this after shooting a gloss clear on it. I moved on and shot a base coat of Olive Drab on my Italian B1T:
After a coat of gloss; I also added the decals to this:
Yes, there are decals on this; they are very small stencils... about ten of them. Here's proof I finished the decals on this:
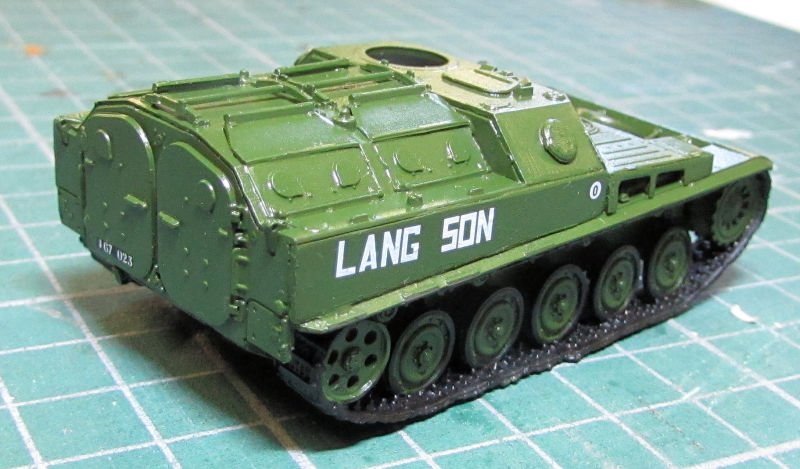
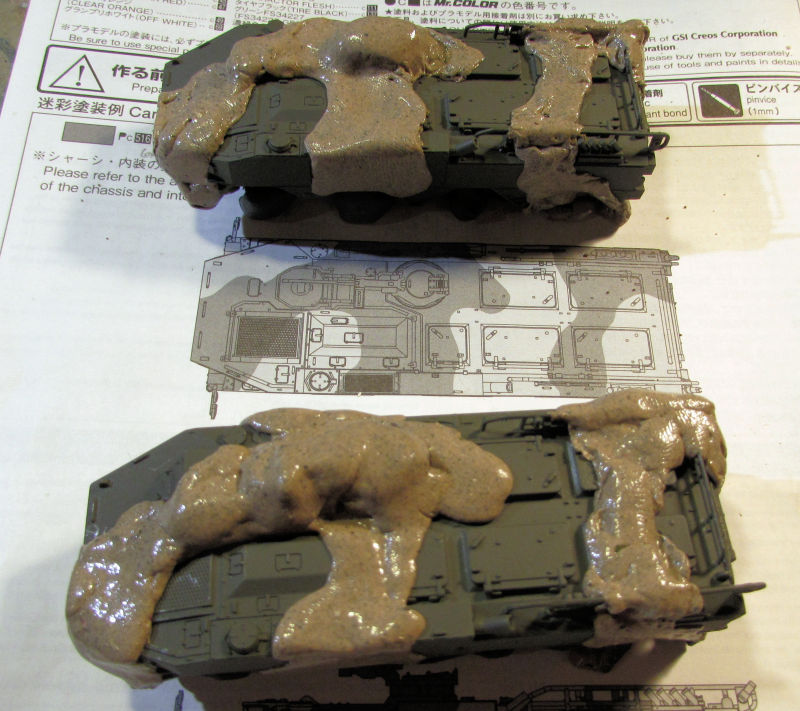
Next up, my two Japanese Type 96 APCs which had been languishing for awhile as I got other models to the paint stage. I first shot a base coat of green on the two of them:
I only showed the one since they both look the same...
Next I masked them off with my Silly Putty to prepare for the second color:
Then I shot the second color:
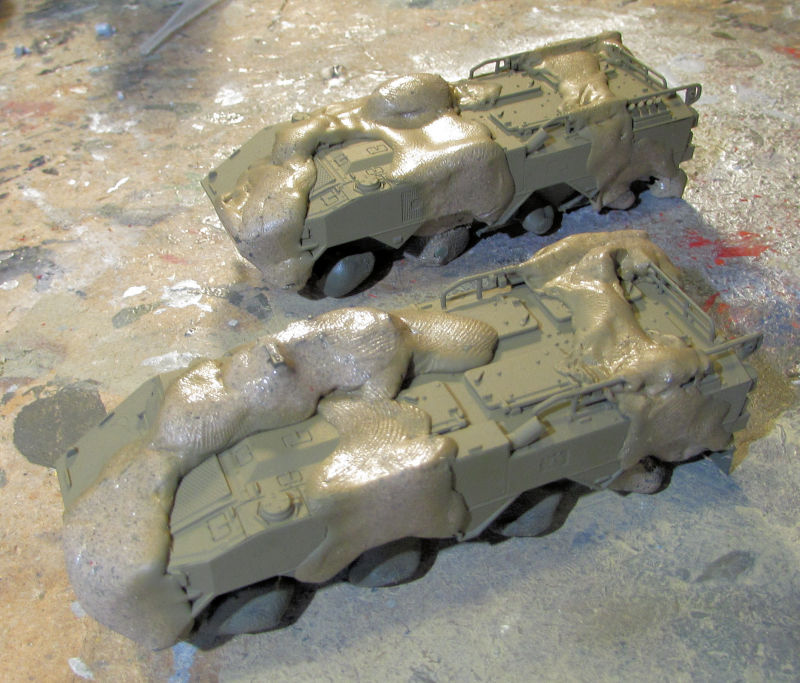
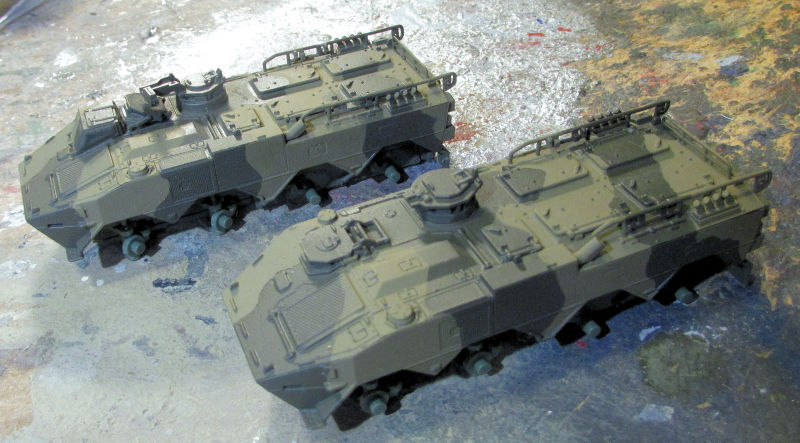
...And then I removed the Silly Putty. Yes! They are ready for a clear coat and decals now:
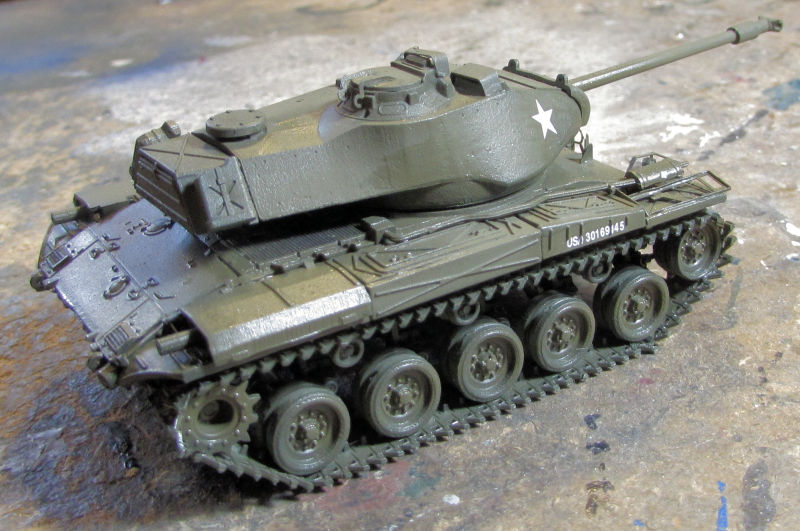
Finally, I shot paint on my Israeli Centurion Sho't Kal Alef, starting with the green drab basecoat:
Later I shot the Israeli Armor Sand Grey over the top, modulating it as best I could:
Finally a gloss coat and decals, as well as some of the detail painting:

Well, it looks like I might actually finish a few of these before year end barring any additional avalanches... That would rock!
That ends this latest tour of Maddog Manufacturing. Thank you all for coming along on this ride; comments are always welcome.
All aboard for this next tour, and remember to keep hands and feet inside the trams at all times...
Let's head over to the shipyards first
On another Forums we're starting a War at Sea Group Build, so I pulled out something quick and easy... so far:
You can see there's not much to this kit:
So I got a quick start on it, mostly doing all the subassemblies that I could:
I like how the gun turrets and torpedo launchers turn!
In the next slipway, I have been slowly adding more photo-etch to the JMSDF ship Izumo. It's been a tough job, but fortunately I'm so very close to being done:
I've been slowly working my way around the flight deck, here is a closeup showing the bow:
And the stern:
That's what's happening in the shipyards, so now we move on. Since the hanger has been idle, we'll head over to the Motor Pool.
I've been going a bit slow on the British FV-432; only getting the suspension on right now:
I did get a couple more of the Russian Aerosans closer to being done. First I filled the most grievous gaps with some Mr. Surfacer 500 and sanded them down:
Then I shot white over them after masking the windshields:
They aren't perfect, but then again, they are for a game...
Later I detail painted one of them and added the two decals to it. This is almost done:
.
Since I was painting, I fired up the airbrush compressor and got started on all the vehicles that have been waiting for color.
First was the French AMX VCI APC. Here it is after the base coat:
Later I added a more medium French Army green to this in an attempt to modulate it:
It didn't work out like I'd hoped but I'm happy with it for now. I then shot a gloss coat on this and added the decals and painted the tracks a basecoat of black:
Next I brought out the M-ATV. I needed to add a clear green to the bulletproof windows all around. Since I lost my Tamiya Clear Green. I improvised with with a mix of Windsor Newton green and Mona Lisa Thinner. It didn't turn out like I hoped again, but it looks good enough from two feet away:
I added them on to the truck after they dried and later I masked them off for paint:
And then it got painted. I used a bottle of Testor's US Army Gulf War Sand color that I found in my collection of paints:
That's where I stopped on this after shooting a gloss clear on it. I moved on and shot a base coat of Olive Drab on my Italian B1T:
After a coat of gloss; I also added the decals to this:
Yes, there are decals on this; they are very small stencils... about ten of them. Here's proof I finished the decals on this:
Next up, my two Japanese Type 96 APCs which had been languishing for awhile as I got other models to the paint stage. I first shot a base coat of green on the two of them:
I only showed the one since they both look the same...
Next I masked them off with my Silly Putty to prepare for the second color:
Then I shot the second color:
...And then I removed the Silly Putty. Yes! They are ready for a clear coat and decals now:
Finally, I shot paint on my Israeli Centurion Sho't Kal Alef, starting with the green drab basecoat:
Later I shot the Israeli Armor Sand Grey over the top, modulating it as best I could:
Finally a gloss coat and decals, as well as some of the detail painting:
Well, it looks like I might actually finish a few of these before year end barring any additional avalanches... That would rock!
That ends this latest tour of Maddog Manufacturing. Thank you all for coming along on this ride; comments are always welcome.