• Modelers Alliance has updated the forum software on our website. We have migrated all post, content and user accounts but we could not migrate the passwords.
    This requires that you manually reset your password.
    Please click here, http://modelersalliance.org/forums/login to go to logon page and use the "Forgot your Password" option.

MIG Late King Tiger (July 1945)

Great work! Neat stuff, glad to see you posting this Sir!


Hello again everyone! I didn’t realize its been so long since I posted any progress here. Time to change that!

First up I added all the suspension arms, drive housing and the rear hull plate to the lower hull. Everything fit just fine. The torsion bars are included in the box, but they are not intended to be installed and since the parts for the interior are not included there really isn’t anywhere to mount them.

Post4_1.jpg


Next I painted the periscopes because they need to be installed from the inside. I used MIGs periscope green which is a “clear” green color, painted the back of the periscopes in chrome silver and then the rest of the housing in flat black. I also painted the top of the hull and the inside of the periscope covers in MIG’s Reseda Green Option 2 from their late war German colors set. Once the periscopes and the hull mounted MG42 were installed I assembled the hull.

Post4_2.jpg


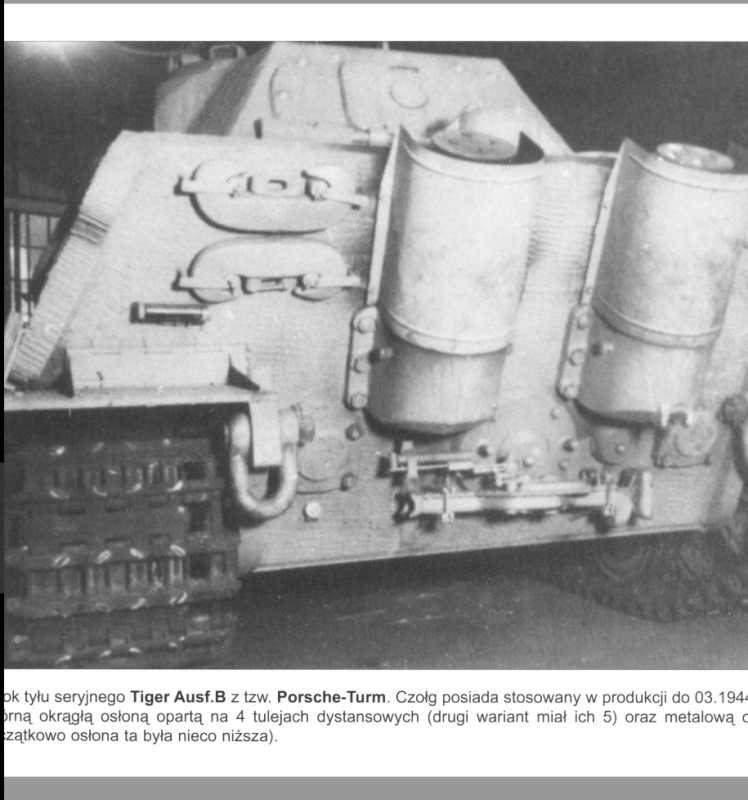
Next step was the engine deck. This particular version has a different layout then the production King Tigers, including armored louvers and a three-door engine access hatch. The kit breaks up the deck into the left side, right side and the middle.

Post4_3.jpg


I primered the left and right side and then also painted them in the base green. This was a lesson from a previous build where the plastic color was visible under the etched grills.

I completed the engine access covers before installing the pieces on the hull. The kit has no handles for the engine doors, which seemed odd to me, so I made some out of brass using my grab handle tool.

Post4_4.jpg


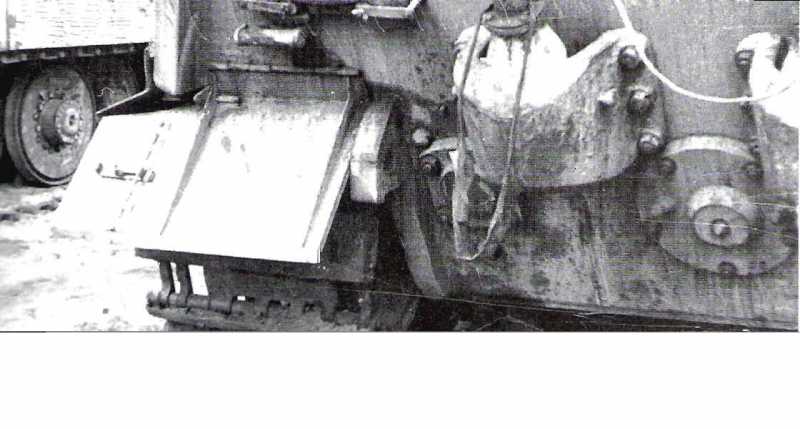
I ran into a bit of an issue when I tried to install the engine deck. First off the instructions would have you install the center section first and then the left and right sides. The side pieces however, have a ridge that is supposed to go under the center part, I assume to support it. I decided to install the sides first, to avoid having to force this all together. I also found that the left and right sides are too long to fit in the hull, as you can see in the photo below.

Post4_5.jpg


After some work with the sanding sticks, mostly on the rear hull portion, I got them both to fit and didn’t need to use any filler!

Post4_6.jpg


And then I slide the center part into place without any issues and added the photoetch grills included in the kit.

Post4_7.jpg


The all the tools, and other fittings where added to the hull.

Post4_8.jpg


Lets talk about the tracks. The kit includes link and length tracks. The detail is actually pretty good, but I have always had issues with link and length so I went searching for some aftermarket tracks. This tiger, like the last production version, has the 18 tooth sprocket and the single link tracks, unlike the earlier version with the two separate link types. The only aftermarket ones I could find are from Fruil, and they aren’t even marketed for the Tiger at all. They are, as far as I can tell, the correct type so I went with them.

Post4_9.jpg


I ended up making a small jig to cut the track pins and then went to assembling them. Overall not to complicated. The tracks for the right side required almost no clean up, but I had to drill out the holes and sand off some flash on the left side. I purposely made them a couple links too short, and I will fix the length once the suspension is on and secured.

Post4_10.jpg


I ended up getting a coat of primer on the hull yesterday and plan to lay down the green today. Hopefully I’ll put up an update later today.

As always – questions and comments are welcome – and thanks for watching.

Mike
 
Hi guys! I’m back with a quick update. I primed the hull with Ammo’s One Shot Primer, which I really love right now, then I painted the hull in Ammo’s Reseda Green Option B. Since this is a paper panzer I went with the color I liked more then reality, if you will. I did decide to go with a green base with a brown camo pattern similar to one of the options in the kit’s painting guide, but I’ll probably add a little bit of my own spin to it. Once the green was down, I added a little bit of Ammo’s Zinc Chromate yellow to lighten up the green and sprayed the centers of the larger panels. It doesn’t show up in the photos very well, but it ended up looking very good.

Post5_1.jpg


Post5_2.jpg


One mistake I did make though, after taking the time to paint the periscopes before installing them, I forgot to mask them and they ended up getting painted over. :bang head Its always something! Oh well, not a terribly hard fix, just annoyed at myself.

I am still learning how to best use these type of acrylics. For this paint work I thinned the paint 50/50 with thinner and sprayed 3 thin coats following a tutorial I saw online, It seemed to turn out pretty well.

On to the turret!

Thanks for watching!
Mike
 
Hi guys – another update, just about done with assembly of this Big Tiger. This work was all completed last weekend, but I didn’t have a chance to get a post up.

First step was to build up a platform for the tank commander inside of the tank. I used some random plastic strips. Also added the supports for the gun. I set the turret on the hull and then I fitted the gun itself so I could set the appropriate angle for the gun then glued it all in place.

Post6_1.jpg


Then I assemble the turret top and bottom halves and finished adding the parts. I did leave off the hooks for the spare track links and the foliage loops so that I don’t break them off during handling. I’ll add them just before I primer and paint.

Post6_2.jpg


Post6_3.jpg


The mantlet is specific for the 10.5cm gun, I assembled the two pieces, then I assed a cast texture using Mr. Surfacer 500 dabbed onto the parts and continued dabbing at it as it dried.

Post6_4.jpg


The mantlet was glued onto the turret. Here it is all dry fitted together.

Post6_5.jpg


And a comparison photo with my JadgPanther armed with the 88mm gun. That 10.5cm is impressive!

Post6_6.jpg


Getting closer. Thanks for watching.
Mike
 
Thanks guys! I am pretty happy with this build so far, and my typical nemesis - the tracks - are already completed! :yipee Momentum should stay up on this one.

Be back soon!
:drinks
 
Hi guys – quick update this weekend.

There are a few details left to go on the turret before painting. One of those is the weld beads around the periscope covers. I tried a third technique for these, and I have to say these turned out the best. I used some two part green epoxy putty. I mixed up a small batch and then rolled some out into a tiny little noodle. Then I cut off little pieces, squished them into the area where the weld needs to be, then textured it with a hobby knife. I am very happy with the result. I was so happy I removed the plastic rod from the gunners periscope cover and re-did them with the epoxy putty.

Post7_1.JPG


And here’s a close up of the commander’s cupola.

Post7_2.jpg


Well I just have the spare track link hangers left to go, then we can get this bugger to paint.

Thanks for watching!
Mike
 
Hi guys – Got some substantial progress to share on my King Tiger.

First thing I needed to do was finish the turret. This involved adding all the track hangers and the foliage loops. The kit provides plastic loops, but I suspected that they would be a challenge to remove, clean and keep on the turret during all the handling that was sure to follow, so I decided to replace them with some brass wire. I ended up using some spare track pin wire from the Friul tracks. It happened to be just about the right size. This was bent around another piece of brass wire that matched the inside diameter of the loops. Then I drilled out the mounting pints in the turret and installed the loops. A little CA glue on the inside and they are firmly mounted. I did leave the middle loop out until after the decals where added just in case it was in the way.

I also attached the mantlet to the turret at this point. I decided at the last minute to add a casting number to it. I shaved off some numbers from the parts trees, and when I had three good ones I glued them down. Originally I had intended to put them vertically at the base, but for some reason when I went to glue them on I forgot and added them horizontally. Oops. Oh well – This was something new that I tried, and I think it came out pretty good.


Post8_1.jpg


Post8_2.jpg


Post8_3.jpg


Once the assembly was complete, I sprayed a on coat of gray primer using the Ammo One Shot Gray. I really like this primer, sprays on really well.


Post8_4.jpg


Once the primer sat for a couple of days to fully cure, I started the paint work. The base colors where sprayed next, Reseda Green Option B from the Ammo late war German colors set for the top and sides with a lightened overspray in the centers of the panels, just like the hull. Vallejo red oxide primer was used on the bottom of the turret and highlighted with Ammo’s rotbrun primer color. I am probably going to display this on a diorama with the turret turned, so I figured the bottom needed to be finished as well. And I didn’t think anyone would waste time camouflaging the bottom of the turret at the end of the war, hence the primer color.


Post8_5.jpg


Post8_6.jpg


Next up was the camo colors. I recently picked up Mig’s Masking Putty and wanted to give it a try. The idea for the camo was a factory-applied brown over green base that was masked with crew applied dark yellow spots.

To accomplish the pattern I basically created some shapes with the putty and sprayed the Red Brown within the masked area. I went slowly, basically painting each different brown section one at a time over a few nights. I read some advice somewhere that basically said when you paint camouflage, you don’t have to do it all at once. Really sound advice. So I basically sprayed, then evaluated then re-masked and adjusted, fixed the over spray, etc etc until I was happy with the brown. Then I applied the dark yellow freehand. After that was down I touched up the yellow with the green and brown. I ended up with something I am pretty happy with. The Brown and Yellow are also from the Ammo Late War German colors set.


Post8_7.jpg


Post8_8.jpg


The gun barrel was painted in Ammo’s gray base, which comes in their German armor interiors set, to mimic the high heat gray primer used on gun barrels.

After the paint sat for a couple of days, I sprayed a coat of future to prep for decals and weathering. I used the kit crosses, which are just black outlines in this case and a set of black numbers outlined in white from another kit I have in the stash. After the decals sat overnight I sealed them with another coat of future.


Post8_9.jpg


The kit decals seem to be slightly opaque in the clear part, which is odd. Hopefully subsequent weathering with help blend that in, if not, I’ll fix it a different way.


Next step – weathering! Wish me luck!

Mike
 
Back
Top