
-
Modelers Alliance has updated the forum software on our website. We have migrated all post, content and user accounts but we could not migrate the passwords.
This requires that you manually reset your password.
Please click here, http://modelersalliance.org/forums/login to go to logon page and use the "Forgot your Password" option.
You are using an out of date browser. It may not display this or other websites correctly.
You should upgrade or use an alternative browser.
You should upgrade or use an alternative browser.
JadgPanther Late Production
- Thread starter Skinny_Mike
- Start date
 That brown looks about right if you plan a faded scheme, just don't fade it as much later.
Skinny_Mike
Well-known member
Hi guys! I can’t believe its been so long since I posted on this thread. Now that my HAF F-16 is nearly done, its time to focus on the JadgPanther. There hasn’t been a ton of progress, but I have made a few strides during some off time on the F-16. I’m still trying to work out the figures for the tank itself, but we’ll get there.
First up, I found a bit of a problem with my kit. There are a number of warped pieces, including the lower hull. I didn’t even notice while I was installing the suspension. Here’s a look though, the walls are defiantly leaning in.

I decided to first attach the rear wall, then use some sprue at the front to spread it apart. That seemed to work pretty well, and when I finally get the top on, that should help get it all nice and solid.
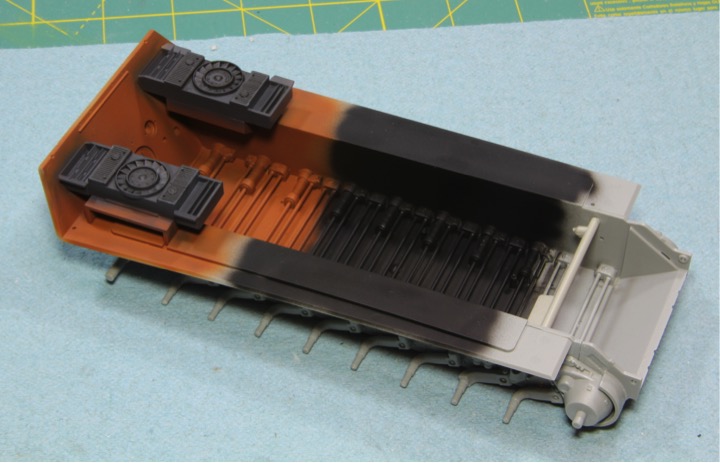
After the rear wall was attached I added the cooling fans and then added a little paint. I had just received the Ammo from MIG German Armor Interior set and I wanted to give them a try. I used the red-oxide primer for the floor and the engine gray for the fans. I was very pleased with the end results. They sprayed very well and using thin layers building up the color left a super smooth finish. I didn’t bother weathering the colors because they are all but invisible. I also painted the mid section flat black, because I am going the have some crew in the hatches and the black will help hide the lack of interior.
I am planning to make a little bit of a diorama for this build. I worked on a bit of the planning for that. First step was to plan out the idea then get the base prepped. The idea will be the JadgPanther stopped on a road somewhere on the eastern front. There will be a mixed unit of soldiers on the rear deck and a few on the ground interacting with them. One edge will have some vegetation to effectively create a border to the scene. We’ll see how it goes.
First up, I measured out the size of the base and cut out some Styrofoam.
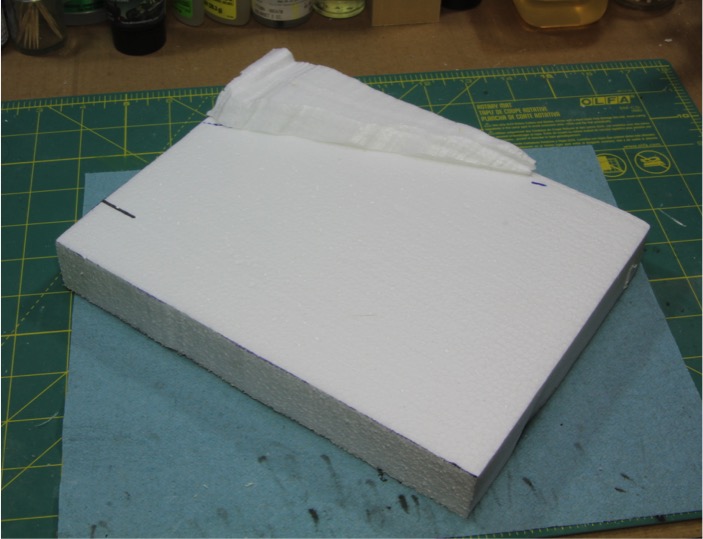
Then I did a bit of a preliminary layout.

After the foam was cut out I also made a frame for the whole thing.
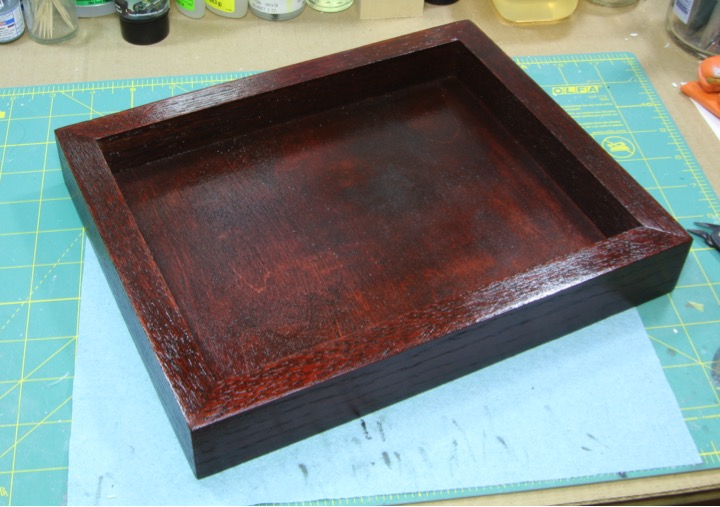
Once I get a little further on the tank itself, I’ll get started on the groundwork and will move the dio over to our dioramas section.
Not much to show really, but I’m shacking off the rust and getting that all important forward progress.
Thanks for the continued interest. See you all soon!
Mike
First up, I found a bit of a problem with my kit. There are a number of warped pieces, including the lower hull. I didn’t even notice while I was installing the suspension. Here’s a look though, the walls are defiantly leaning in.
I decided to first attach the rear wall, then use some sprue at the front to spread it apart. That seemed to work pretty well, and when I finally get the top on, that should help get it all nice and solid.
After the rear wall was attached I added the cooling fans and then added a little paint. I had just received the Ammo from MIG German Armor Interior set and I wanted to give them a try. I used the red-oxide primer for the floor and the engine gray for the fans. I was very pleased with the end results. They sprayed very well and using thin layers building up the color left a super smooth finish. I didn’t bother weathering the colors because they are all but invisible. I also painted the mid section flat black, because I am going the have some crew in the hatches and the black will help hide the lack of interior.
I am planning to make a little bit of a diorama for this build. I worked on a bit of the planning for that. First step was to plan out the idea then get the base prepped. The idea will be the JadgPanther stopped on a road somewhere on the eastern front. There will be a mixed unit of soldiers on the rear deck and a few on the ground interacting with them. One edge will have some vegetation to effectively create a border to the scene. We’ll see how it goes.
First up, I measured out the size of the base and cut out some Styrofoam.
Then I did a bit of a preliminary layout.
After the foam was cut out I also made a frame for the whole thing.
Once I get a little further on the tank itself, I’ll get started on the groundwork and will move the dio over to our dioramas section.
Not much to show really, but I’m shacking off the rust and getting that all important forward progress.
Thanks for the continued interest. See you all soon!
Mike
Dig the base, this will look fine. 
Skinny_Mike
Well-known member
Thanks guys! Spent the night trying to figure out just what aftermarket to use and what to not bother with. I may limit the etch to a few parts, just so I don't get frustrated and shelve the kit. More to come!
centaur567
Well-known member
Great start Mike, Don't stop now. Gary
Skinny_Mike
Well-known member
Great start Mike, Don't stop now. Gary
Don't plan on it, I'm pretty motivated on this one. Just ordered some new figures to try out, but I'm probably going to go back to my original. We'll see.
Skinny_Mike
Well-known member
Hi guys, back with a little bit of progress on this kitty.
First off I cleaned and finished the road wheels. The rubber part was painted in Gunze Mr. Color Tire Black. Then masked off and the Panzer yellow, followed by the green and brown for the outer road wheels. I think they will look really good once I get them all weathered.

For the next set of steps, I deviated from the instructions. Since I knew the hull bottom was warped, I wanted to attach the top of the hull while there wasn’t anything attached on the outside. This meant I needed to do some work to get the parts installed from the interior attached. I started with the top of the tank. I needed to add some figures so I built a couple of platforms for the two half figures I am using to sit on. These comprised some plastic rod drilled and installed in the hull top, then a thick plastic sheet was cut and drilled to match the pattern of the rods. This allowed me to slide the platform up and down to correctly position each figure. Once I had them positioned correctly, I glued them in place.

I finished installing all the interior parts, including the gun breach and the hull mounted MG. Then the roof was installed. Sorry, didn’t take a lot of pictures during these steps. There really just wasn’t a lot of fuss. I also removed the molded on front mud guards as I plan to replace them with some photo etched replacements.

Once the top dried, I attached the two hull halves. I attached one side at a time, slowly adding Tamiya extra thin to the joint and holding until it had set. Unfortunately I was left with a couple of gaps. One was at the back where the hull top and the rear plate meet.

And the other was at the front.

Both were filled with some putty.

I’ll check how they turned out after a primer coat. Starting to really look the part now.

Thanks for watching guys, this one should start picking up speed now as this is the only build on the workbench right now.
As always questions and comments are welcome.
Mike
First off I cleaned and finished the road wheels. The rubber part was painted in Gunze Mr. Color Tire Black. Then masked off and the Panzer yellow, followed by the green and brown for the outer road wheels. I think they will look really good once I get them all weathered.
For the next set of steps, I deviated from the instructions. Since I knew the hull bottom was warped, I wanted to attach the top of the hull while there wasn’t anything attached on the outside. This meant I needed to do some work to get the parts installed from the interior attached. I started with the top of the tank. I needed to add some figures so I built a couple of platforms for the two half figures I am using to sit on. These comprised some plastic rod drilled and installed in the hull top, then a thick plastic sheet was cut and drilled to match the pattern of the rods. This allowed me to slide the platform up and down to correctly position each figure. Once I had them positioned correctly, I glued them in place.
I finished installing all the interior parts, including the gun breach and the hull mounted MG. Then the roof was installed. Sorry, didn’t take a lot of pictures during these steps. There really just wasn’t a lot of fuss. I also removed the molded on front mud guards as I plan to replace them with some photo etched replacements.
Once the top dried, I attached the two hull halves. I attached one side at a time, slowly adding Tamiya extra thin to the joint and holding until it had set. Unfortunately I was left with a couple of gaps. One was at the back where the hull top and the rear plate meet.
And the other was at the front.
Both were filled with some putty.
I’ll check how they turned out after a primer coat. Starting to really look the part now.
Thanks for watching guys, this one should start picking up speed now as this is the only build on the workbench right now.
As always questions and comments are welcome.
Mike
That's a helo'astart....
Skinny_Mike
Well-known member
Thanks guys! We're still moving on this one. More soon!

centaur567
Well-known member
Looking good. Gary
Skinny_Mike
Well-known member

Skinny_Mike
Well-known member
Hi folks! There’s been a lot going on lately that has unfortunately kept me away from the bench. But most of that has been cleared up and I had a pretty good weekend, so here is some progress.
First up is the JadgPanther’s back deck. I pretty much just followed the instructions to add all the details. I decided not to bother replacing most of the little details with etch because the kit plastic is pretty good in my opinion. I did however decide to use the photo etch screens from the Alliance Modelworks set, instead of Dragon’s supplied screens. The aftermarket was just a little more refined. I did have to replace the two handles on the engine hatch as one was broken in the kit. I just used some same-sized brass rod bent using a handle making tool and glued them in place. I also used the etched brackets on the very rear, which are used to stow the tow cable. I figured they would be better then the kit parts. In the end only marginally so, the kit parts are pretty nice.

The next step was to get the rear of the hull finished. I just added the plastic following the directions. The exhaust pipes will be painted and weathered off the tank and added later.

I decided to try to solder some of the etched fenders and parts together. This is a new technique for me, so I spent some time practicing before I committed to using it for the kit. I used some of the PE that I didn’t plan on using, and then I gave it a shot on the kit itself. First up was the side skirt hanger. I bent all the parts and then soldered them together. Here was my first completed part.

Its not super clean like what I’ve seen people do, but for a first real attempt, I’m happy with the outcome. Just need to keep practicing. So I soldered the left side assemblies, and then just to compare, I used CA glue for the right side assemblies. Here’s a comparison. I’m sure you can tell which is which.

Obviously we see which is cleaner. The CA’ed assembly was a lot faster as well. But I’m happy to have learned a new skill and put it to use. Next up will be to assemble the parts for the sides, so we can see how well they mate up.
Sorry for the short update today, but I am marching right along. Really hoping to make it by the deadline on this one.
Talk to you all soon, and as always, all comments/questions/critiques are welcome!
Mike
First up is the JadgPanther’s back deck. I pretty much just followed the instructions to add all the details. I decided not to bother replacing most of the little details with etch because the kit plastic is pretty good in my opinion. I did however decide to use the photo etch screens from the Alliance Modelworks set, instead of Dragon’s supplied screens. The aftermarket was just a little more refined. I did have to replace the two handles on the engine hatch as one was broken in the kit. I just used some same-sized brass rod bent using a handle making tool and glued them in place. I also used the etched brackets on the very rear, which are used to stow the tow cable. I figured they would be better then the kit parts. In the end only marginally so, the kit parts are pretty nice.
The next step was to get the rear of the hull finished. I just added the plastic following the directions. The exhaust pipes will be painted and weathered off the tank and added later.
I decided to try to solder some of the etched fenders and parts together. This is a new technique for me, so I spent some time practicing before I committed to using it for the kit. I used some of the PE that I didn’t plan on using, and then I gave it a shot on the kit itself. First up was the side skirt hanger. I bent all the parts and then soldered them together. Here was my first completed part.
Its not super clean like what I’ve seen people do, but for a first real attempt, I’m happy with the outcome. Just need to keep practicing. So I soldered the left side assemblies, and then just to compare, I used CA glue for the right side assemblies. Here’s a comparison. I’m sure you can tell which is which.
Obviously we see which is cleaner. The CA’ed assembly was a lot faster as well. But I’m happy to have learned a new skill and put it to use. Next up will be to assemble the parts for the sides, so we can see how well they mate up.
Sorry for the short update today, but I am marching right along. Really hoping to make it by the deadline on this one.
Talk to you all soon, and as always, all comments/questions/critiques are welcome!
Mike
Skinny_Mike
Well-known member
Both sides are great!..
Luiz
Thanks Luiz!
Skinny_Mike
Well-known member
Hi guys! I am back with another update. Not sure if I’ll actually get this done by the end of the month, but I sure am going to try.
All of my progress this time is on the left side of the vehicle. Its been a little slow going as I continue to solder the photo etch. Like most new skills there are moments of happiness and moments of frustration, but practice makes perfect.
On to the update!
First thing I did was to fill in all the mounting holes for the parts I planned to use PE instead of the kit parts. Next I added the ledge/skirt attachment brackets to the side of the tank. This is the soldered version. Then I assembled the kit tool holder and the cleaning rod tube assembly. I decided after I had the tube assembled that I really should have used the photo etch for the handles on the end covers. So I removed the molded on chunk of plastic, assembled the etch, including the retention chains, and then mounted all the plastic to the hull. Here is the tube as supplied by Dragon:

And after I enhanced it. Sorry, forgot to take a picture before I mounted it on the hull. Both sides got the new handle and retention chain.

Next up was the spare track holder. I used the PE assembly from my aftermarket kit here as well. I chose to solder the assembly freehand, and I ended up with a pretty roughed up assembly. This assembly was a little frustrating and I almost tossed in the soldering iron! Oh well, practice practice practice I suppose. Here is the trach holder installed.

And here is a shot of the left side with everything installed.

Once I had this completed I worked on the front fender. This is the PE version from the Alliance Modelworks set. I soldered the seams and all the parts together and then mounted it on the front of the tank. The instructions in the PE set where not very clear on how to mount the fender, but you basically have to make a Z shaped bend out of the mounting piece. It took some effort, but I eventually got it all set. The kit headlight mounts to the fender.

I noticed today that the head lamp is actually crooked to the base. I’ll need to align that a little bit better.
That’s where I am today. I was hoping to have a primer coat on this beast this weekend, but obviously I didn’t get there. Better to not rush it though.
See you all soon!
Thanks for watching
Mike
All of my progress this time is on the left side of the vehicle. Its been a little slow going as I continue to solder the photo etch. Like most new skills there are moments of happiness and moments of frustration, but practice makes perfect.
On to the update!
First thing I did was to fill in all the mounting holes for the parts I planned to use PE instead of the kit parts. Next I added the ledge/skirt attachment brackets to the side of the tank. This is the soldered version. Then I assembled the kit tool holder and the cleaning rod tube assembly. I decided after I had the tube assembled that I really should have used the photo etch for the handles on the end covers. So I removed the molded on chunk of plastic, assembled the etch, including the retention chains, and then mounted all the plastic to the hull. Here is the tube as supplied by Dragon:
And after I enhanced it. Sorry, forgot to take a picture before I mounted it on the hull. Both sides got the new handle and retention chain.
Next up was the spare track holder. I used the PE assembly from my aftermarket kit here as well. I chose to solder the assembly freehand, and I ended up with a pretty roughed up assembly. This assembly was a little frustrating and I almost tossed in the soldering iron! Oh well, practice practice practice I suppose. Here is the trach holder installed.
And here is a shot of the left side with everything installed.
Once I had this completed I worked on the front fender. This is the PE version from the Alliance Modelworks set. I soldered the seams and all the parts together and then mounted it on the front of the tank. The instructions in the PE set where not very clear on how to mount the fender, but you basically have to make a Z shaped bend out of the mounting piece. It took some effort, but I eventually got it all set. The kit headlight mounts to the fender.
I noticed today that the head lamp is actually crooked to the base.
I’ll need to align that a little bit better.That’s where I am today. I was hoping to have a primer coat on this beast this weekend, but obviously I didn’t get there. Better to not rush it though.
See you all soon!
Thanks for watching
Mike