
-
Modelers Alliance has updated the forum software on our website. We have migrated all post, content and user accounts but we could not migrate the passwords.
This requires that you manually reset your password.
Please click here, http://modelersalliance.org/forums/login to go to logon page and use the "Forgot your Password" option.
You are using an out of date browser. It may not display this or other websites correctly.
You should upgrade or use an alternative browser.
You should upgrade or use an alternative browser.
Maddog Manufacturing 2023 Grand Re-Opening
- Thread starter Duke Maddog
- Start date
Duke Maddog
Well-known member
Thank you Martin! Yeah, this is Maddog Manufacturing at it's finest!
James, thank you! I wish I could be even more productive than I am now. I've been wanting to finish some of these for a while.
James, thank you! I wish I could be even more productive than I am now. I've been wanting to finish some of these for a while.
Duke Maddog
Well-known member
My apologies; I have been gone for awhile, but now I have time to actually start a new tour of Maddog Manufacturing. This will be a rather short tour, as I've had a lot going on and not as much time to work on anything much except when I got to Hobby Days. Even then, Hobby Day production was down.
Anyway, without further ado, let's board the trams and get this tour started!
Once again, we start in the Hangar.
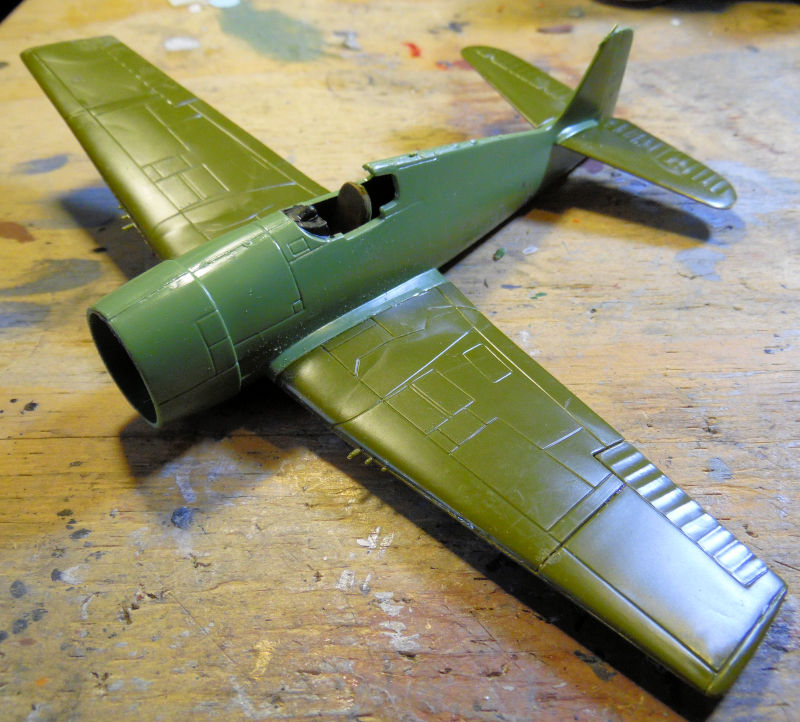
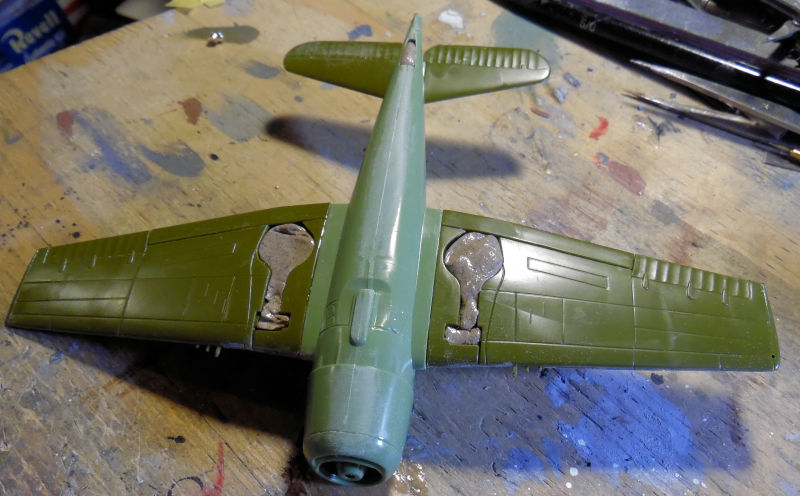
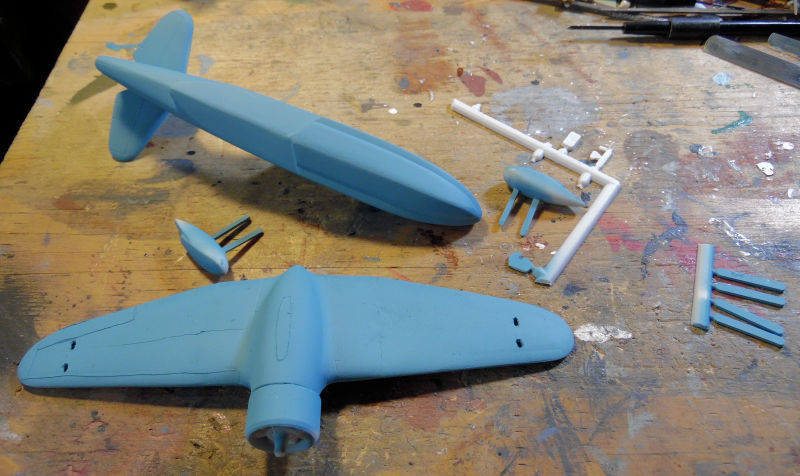
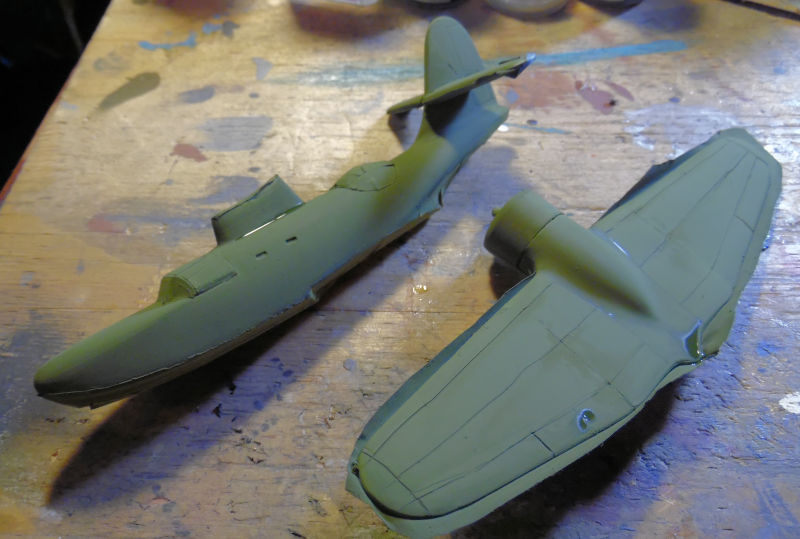
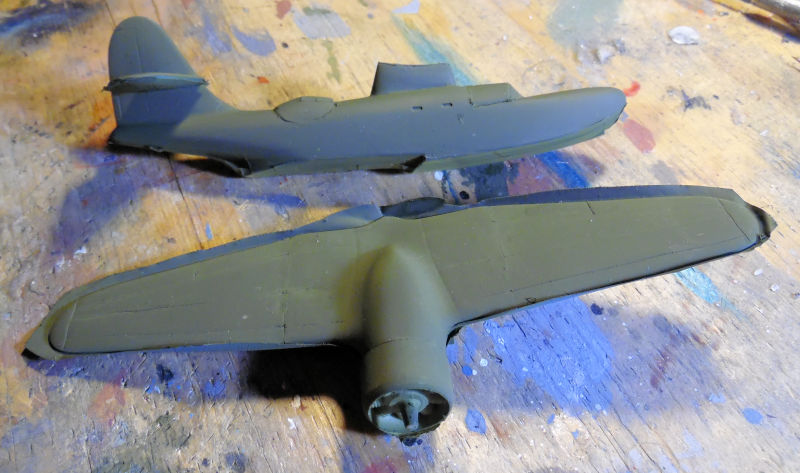
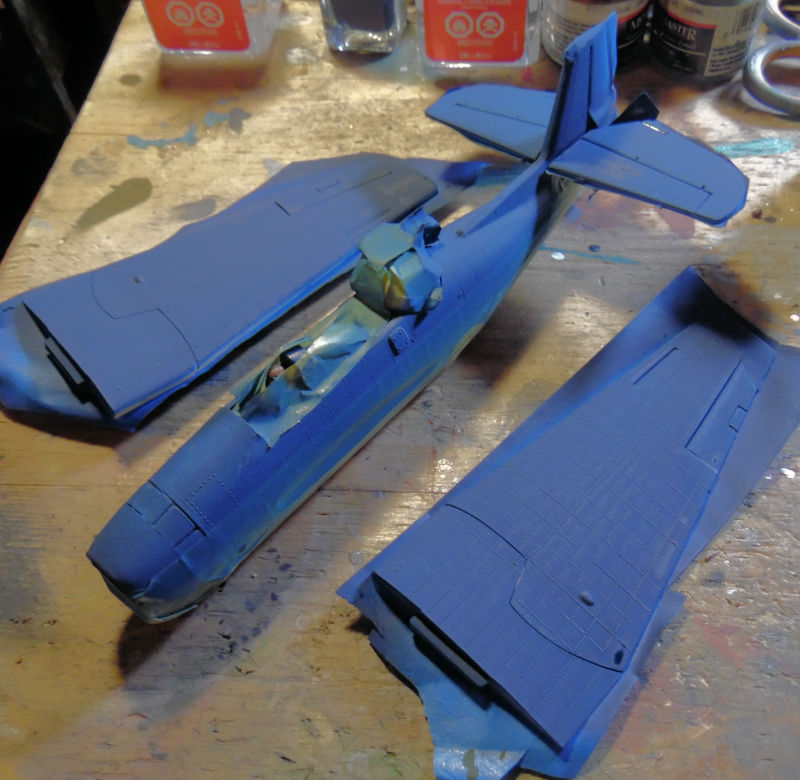
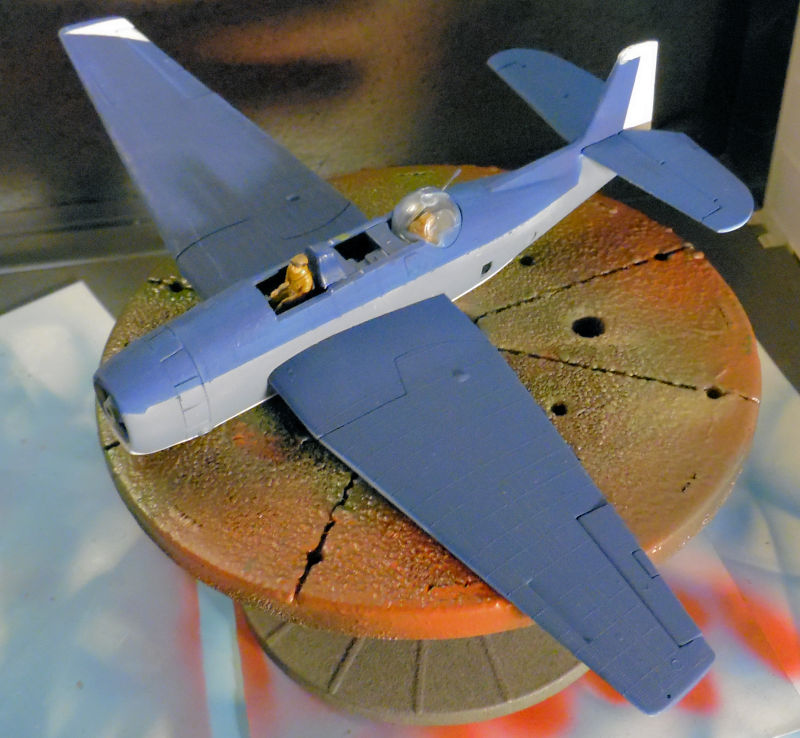
Not much to show, but we did get started on two models that two friends purchased for me at the latest Distressed Kit Auction back in June. These were the Matchbox F-6F Hellcat built up to this point:
Next was an ancient Airfix Avenger as part of that deal. We got it this far:
Again, short tour, that's all there is in the Hangar. Now to check out the work in the Shipyards....
Over here in the shipyards, only a small amount of work has been done on a couple of the small boats. First, the Vosper's Perkasa boat hull was masked for painting the lower hull:
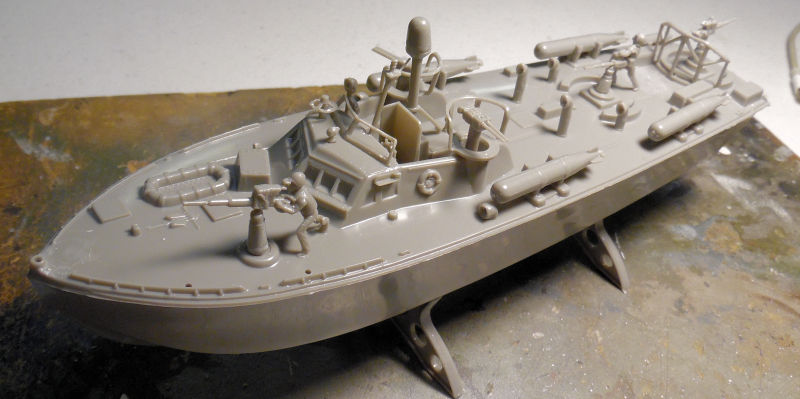
Next, we got all the greeblies added to the front and second decks of the Japanese PT-15 torpedo boat:
First the front deck:
The extra holes are for the railings that will be going on last. And now a shot of this with the first two forward decks cemented in and the rear deck just dry fit in place:
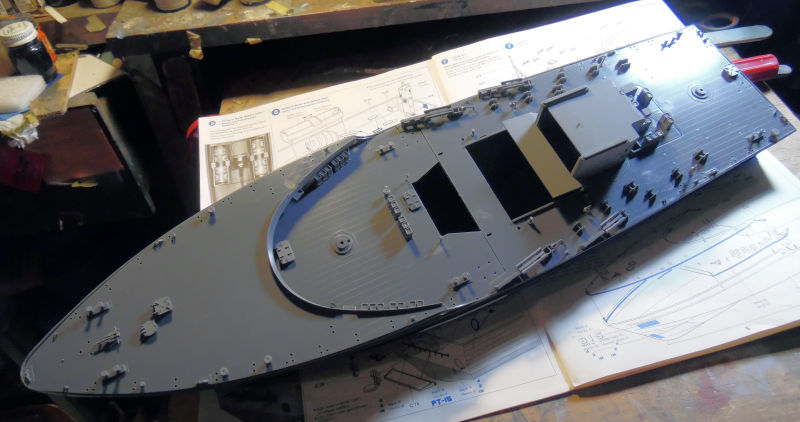
This is almost all ready for paint at this point. The decks and greeblies and deck houses all have the same Neutral grey color.
Moving on to the Motor Pool, there's been a little more done than in the previous departments, starting with a couple French vehicles that are based on the AMX-13 chassis.
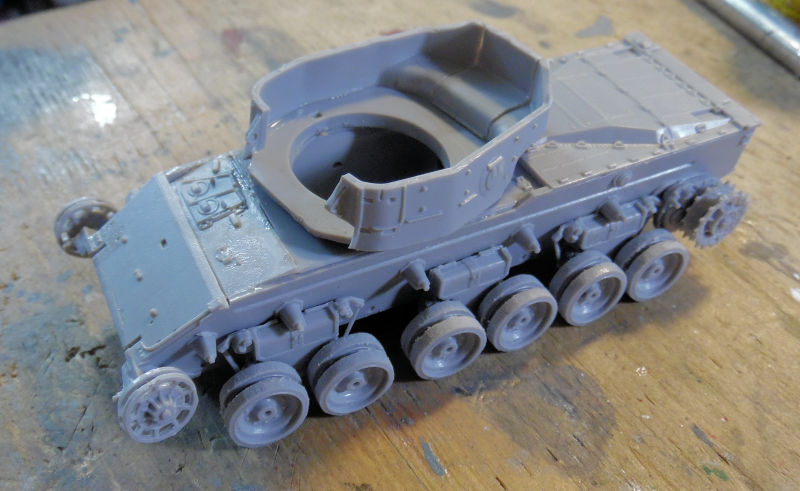
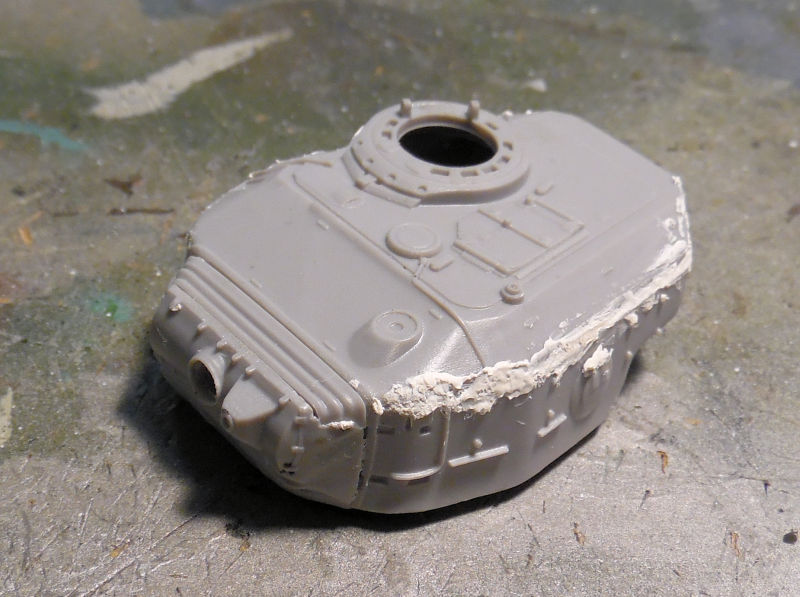
First is the AMX-61 102mm self propelled gun. We got it all assembled to this point and then promptly lost the gun mount assembly seen in the lower right of the picture:
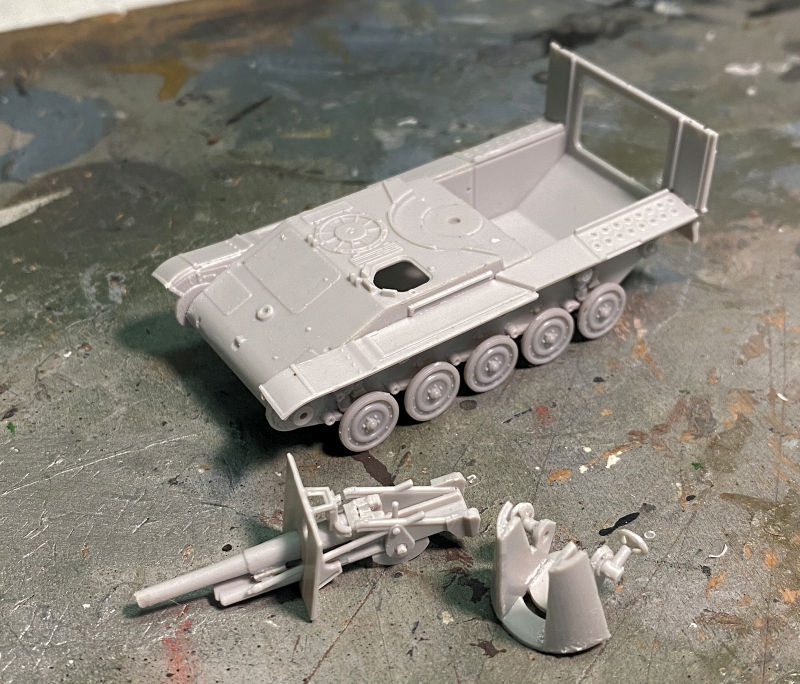
Looks like that won't be done for awhile until that sub assembly shows up again, or a new kit is purchased. Story of my life, especially recently...
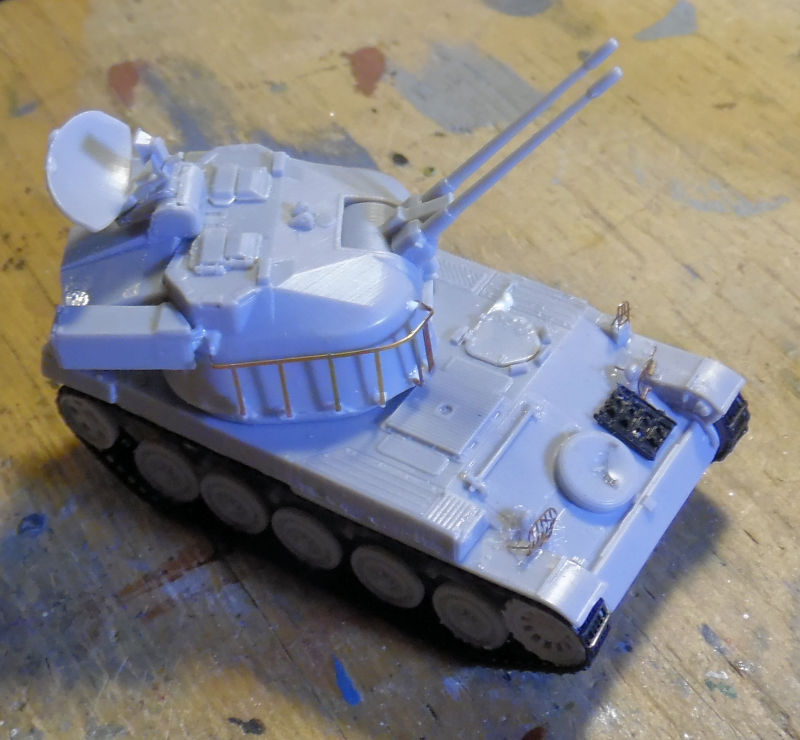
The other French vehicle is the DCA. We first got all the main roadwheels on it:
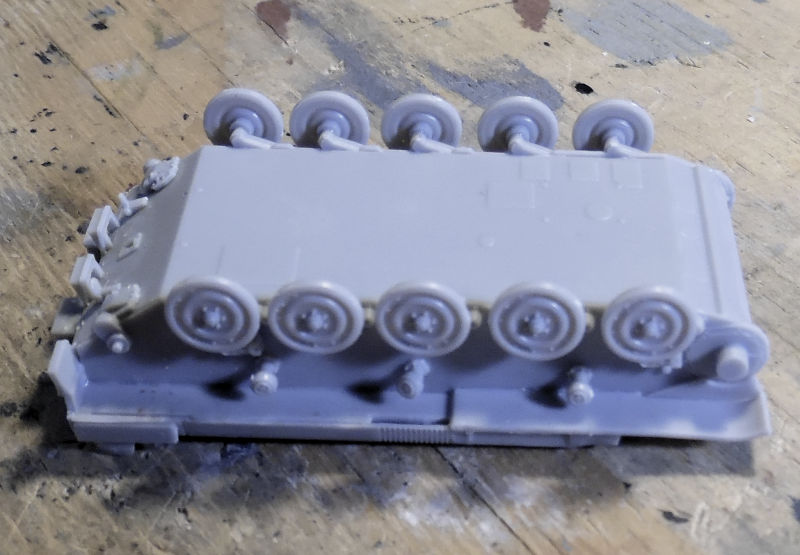
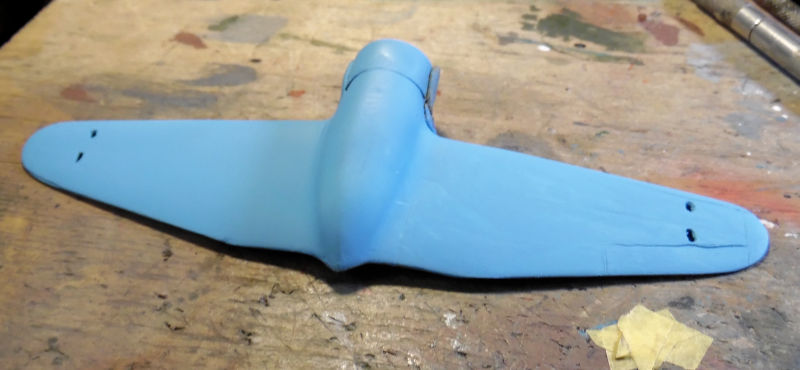
By the way, the plastic is not that blue....
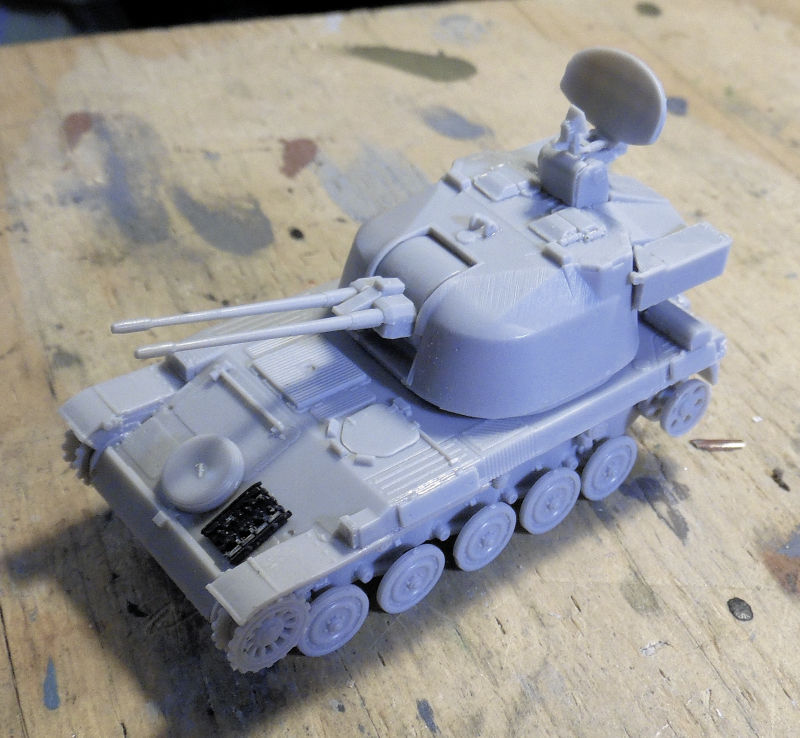
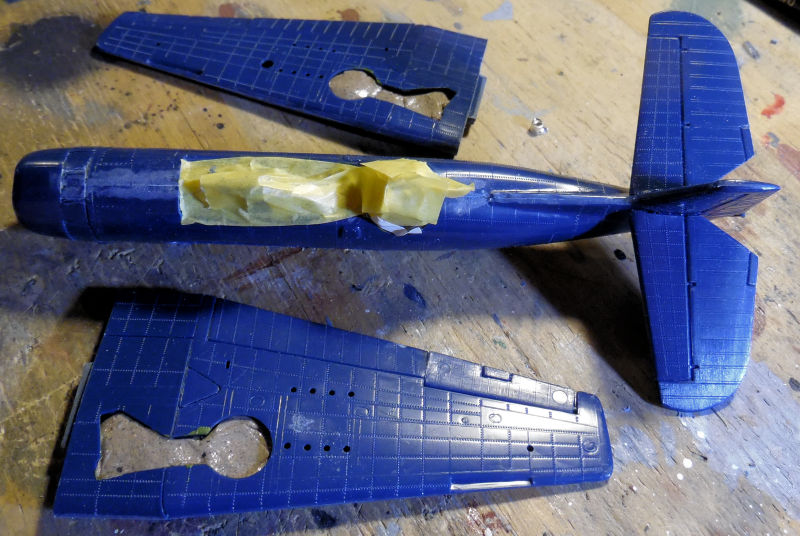
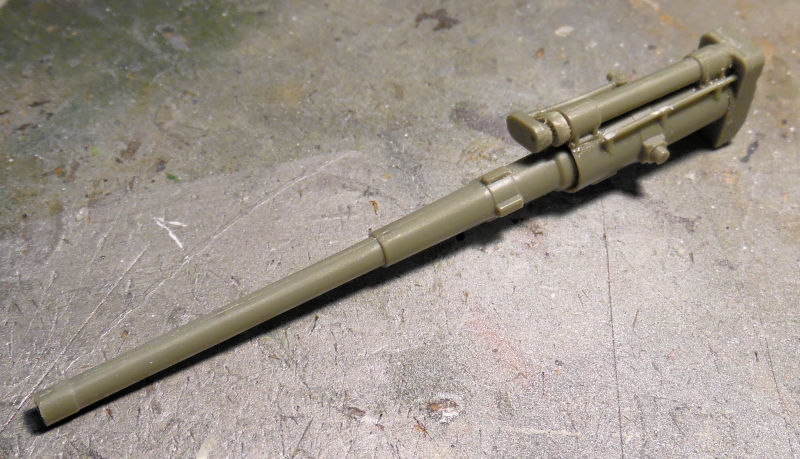
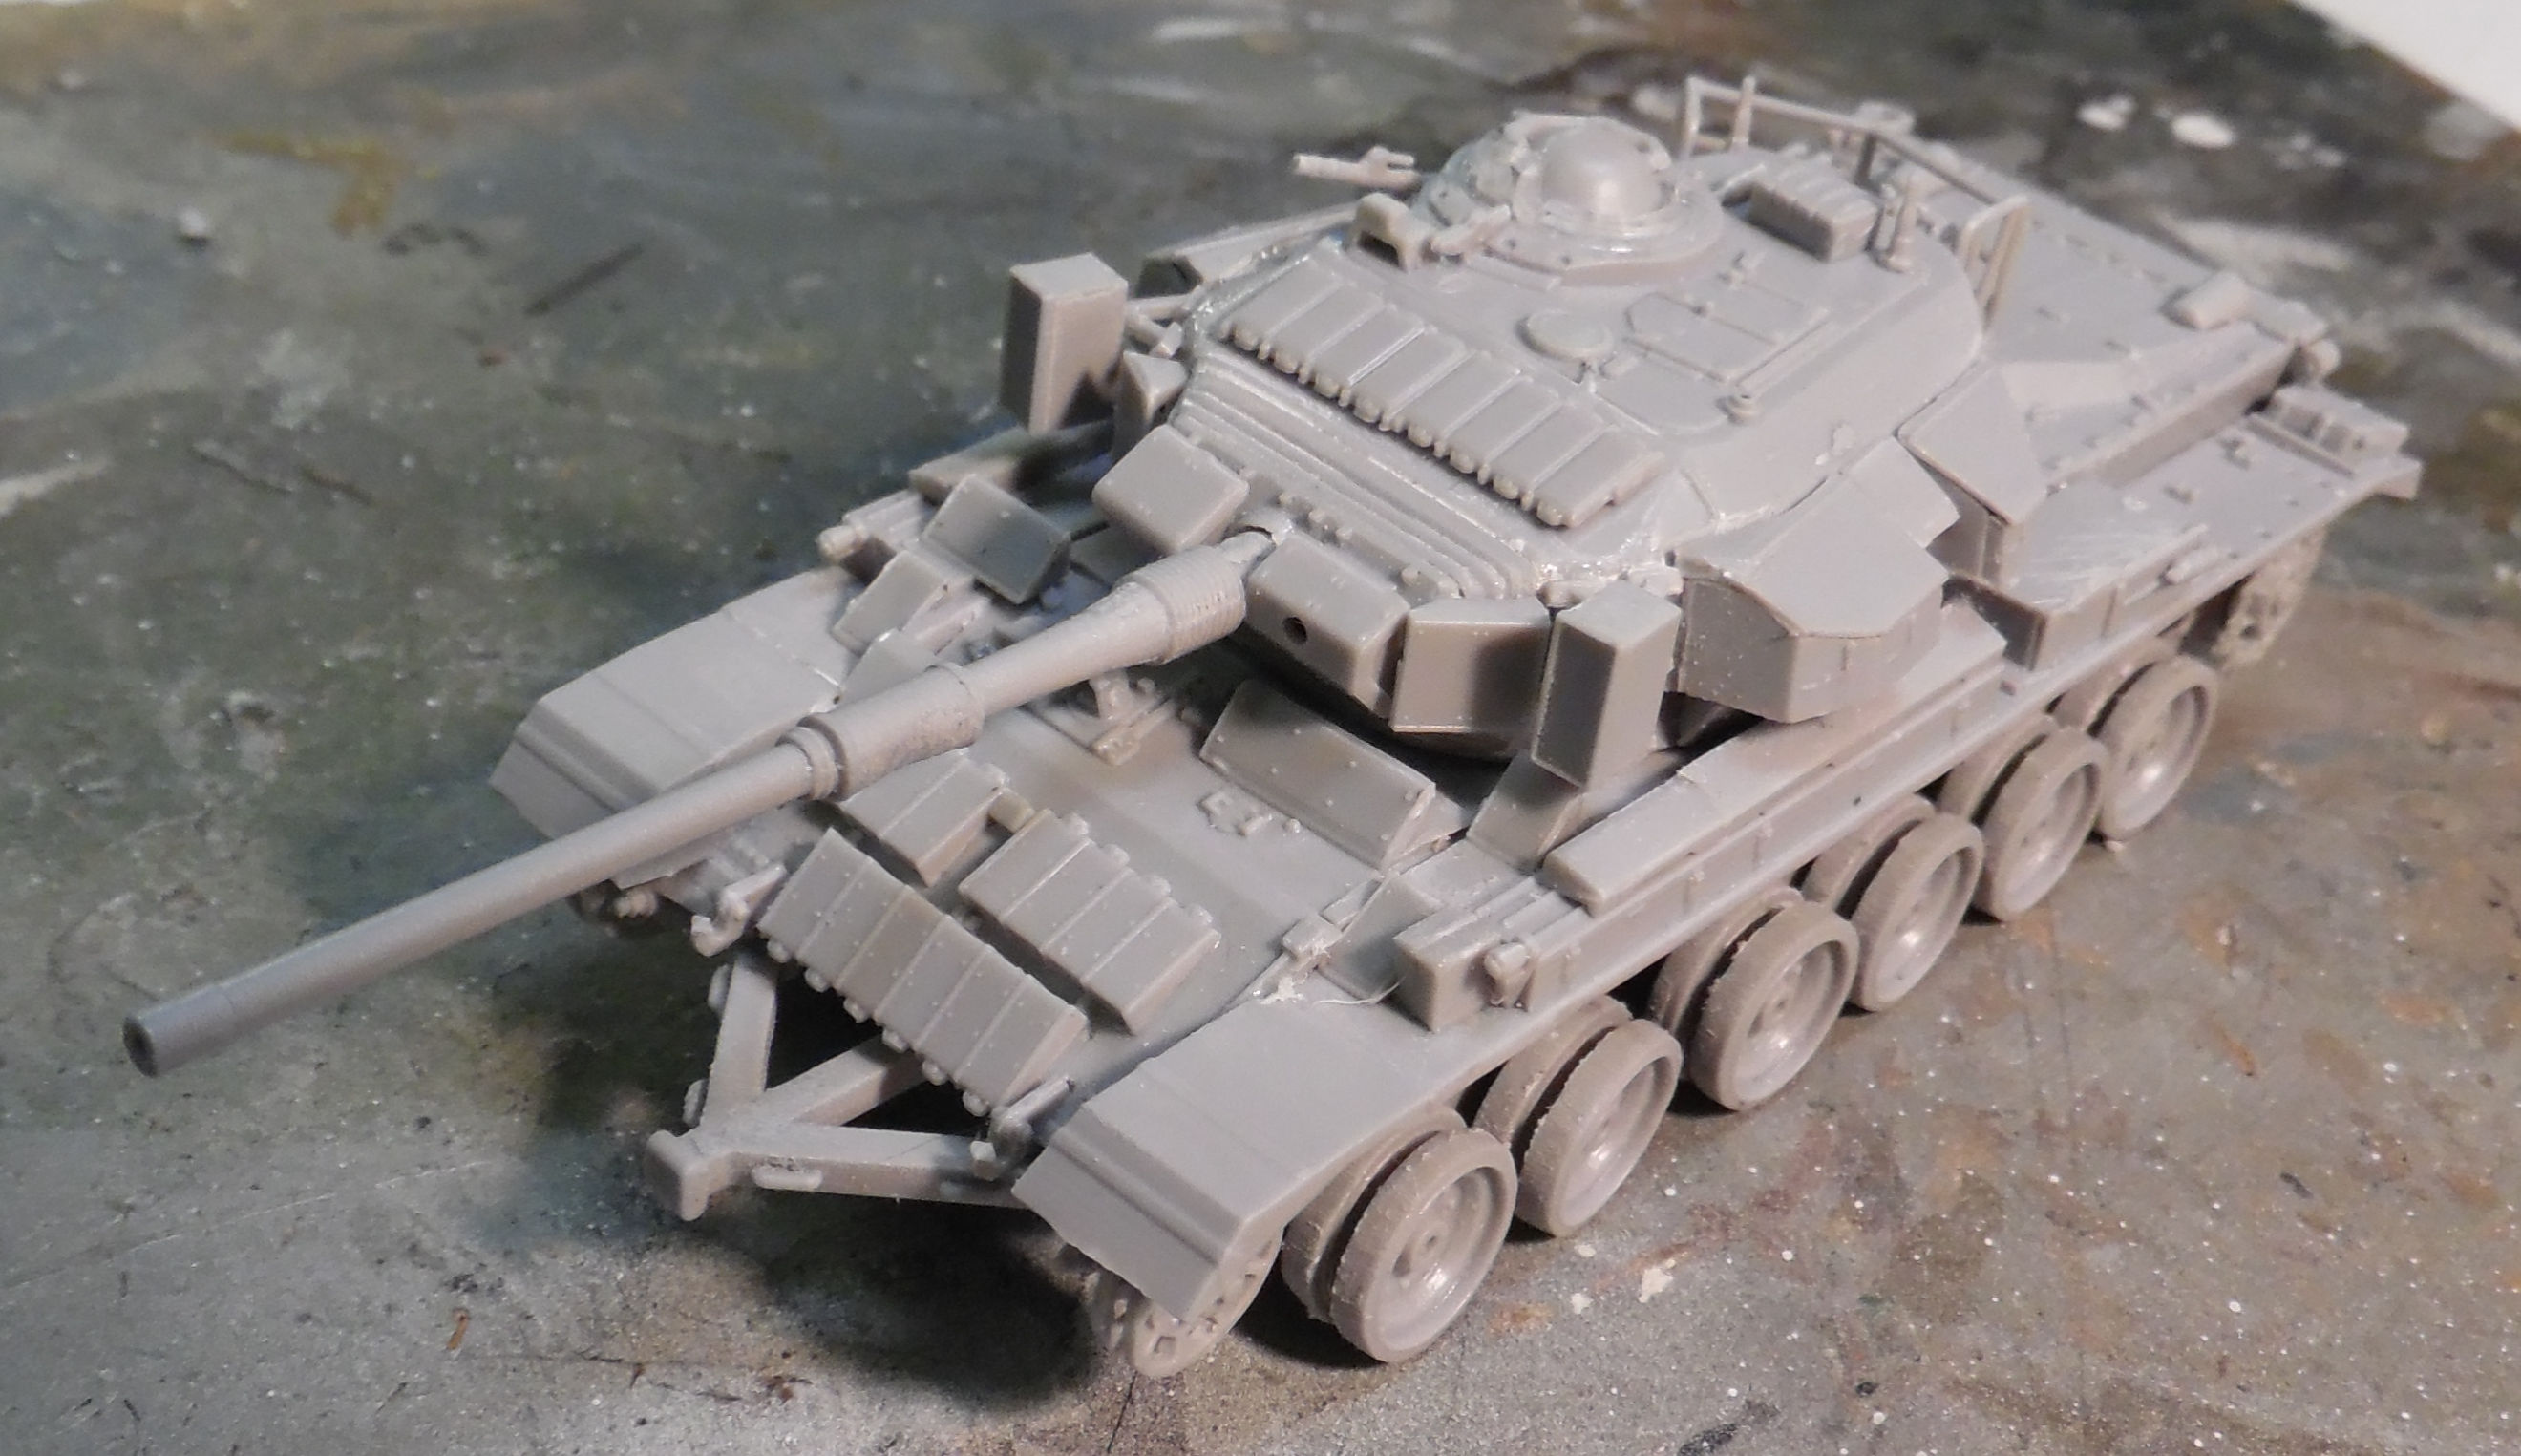
Later we assembled the radar set in parts as we tried figuring out how it was supposed to look. The instructions show it facing aft and I wanted mine to be facing forward:
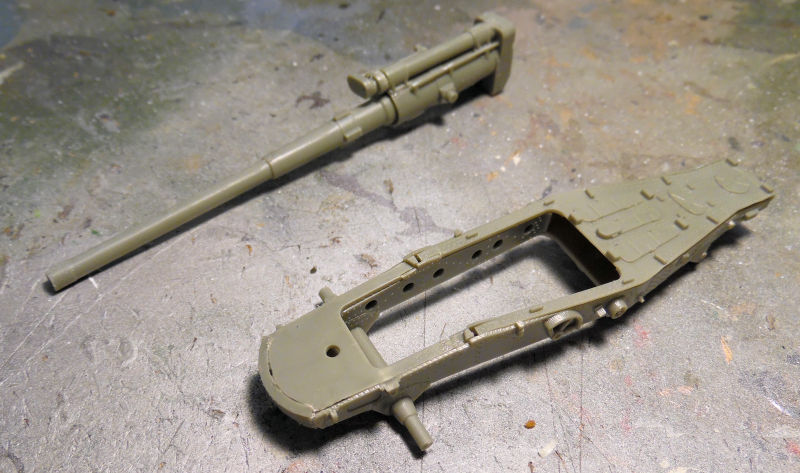
You can see above that while sub assemblies for the radar set were drying, additional parts were added to the turret. Later we got things figured out and assembled, as well as most of the remaining detail parts that won't break off during painting and handling:
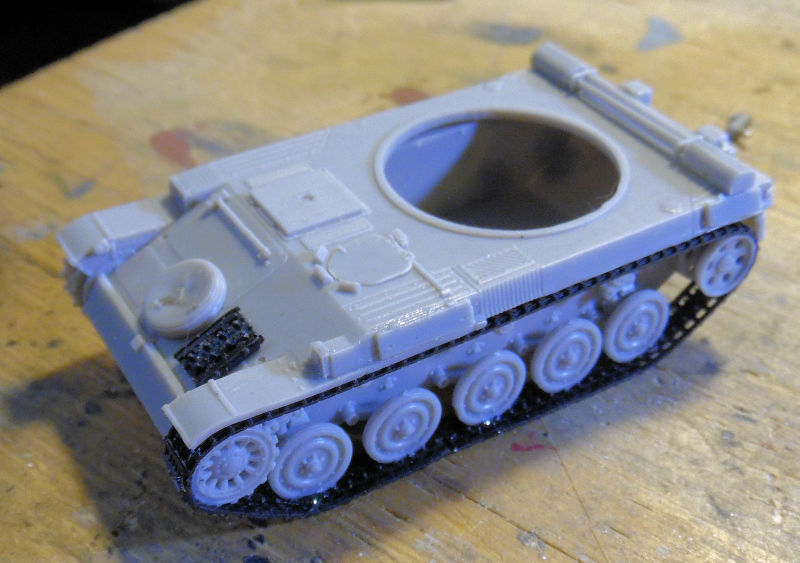
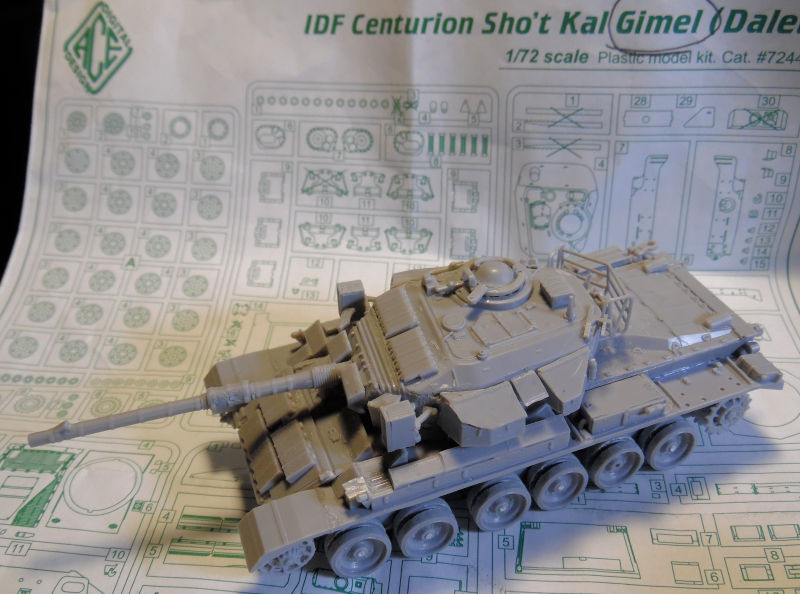
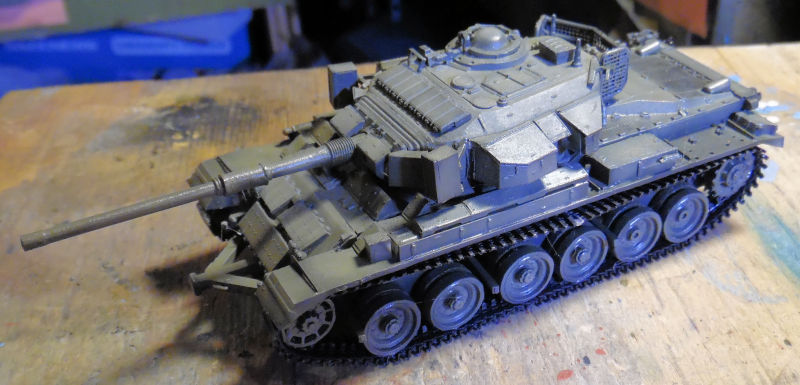
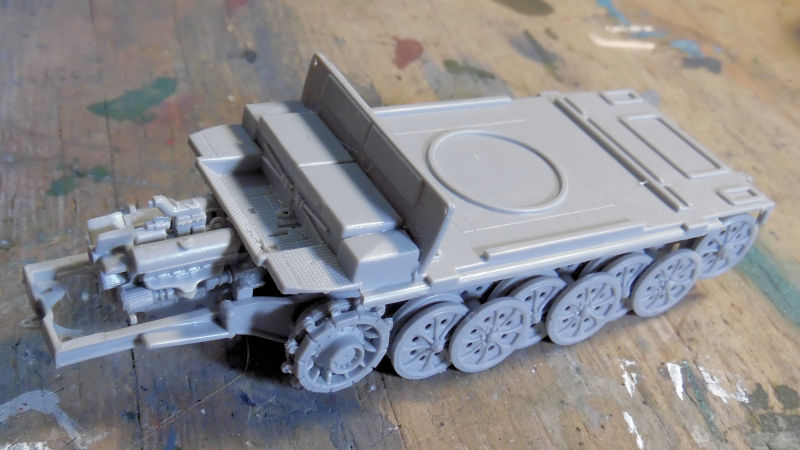
Finally, the lower hull for the Israeli Shot Kal Gimmel was assembled:
We also had gotten the same assembly done for the Shot Kal Dalet but since it looks the same, no need for a pic.
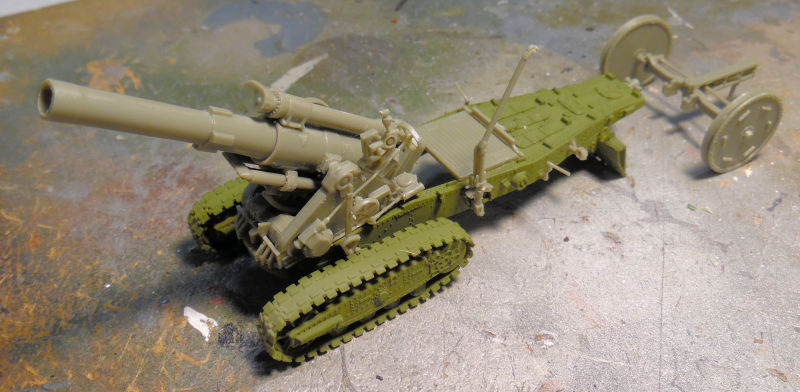
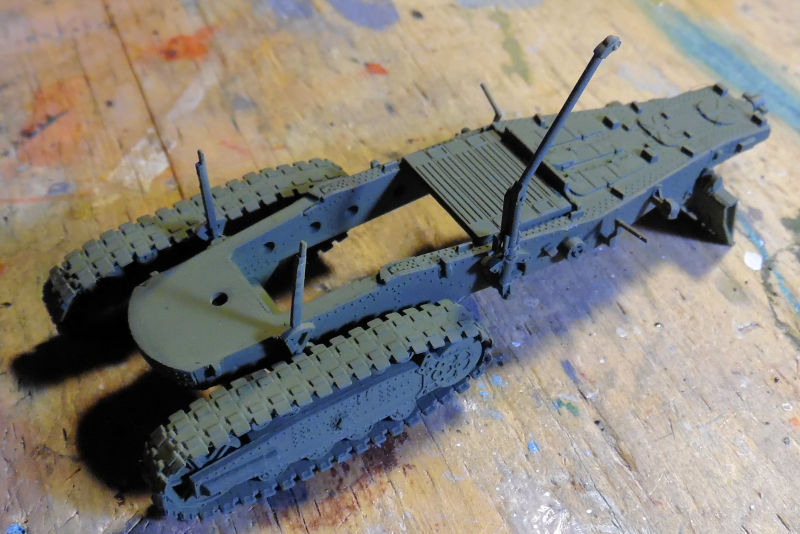
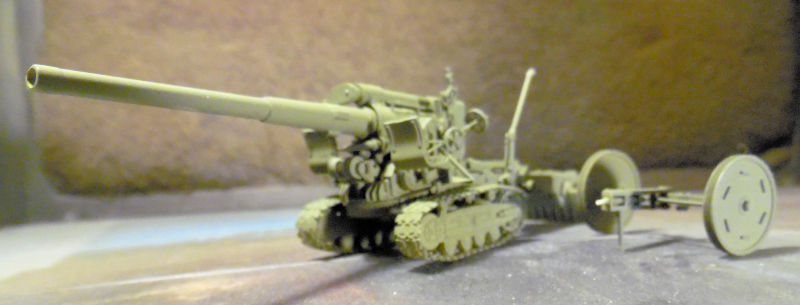
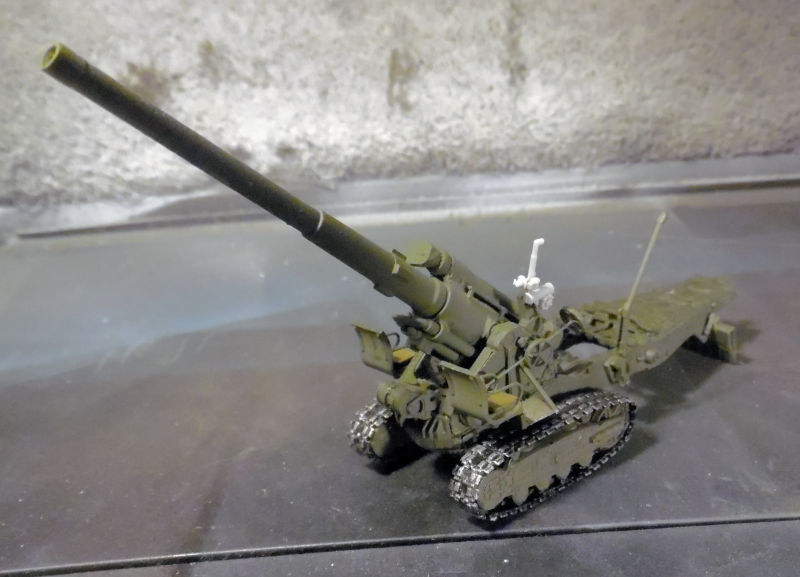
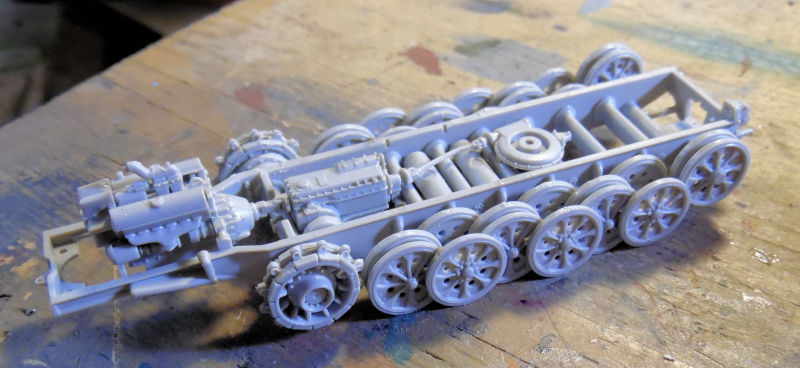
Additional progress was made on the Russian 240 mm tracked artillery piece; the tracks were added to the bogie assemblies:
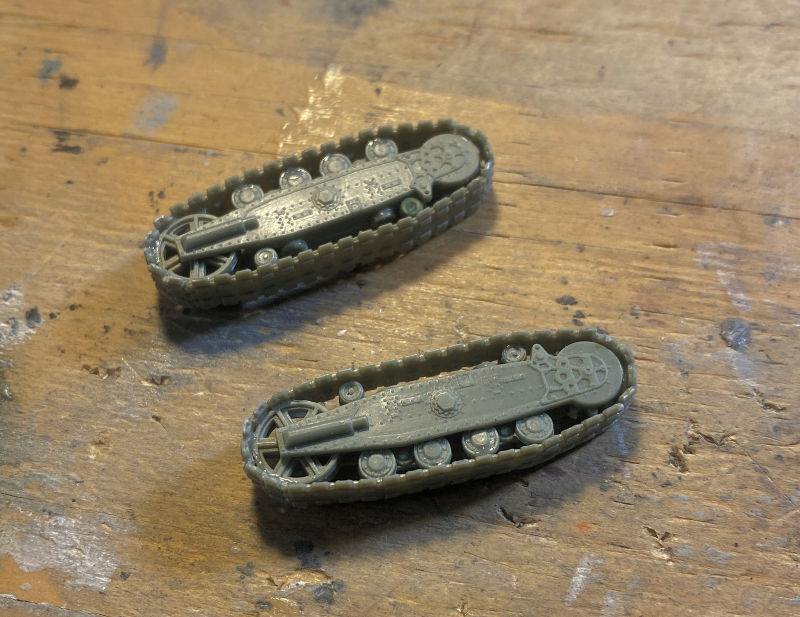
Later on, all the sub assemblies were put together to see what adjustments would be needed:
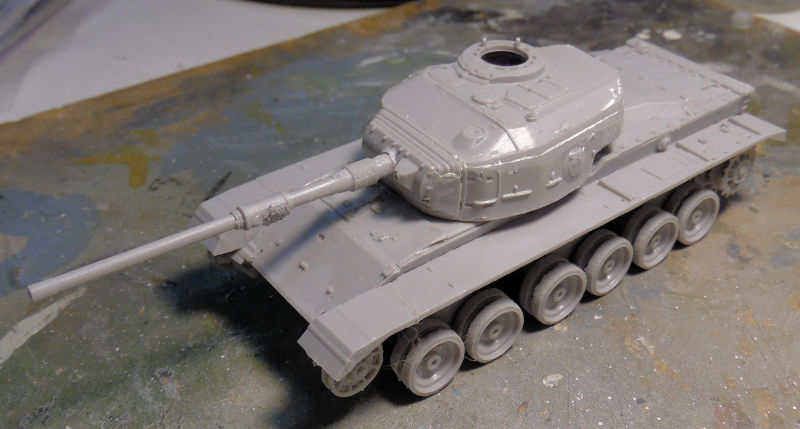
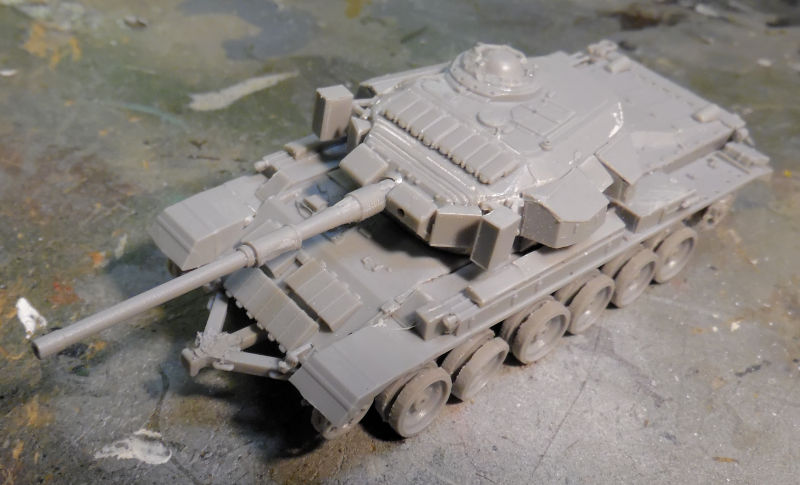
Last but not least, we got almost all the assembly done on the South African Eland-90. The only problem now is that the main gun has gone missing so until we get another, or find the sprue that has it; this one will sit unfinished for awhile:
Finally, in our semi-rarely used spare workshop, we have a couple little projects happening.
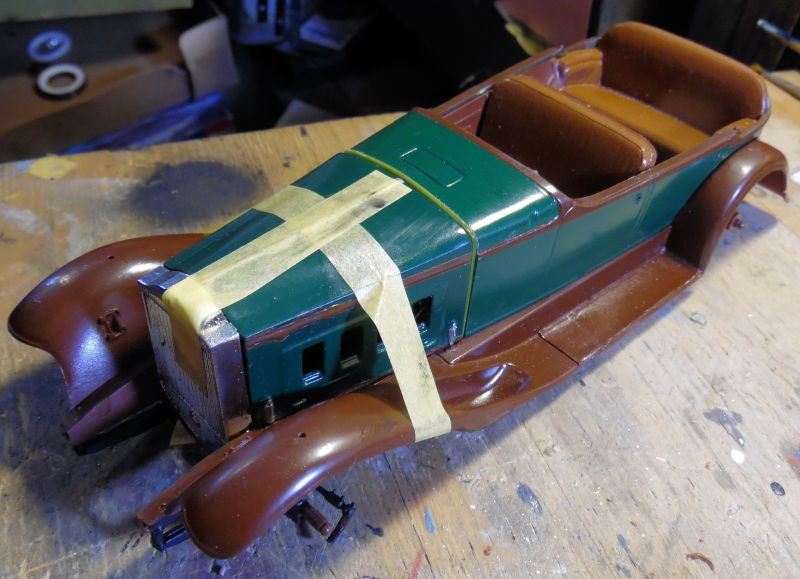
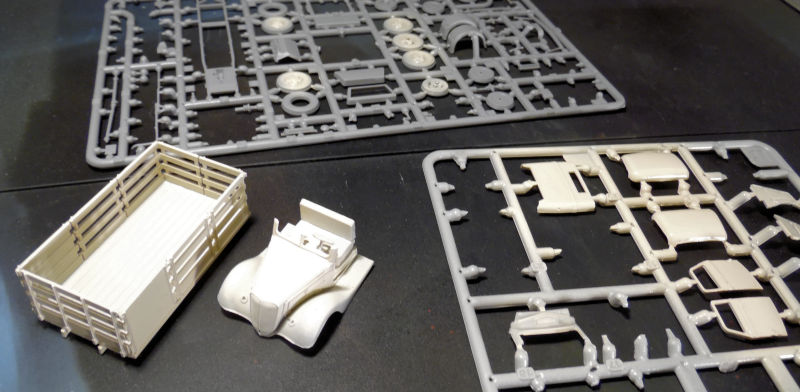
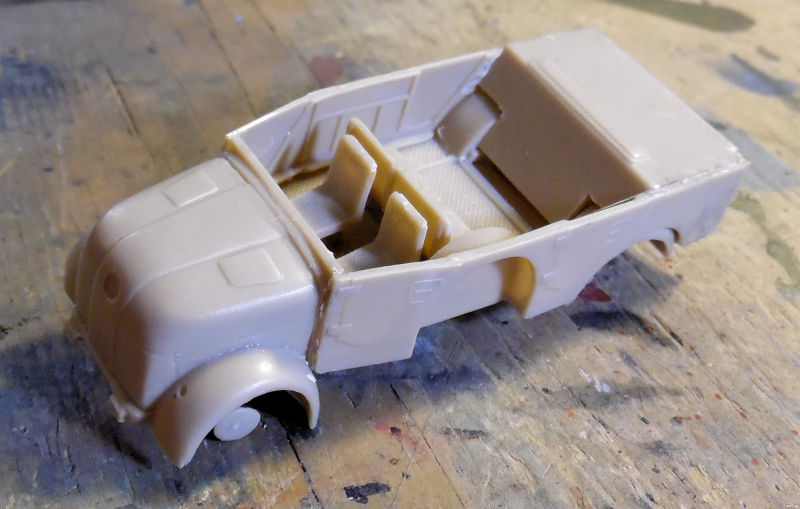
First off, the chassis to the 1/24 scale Packard was glued inside the fenders since anytime we tried adding additional chassis parts, the whole chassis kept breaking apart:
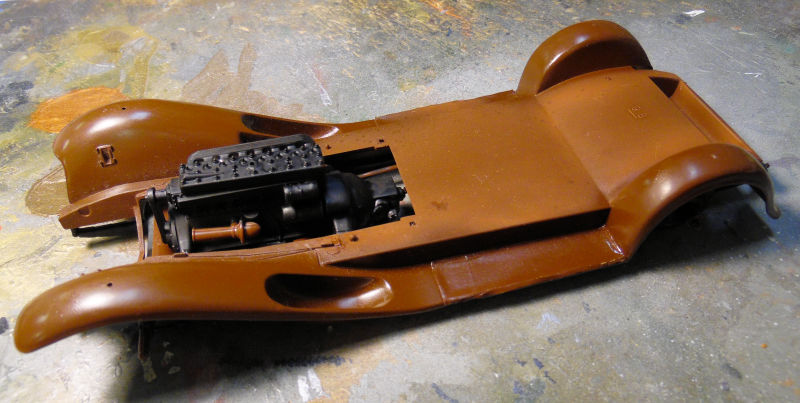
Hopefully, this will stay glued; this plastic is so brittle it barely holds together!
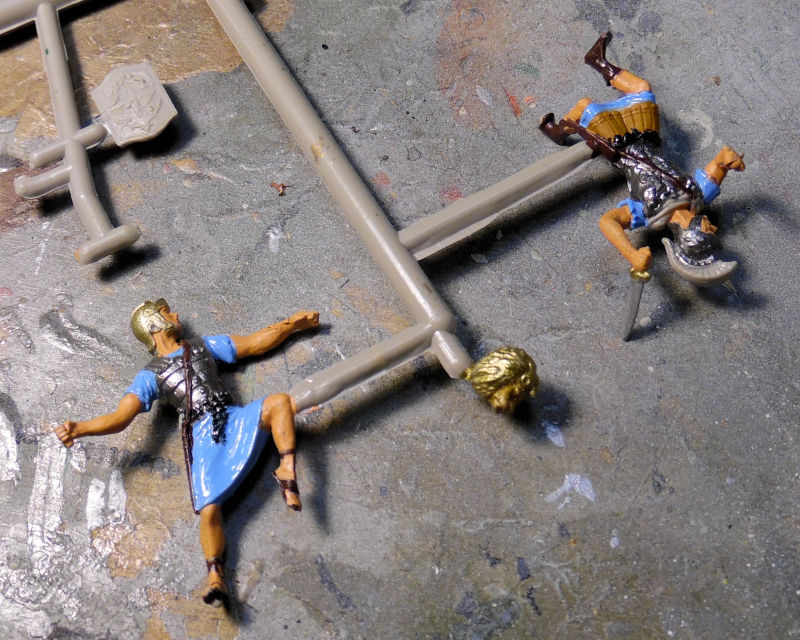
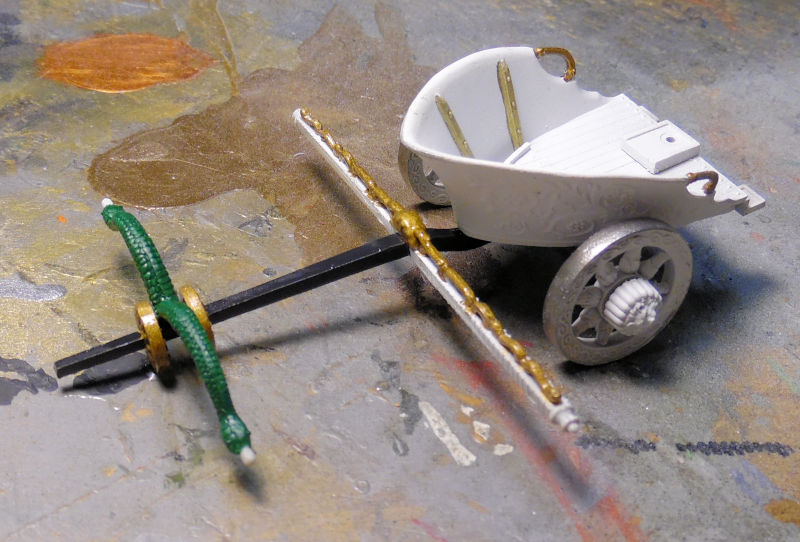
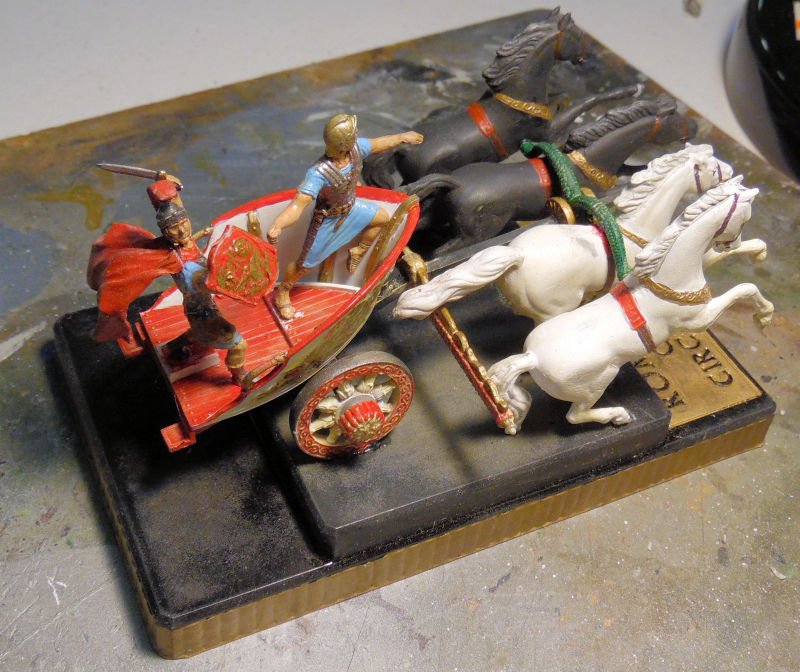
Finally, for fun, we've been working on the ancient UPC model of a Roman Racing Chariot. No scale is given, but based on the size of the guys, it is probably somewhere between 1/50-1/56 scale; possibly 1/48 at a stretch. First, the Roman crew was painted up with the colors available at the time:
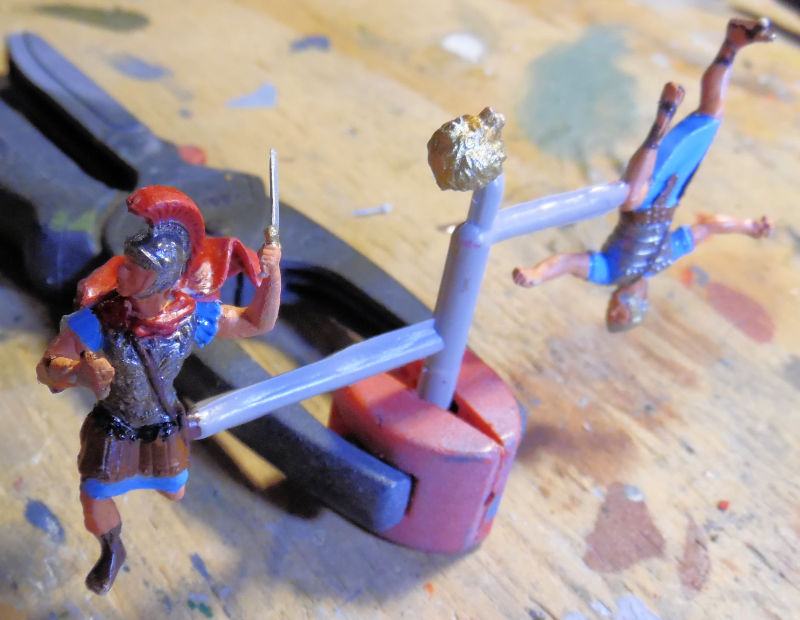
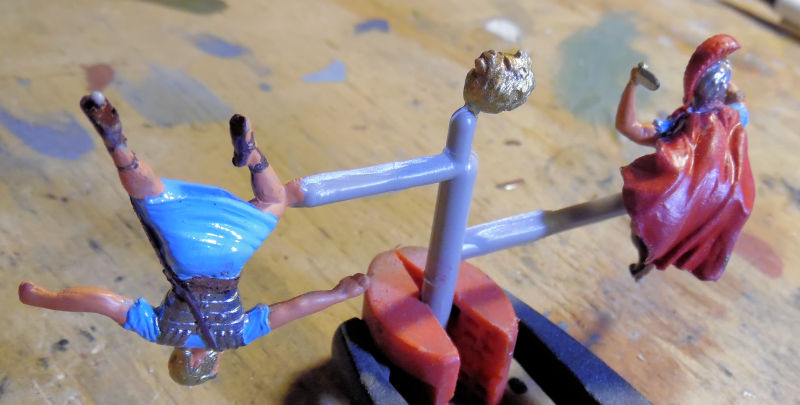
Later, they were completely painted, waiting on washes and drybrushing:
Two of the horses were done next; the other two will be black stallions. The two whites will need a bit of touch up:

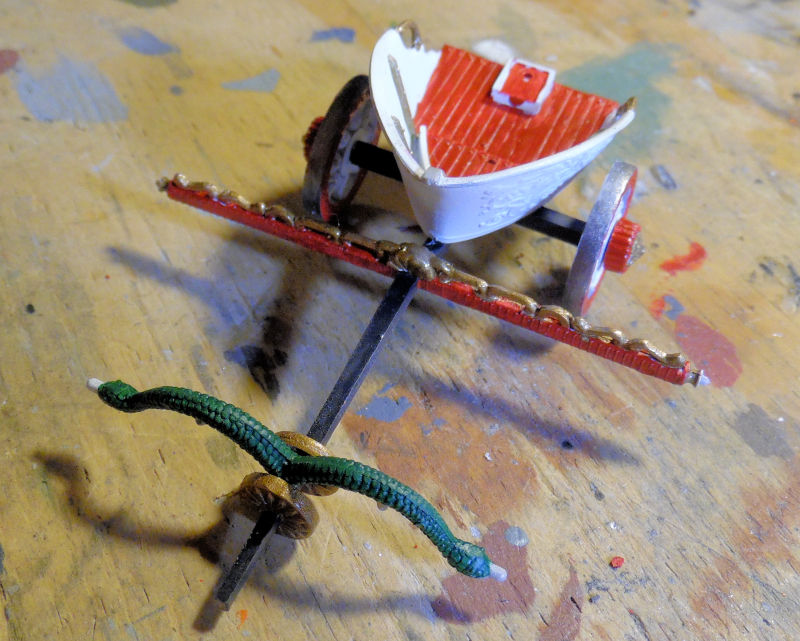
Finally, the chariot itself was built up and then painted. It said to make the chariot black but I decided we were going to paint it white:
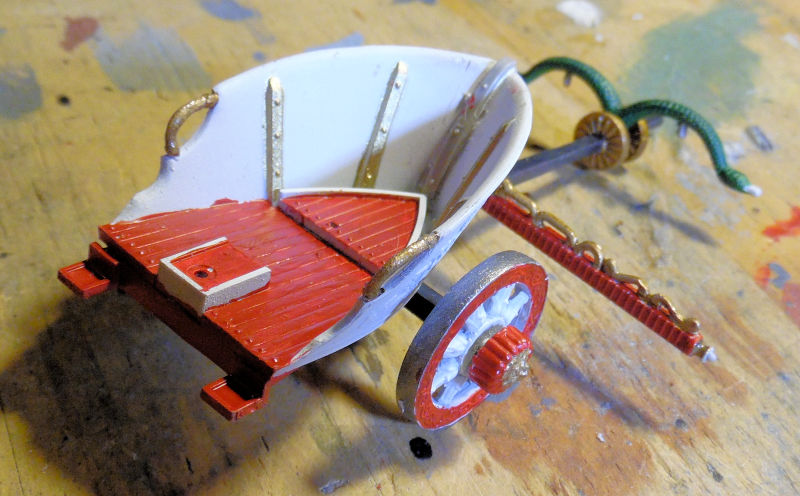
You can see some of the other details were painted as well. Later all the painting was done; all that's needed are some touch ups and then the decals can go on:
And that concludes this latest tour of Maddog Manufacturing, I hope you enjoyed it. As always, comments are welcome.
Anyway, without further ado, let's board the trams and get this tour started!
Once again, we start in the Hangar.
Not much to show, but we did get started on two models that two friends purchased for me at the latest Distressed Kit Auction back in June. These were the Matchbox F-6F Hellcat built up to this point:
Next was an ancient Airfix Avenger as part of that deal. We got it this far:
Again, short tour, that's all there is in the Hangar. Now to check out the work in the Shipyards....
Over here in the shipyards, only a small amount of work has been done on a couple of the small boats. First, the Vosper's Perkasa boat hull was masked for painting the lower hull:
Next, we got all the greeblies added to the front and second decks of the Japanese PT-15 torpedo boat:
First the front deck:
The extra holes are for the railings that will be going on last. And now a shot of this with the first two forward decks cemented in and the rear deck just dry fit in place:
This is almost all ready for paint at this point. The decks and greeblies and deck houses all have the same Neutral grey color.
Moving on to the Motor Pool, there's been a little more done than in the previous departments, starting with a couple French vehicles that are based on the AMX-13 chassis.
First is the AMX-61 102mm self propelled gun. We got it all assembled to this point and then promptly lost the gun mount assembly seen in the lower right of the picture:
Looks like that won't be done for awhile until that sub assembly shows up again, or a new kit is purchased. Story of my life, especially recently...
The other French vehicle is the DCA. We first got all the main roadwheels on it:
By the way, the plastic is not that blue....
Later we assembled the radar set in parts as we tried figuring out how it was supposed to look. The instructions show it facing aft and I wanted mine to be facing forward:
You can see above that while sub assemblies for the radar set were drying, additional parts were added to the turret. Later we got things figured out and assembled, as well as most of the remaining detail parts that won't break off during painting and handling:
Finally, the lower hull for the Israeli Shot Kal Gimmel was assembled:
We also had gotten the same assembly done for the Shot Kal Dalet but since it looks the same, no need for a pic.
Additional progress was made on the Russian 240 mm tracked artillery piece; the tracks were added to the bogie assemblies:
Later on, all the sub assemblies were put together to see what adjustments would be needed:
Last but not least, we got almost all the assembly done on the South African Eland-90. The only problem now is that the main gun has gone missing so until we get another, or find the sprue that has it; this one will sit unfinished for awhile:
Finally, in our semi-rarely used spare workshop, we have a couple little projects happening.
First off, the chassis to the 1/24 scale Packard was glued inside the fenders since anytime we tried adding additional chassis parts, the whole chassis kept breaking apart:
Hopefully, this will stay glued; this plastic is so brittle it barely holds together!
Finally, for fun, we've been working on the ancient UPC model of a Roman Racing Chariot. No scale is given, but based on the size of the guys, it is probably somewhere between 1/50-1/56 scale; possibly 1/48 at a stretch. First, the Roman crew was painted up with the colors available at the time:
Later, they were completely painted, waiting on washes and drybrushing:
Two of the horses were done next; the other two will be black stallions. The two whites will need a bit of touch up:
Finally, the chariot itself was built up and then painted. It said to make the chariot black but I decided we were going to paint it white:
You can see some of the other details were painted as well. Later all the painting was done; all that's needed are some touch ups and then the decals can go on:
And that concludes this latest tour of Maddog Manufacturing, I hope you enjoyed it. As always, comments are welcome.
Hope you're ok Mark. Glad to have ya back.
Duke Maddog
Well-known member
Thank you Bob! I can't say for sure that I'm okay, but at least my ability to build models hasn't been affected. Thank God for small favors!
Duke Maddog
Well-known member
Despite more issues happening, we managed to get more progress done. The next tour of Maddog Manufacturing is preparing to start. All aboard the trams for this next trip through Maddog Manufacturing. remember to keep hands and feet inside the trams at all times.
Once again, we'll start in the Hangar.
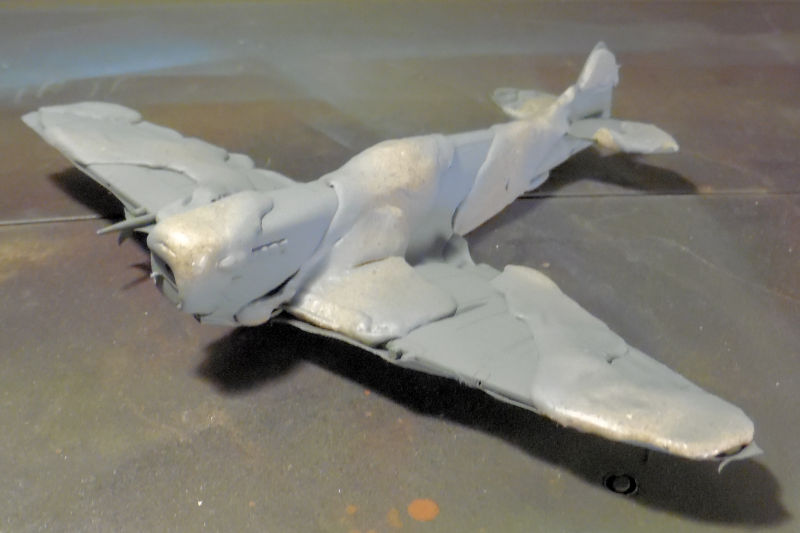
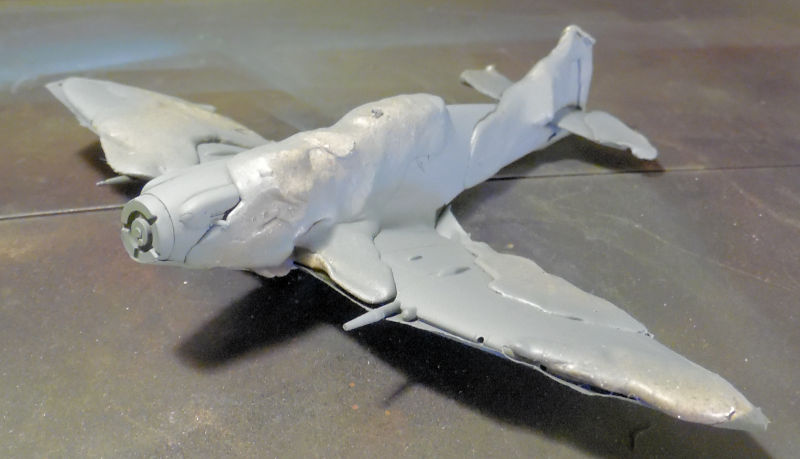
Some time before, knowing that the weather was going to improve, we masked off the various aircraft that we planned to paint. The Hellcat got Silly Putty in the cockpit and wheel wells:
The Avenger was masked off the same, with tape and Silly Putty:
With the weather more amenable to airbrushing a couple days later, some of these finally got their first paint.
The two Spitfires got their undercoat:
[IMGhttps://modelersalliance.org/galleries/wip-british-spitfire-mk-ix-a-jpg.129969/full[/IMG]
Followed by the Russian Il-2M3 Shtormovik:
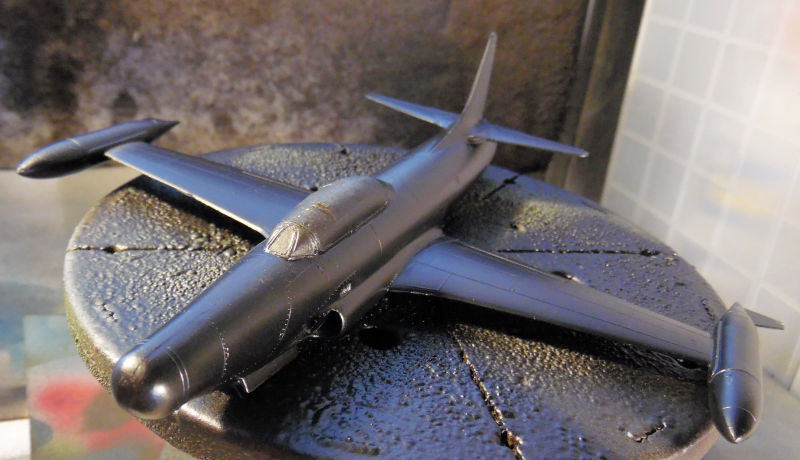
Then we shot the blue on the Russian Be-4 flying boat:
Followed by the white underneath the Avenger:

Once the paint dried sufficiently on the Avenger, more masking was applied for the second color:
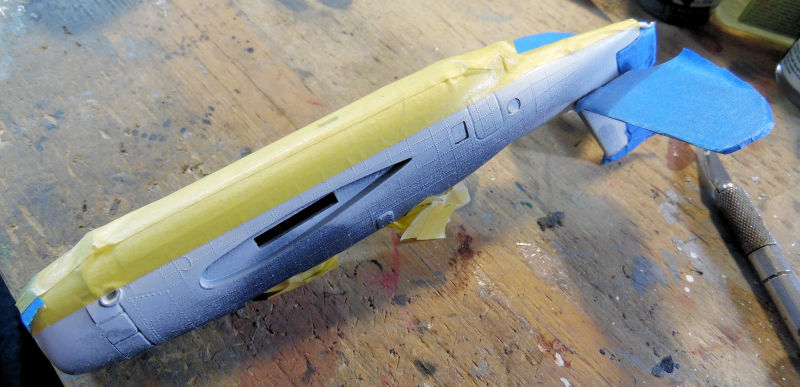
I masked the tail wrong; it was supposed to be an angled white section; I masked the entire moveable part. That's how it's gonna stay. The intermediate blue went on next:
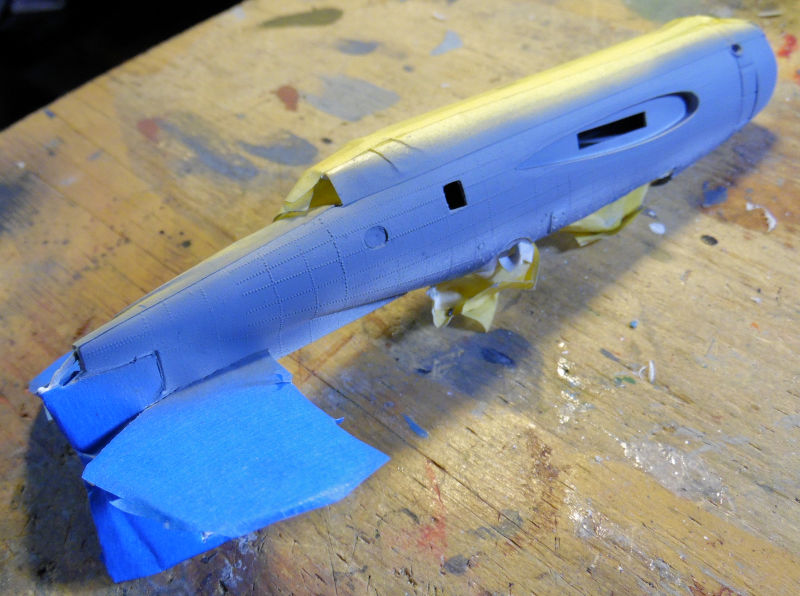
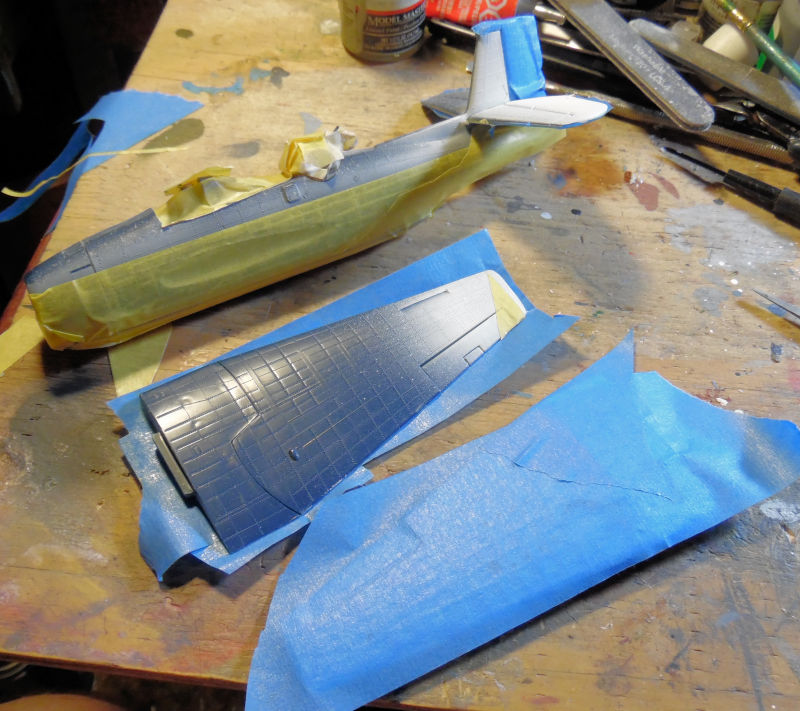
Finally, when the intermediate blue was dry, we masked off the blue for the final color which will hopefully go on later this weekend or next week:
That finishes the tour of the Hangar, now on to the Shipyards....
This next one was a kit I got in a Distressed Kit Auction; I had thought it was a 1/72 scale boat. So we got started on it, getting the hull and some major parts assembled:

That took all of five minutes. Another fifteen to twenty minutes later, it looked like this:
That's when I realized this is actually more like 1/96 scale, The crewmen and stubby torpedoes kinda gave it away. Oh well, it is all finished assembly and ready for paint so I will finish it and leave it on the shelf.
That's all that was done in the Shipyards, so on to the Motor Pool....
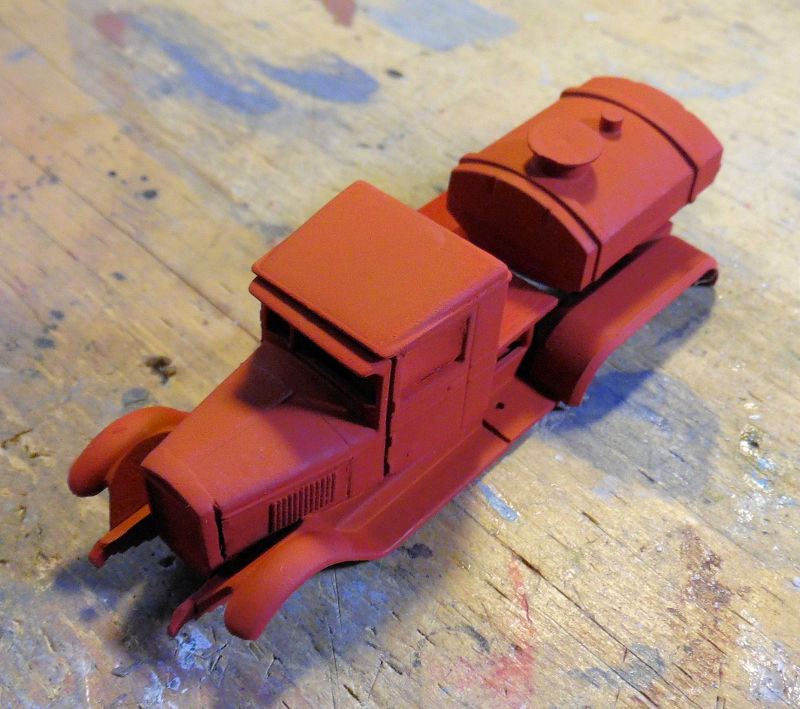
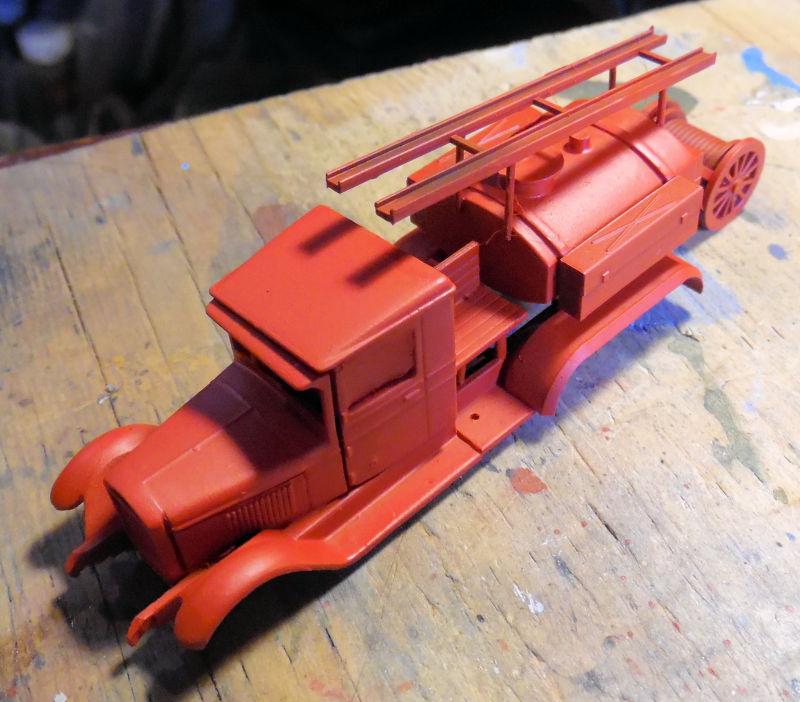
Here in the Motor Pool, things have moved on better. First off, the little Russian fire truck got a better coat of red paint on it, prior to moving forward on the finishing:
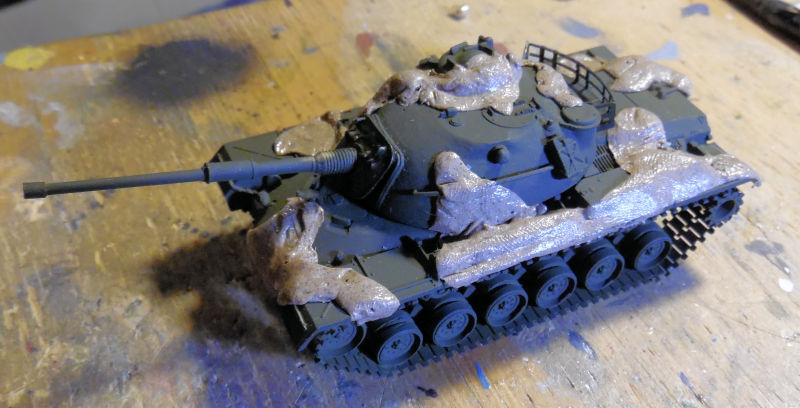
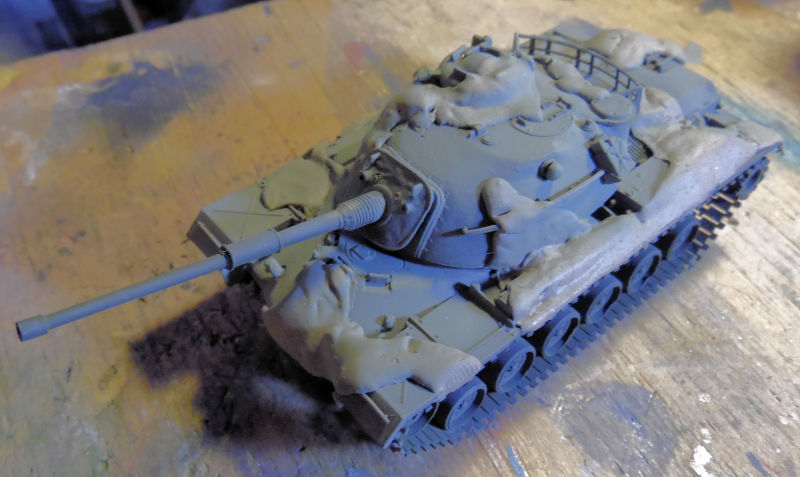
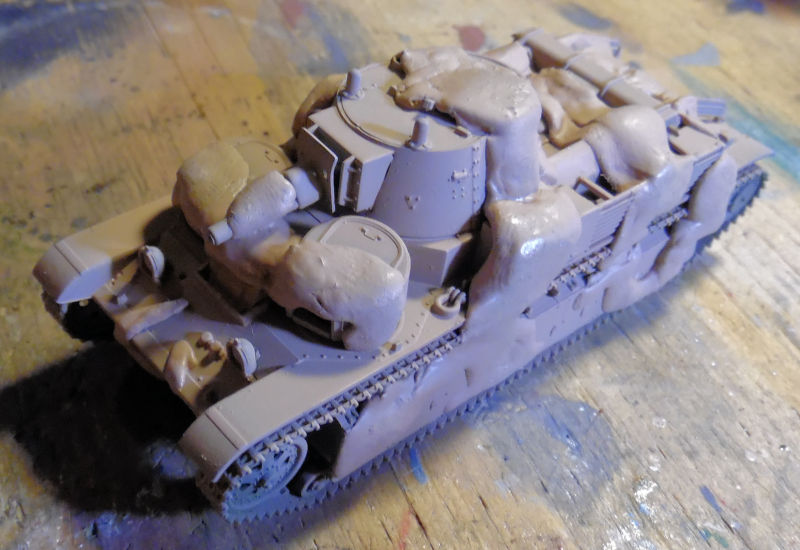
The M48-A5 has been finally masked with Silly Putty for the second of three (or four) colors on the camouflage:
Meanwhile, further progress was made building the detail parts and sub-assemblies for the Russian 280mm tracked artillery piece:
Still a lot more pieces and sub-assemblies to do for that little gun. I feel like it's taking forever, but at least I can see progress every time I take more pics.
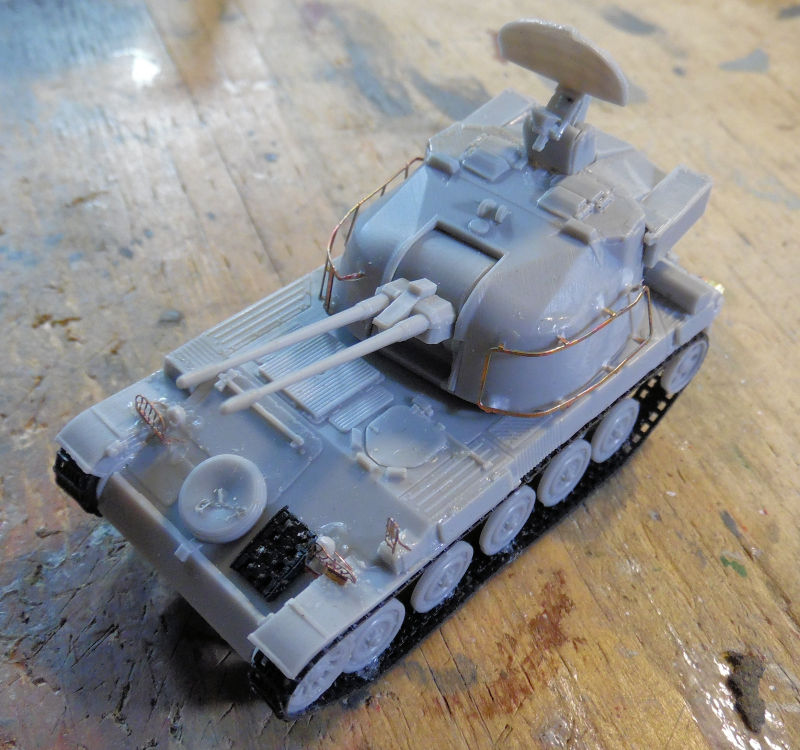
Moving on to the next bay we have the French DCA getting it's tracks on:
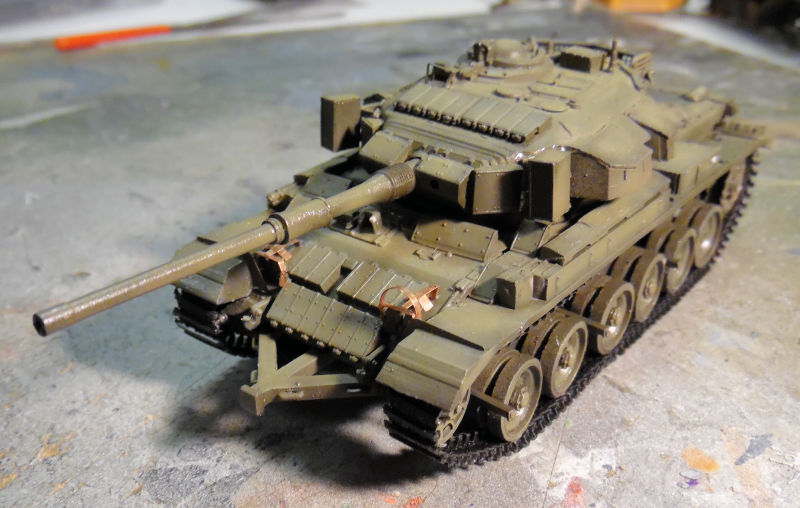
Later on we added almost all the photo etch to this. I wanted to let the turret P/E dry before adding the last P/E part on the other side of the turret:
Finally everything dried enough to add the final piece of Photo Etch.This one is now ready for paint:
Moving to the next bin, rapid progress was made on the Israeli Sho't Kal Gimmel. The upper hull plates went on, the wheels went on, and the basic turret was assembled. Then I noticed we put more than half the wheels on backward and had to pull them off and re-install them properly:
Later we tried to get the next Israeli Sho't Kal Dalet caught up but only got the upper hull plates on, the wheels installed (correctly!) and half the turret assembled:
Hopefully further progress can be made soon. I want to get these both in the spray booth at the same time.
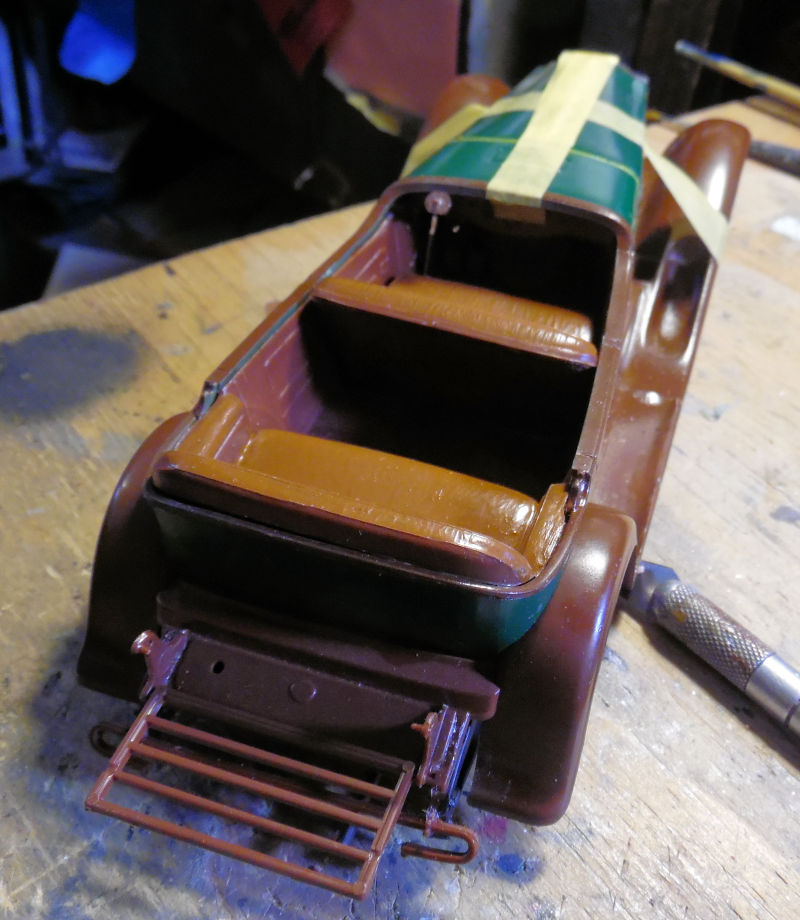
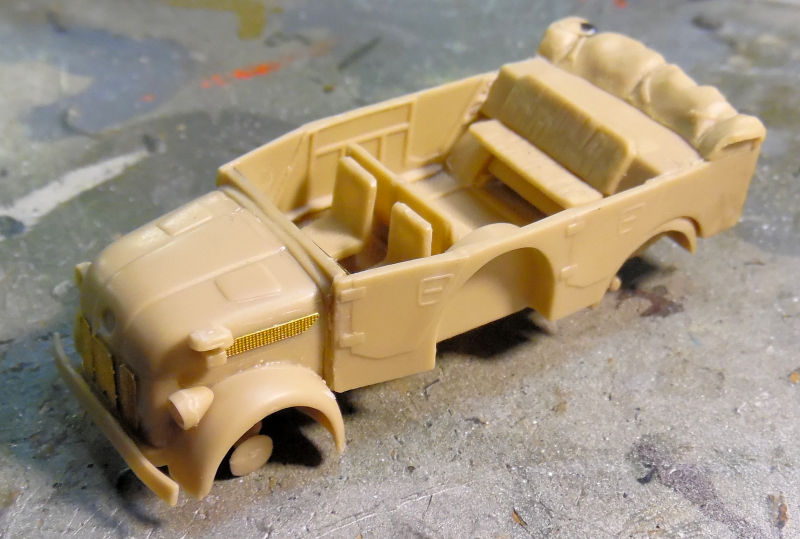
Finally, in our separate Assembly Yard, we have progress done on a couple of unique and different models. First is the Packard in 1/24 scale. This beastie has been causing so many problems. First off, the instructions say to place the engine cover on and then glue the radiator assembly on since the engine cover is supposed to come off to show the engine itself. After adding the fire wall, we did just that, making sure it would dry right with tape:
You can see it didn't quite make it. That is mostly because the engine cover itself wasn't seated properly. While it was drying, we added half of the parts to the rear of the car. Some parts were missing, so I just need to find them somewhere in the hobby room to finish this part:
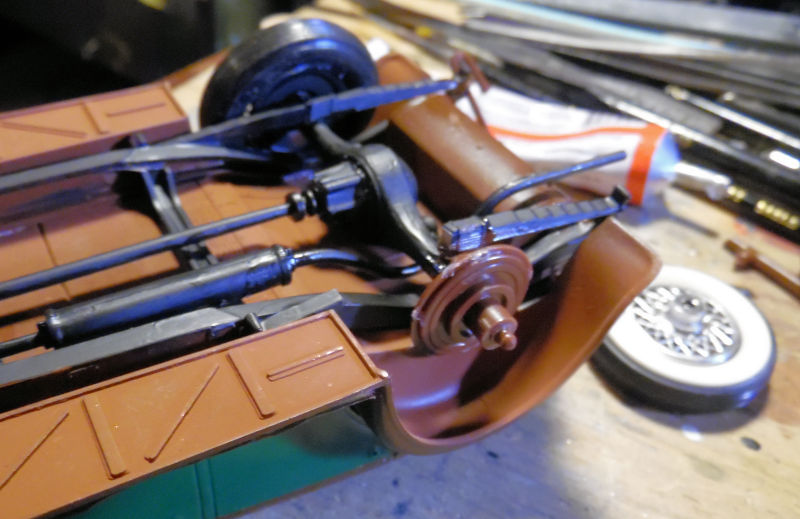
Naturally I wanted to see how well the wheels lined up and touched the ground. What I found was disappointing to say the least. This rear wheel was so misaligned that the car looked like it was lifting the back wheel to water a fire hydrant! Our attempts to fix it resulted in a shattered leaf spring , some of which was re-glued on:
Then I thought we should build the canvas top, and found this issue when we did:
Look on the left and you'll see how warped this was. Just like everything else on this warped brittle model, it was one more thing that made me box this up and stick it back on the shelf for now.
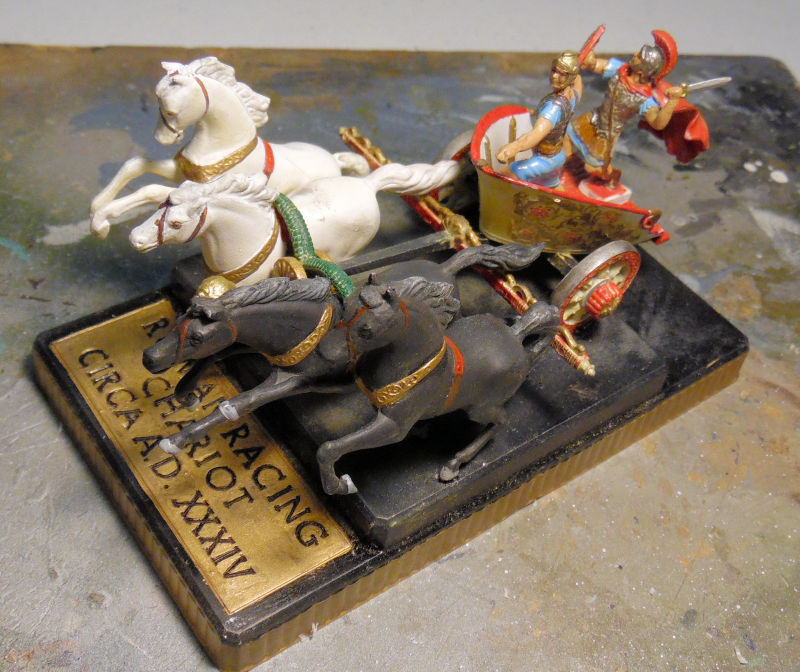
Finally, we did make some progress on the last fun little project. The horses and chariot are now glued together and mounted on the base. Now all that is needed is the reins and whip and we can call this done:
And that now concludes this latest tour of Maddog Manufacturing. Thank you all for stopping in and taking the tour, it's a pleasure to have you aboard. As always, comments are welcome.
Once again, we'll start in the Hangar.
Some time before, knowing that the weather was going to improve, we masked off the various aircraft that we planned to paint. The Hellcat got Silly Putty in the cockpit and wheel wells:
The Avenger was masked off the same, with tape and Silly Putty:
With the weather more amenable to airbrushing a couple days later, some of these finally got their first paint.
The two Spitfires got their undercoat:
[IMGhttps://modelersalliance.org/galleries/wip-british-spitfire-mk-ix-a-jpg.129969/full[/IMG]
Followed by the Russian Il-2M3 Shtormovik:
Then we shot the blue on the Russian Be-4 flying boat:
Followed by the white underneath the Avenger:
Once the paint dried sufficiently on the Avenger, more masking was applied for the second color:
I masked the tail wrong; it was supposed to be an angled white section; I masked the entire moveable part. That's how it's gonna stay. The intermediate blue went on next:
Finally, when the intermediate blue was dry, we masked off the blue for the final color which will hopefully go on later this weekend or next week:
That finishes the tour of the Hangar, now on to the Shipyards....
This next one was a kit I got in a Distressed Kit Auction; I had thought it was a 1/72 scale boat. So we got started on it, getting the hull and some major parts assembled:
That took all of five minutes. Another fifteen to twenty minutes later, it looked like this:
That's when I realized this is actually more like 1/96 scale, The crewmen and stubby torpedoes kinda gave it away. Oh well, it is all finished assembly and ready for paint so I will finish it and leave it on the shelf.
That's all that was done in the Shipyards, so on to the Motor Pool....
Here in the Motor Pool, things have moved on better. First off, the little Russian fire truck got a better coat of red paint on it, prior to moving forward on the finishing:
The M48-A5 has been finally masked with Silly Putty for the second of three (or four) colors on the camouflage:
Meanwhile, further progress was made building the detail parts and sub-assemblies for the Russian 280mm tracked artillery piece:
Still a lot more pieces and sub-assemblies to do for that little gun. I feel like it's taking forever, but at least I can see progress every time I take more pics.
Moving on to the next bay we have the French DCA getting it's tracks on:
Later on we added almost all the photo etch to this. I wanted to let the turret P/E dry before adding the last P/E part on the other side of the turret:
Finally everything dried enough to add the final piece of Photo Etch.This one is now ready for paint:
Moving to the next bin, rapid progress was made on the Israeli Sho't Kal Gimmel. The upper hull plates went on, the wheels went on, and the basic turret was assembled. Then I noticed we put more than half the wheels on backward and had to pull them off and re-install them properly:
Later we tried to get the next Israeli Sho't Kal Dalet caught up but only got the upper hull plates on, the wheels installed (correctly!) and half the turret assembled:
Hopefully further progress can be made soon. I want to get these both in the spray booth at the same time.
Finally, in our separate Assembly Yard, we have progress done on a couple of unique and different models. First is the Packard in 1/24 scale. This beastie has been causing so many problems. First off, the instructions say to place the engine cover on and then glue the radiator assembly on since the engine cover is supposed to come off to show the engine itself. After adding the fire wall, we did just that, making sure it would dry right with tape:
You can see it didn't quite make it. That is mostly because the engine cover itself wasn't seated properly. While it was drying, we added half of the parts to the rear of the car. Some parts were missing, so I just need to find them somewhere in the hobby room to finish this part:
Naturally I wanted to see how well the wheels lined up and touched the ground. What I found was disappointing to say the least. This rear wheel was so misaligned that the car looked like it was lifting the back wheel to water a fire hydrant! Our attempts to fix it resulted in a shattered leaf spring , some of which was re-glued on:
Then I thought we should build the canvas top, and found this issue when we did:
Look on the left and you'll see how warped this was. Just like everything else on this warped brittle model, it was one more thing that made me box this up and stick it back on the shelf for now.
Finally, we did make some progress on the last fun little project. The horses and chariot are now glued together and mounted on the base. Now all that is needed is the reins and whip and we can call this done:
And that now concludes this latest tour of Maddog Manufacturing. Thank you all for stopping in and taking the tour, it's a pleasure to have you aboard. As always, comments are welcome.
Heavens Eagle
Well-known member
Duke Maddog
Well-known member
Thank you Paul! It worked! I was able to get the gap closed and the top is now ready for paint. Maybe someday I'll get that car finished!
Duke Maddog
Well-known member
Well we have had a pretty productive week this past week, so now it's time to host another tour of Maddog Manufacturing. The trams are boarding now, so all aboard and remember to keep hands and feet inside at all times.
As always, we start in the Hangar.
We had a great opportunity to bring out the spray gun and so base paints were shot on all aircraft needing it topside.
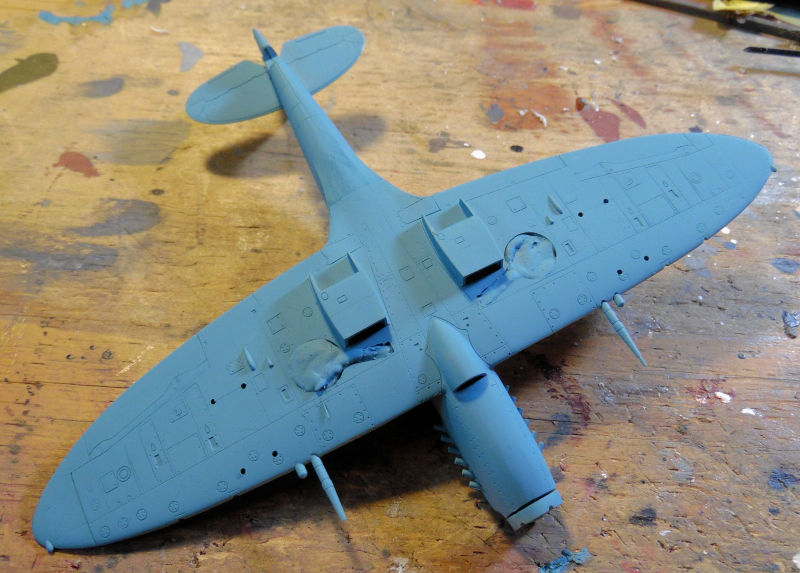
First were the two Spitfires:

Then the Russian Be-4:
You can see the paint was a bit too diluted so we took another shot. The second shot was far better:

And the Be-4:
While we had the better paint in the sprayer, we also shot the Il-2M3:
While all that was drying, we switched and shot the final Navy blue onto the Avenger:
Later that masking came off that and now the Avenger is ready for clearcoat and decals:
Personally, I do not know why the turret frosted like it did. I was certain the masking was sealed properly so I have no idea what happened. I will try to buff it out and shine it as best I can, but I am not going to go to outlandish lengths to make it as perfect as possible.
So that is all that has been done in the Hangar so far. You can see everything has been set up for the remaining camouflage patterns before clearcoat and decals. There might be a few aircraft crossing the finish line this month!
Since nothing of note has been happening in the Shipyards, we'll move on to the Motor Pool.
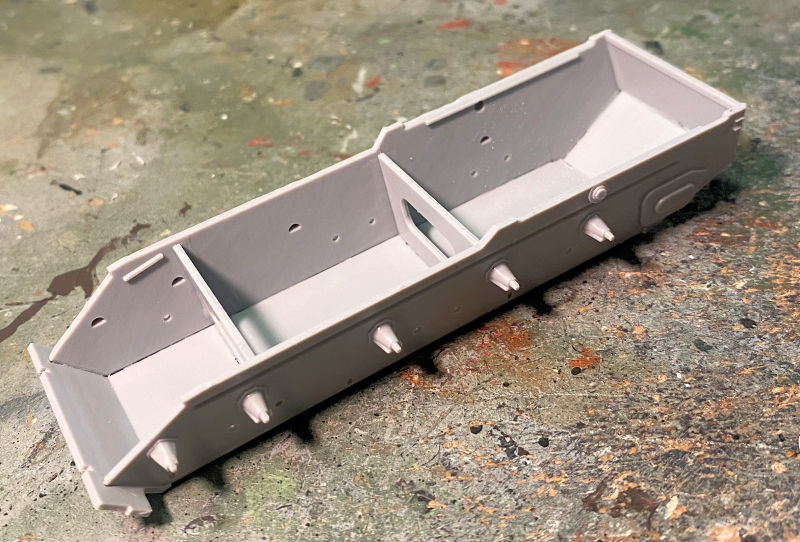
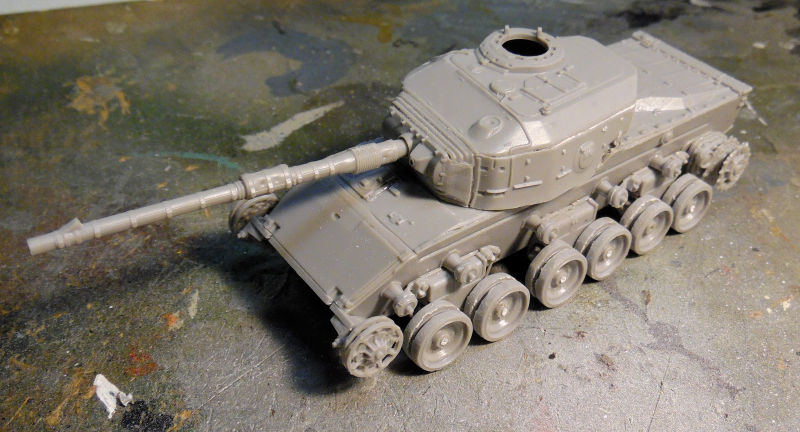
Here in the Motor Pool quite a bit has been done. To start with, here in Bay One, we found an ancient ESCI kit of a Hetzer that we were trying to sell. The box was busted up, and the thing had no nibbles, even when priced at a buck. So, out it came and the basic first steps were made. You can see here the main lower hull was assembled, but when it came time for the front plate to be installed, it broke while we were cleaning it up. So this is where it stands now:

Moving on to the next bay, we have the first shot of green on the base of the Russian 280m tracked artillery piece. Like the aircraft, I didn't like it. Besides, certain pieces were left off so they had to be added before we shot it again. You can see it here with the gun dry-fit into place:
Later, the base part got it's second coat:
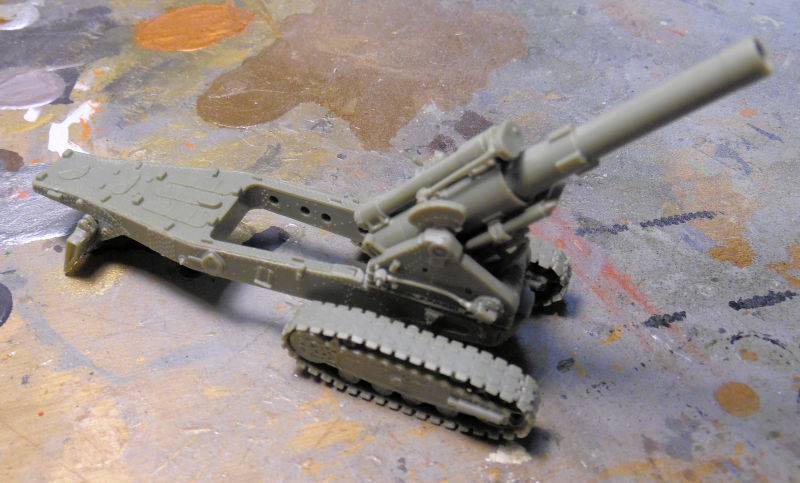
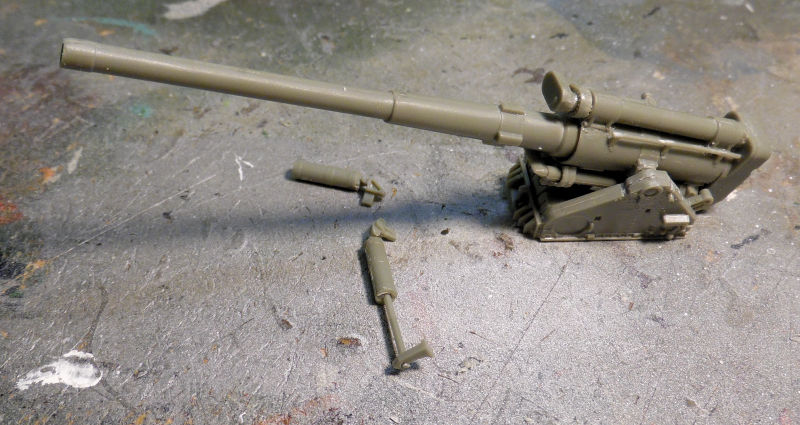
Meanwhile, I felt it was time for the second tracked artillery piece to be started so we pulled out that and assembled the main gun first:
Later the base part was started, but a semi-vital piece is missing. I might just say 'screw it!' and move on anyway....
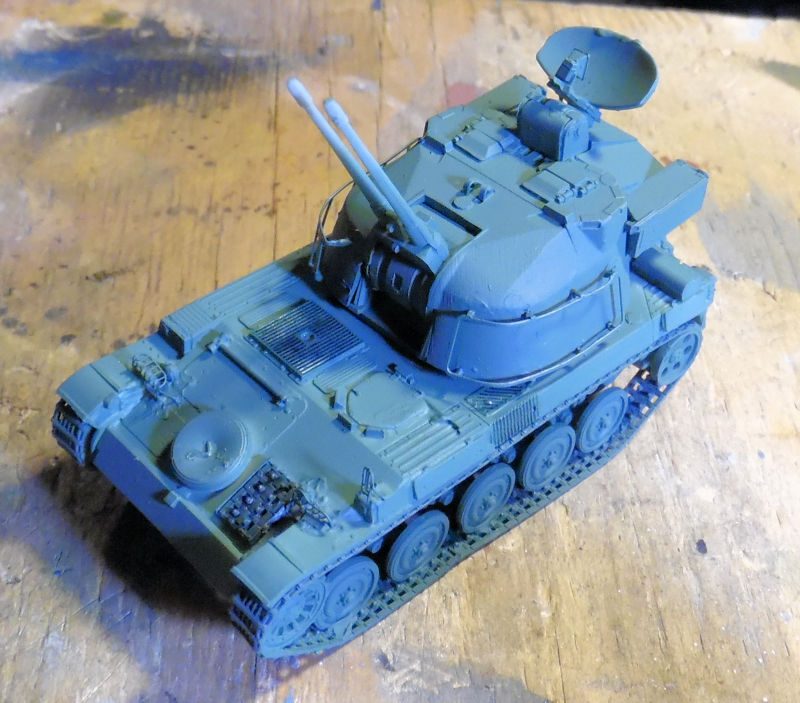
That is as far as we got on that one. In this next bay, we shot the base coat on the French DCA anti-aircraft system. It does NOT look this blue in person:
Later came clearcoat, a wash, and decals:
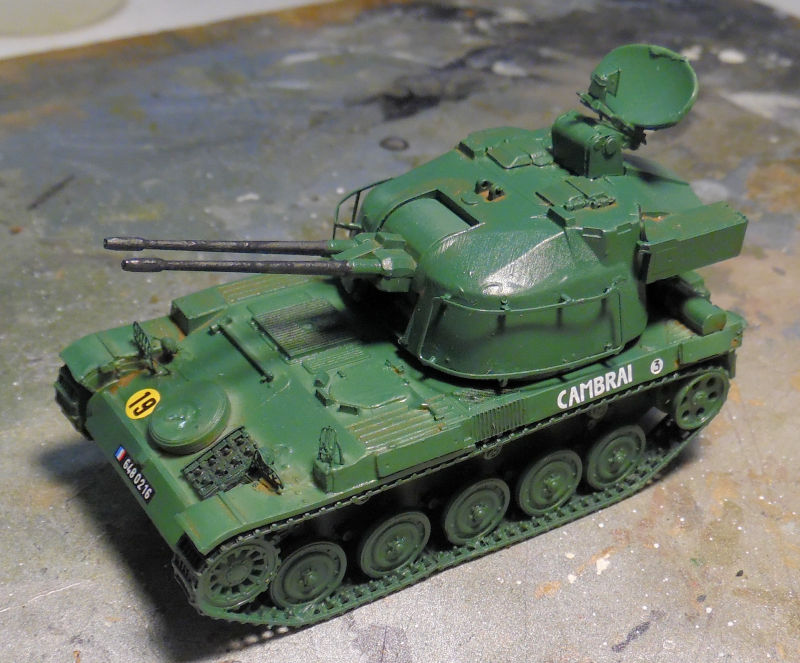
This one was later driven out onto the parade ground for breaking in by it's crew.
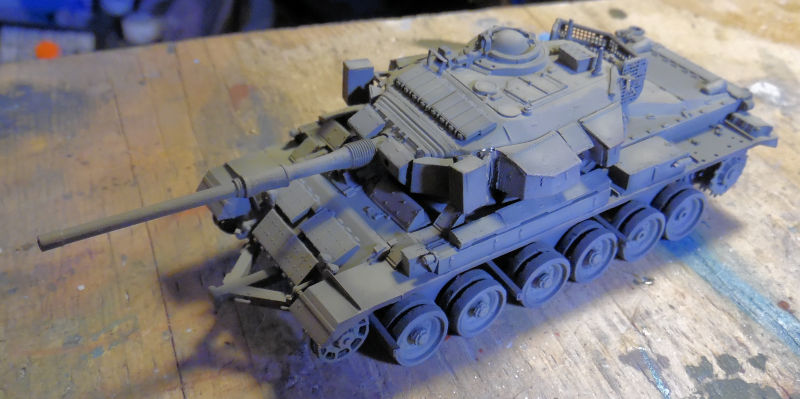
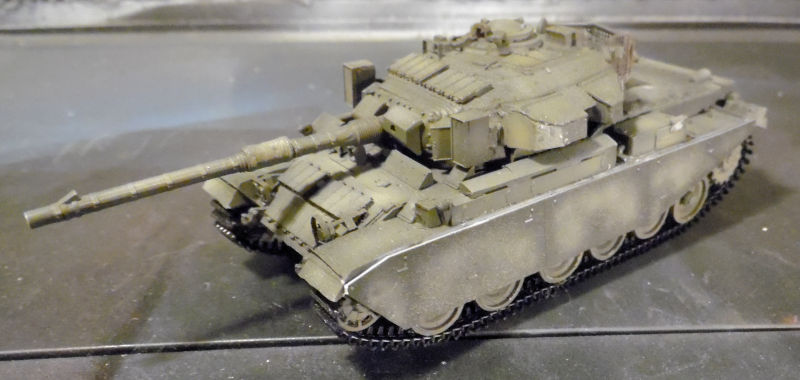
In this next bay, we decided to move forward on the Sho't Kal Dalet by completing the basic turret. For some reason, this turret was far more rough than the Gimmel turret was:
Later after some cleanup, the main gun was added to the turret and the fenders were added to the sides:
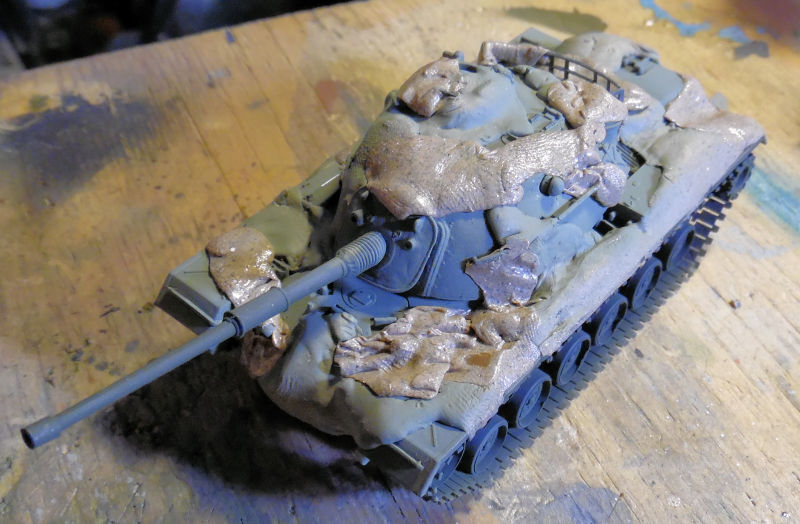
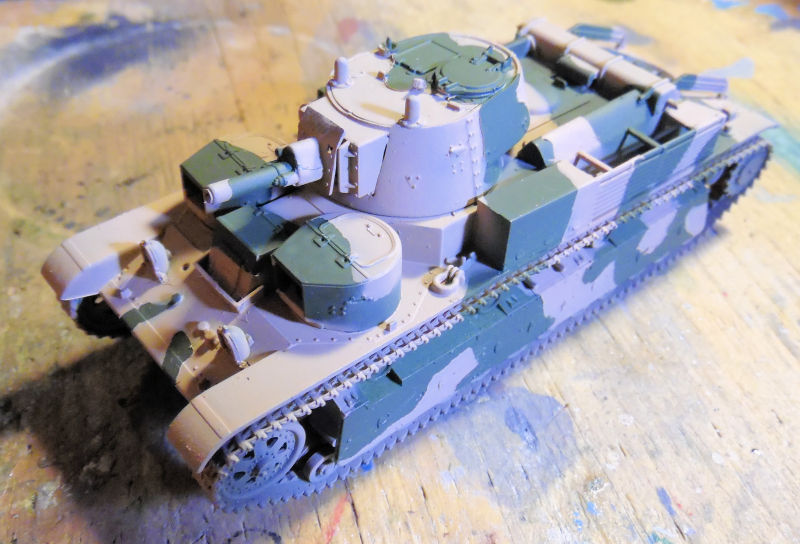
Now this is more or less caught up with the Gimmel. Moving on to the next bay, we have the M48-A5 Patton. The base had already been shot on, so the masking went on and the second color was shot:
Additional Silly Putty was added to cover the second color when it was dry:
And the third color was shot:
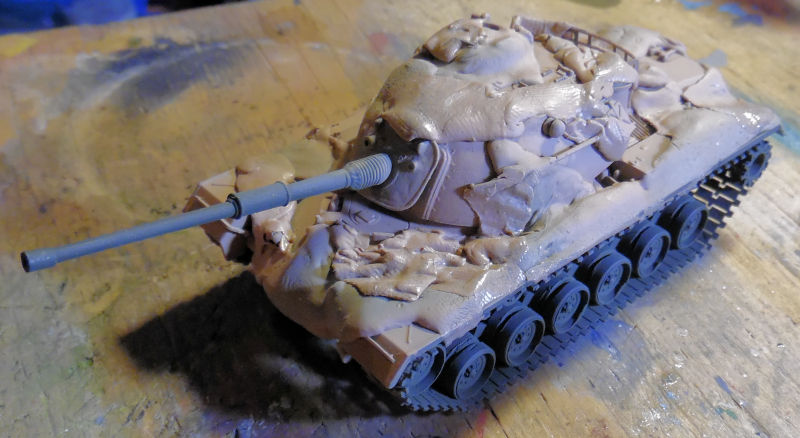
When it was dry, I hand painted some black shapes on the edges for the fourth color. They may be a bit hard to see in this pic, they look like shadows:
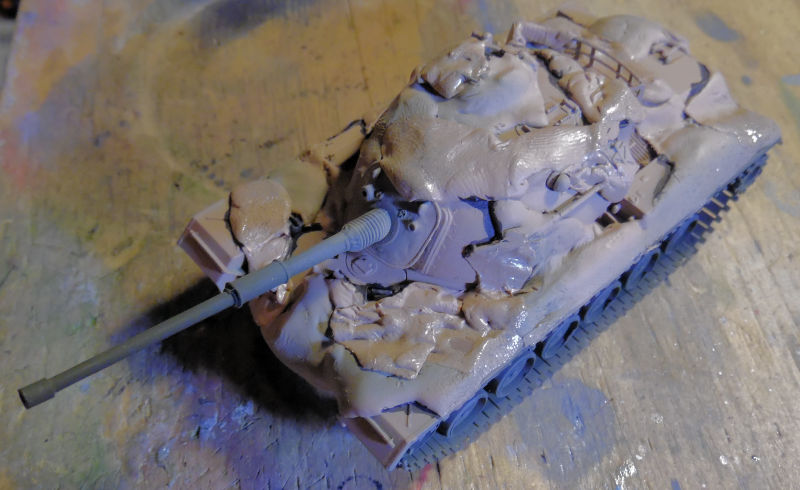
Finally, everything came off when it was all dry:
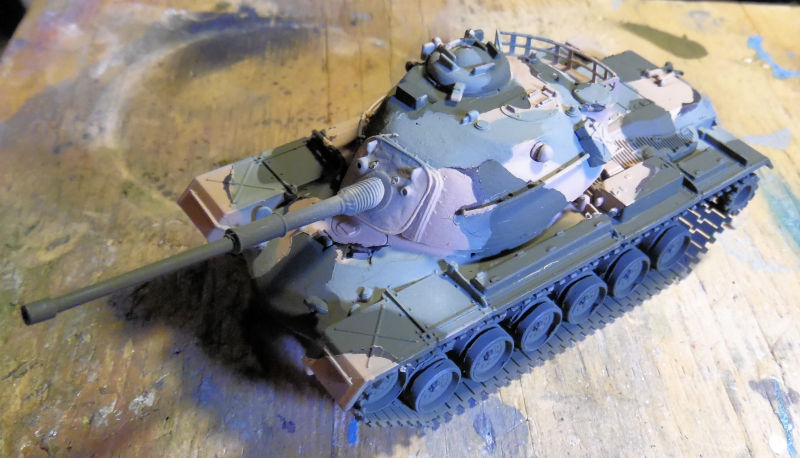
Later a clearcoat and decals went on:
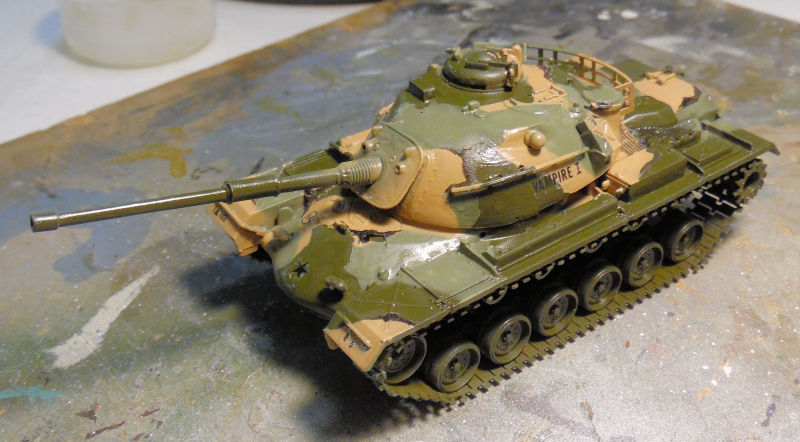
After that, some dullcoat was applied, and the final details were added and this was driven off by it's crew for familiarization....
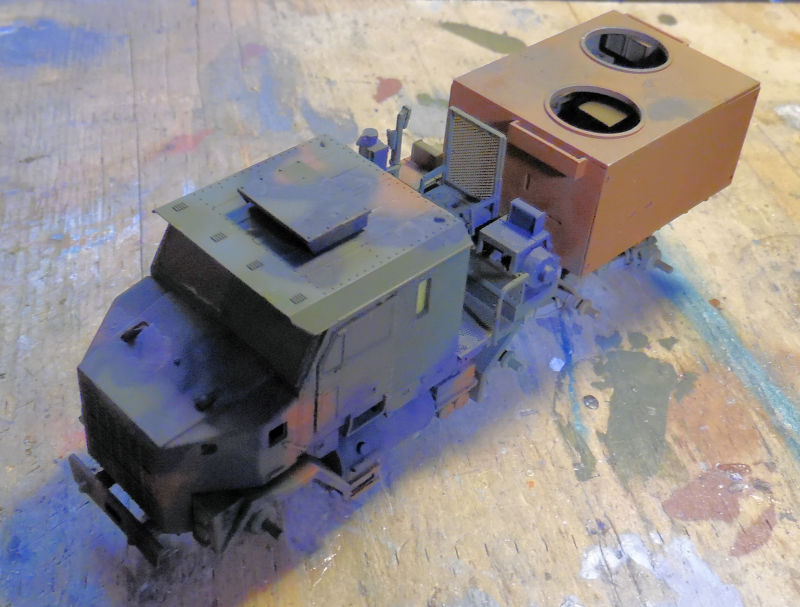
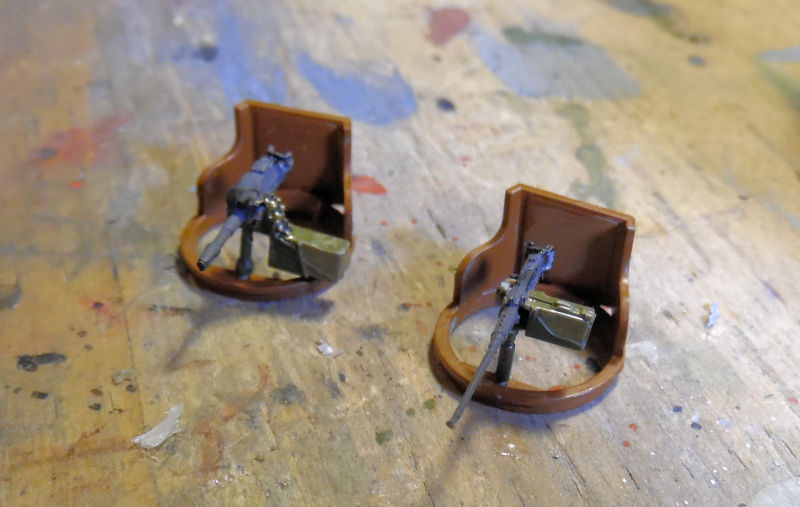
In another bay over here, the M1070 gun truck finally had some progress done. Base paint was applied to the inside of the cab and the outside:
The windscreen and side doors were masked off, both inside and out:
Finally, base paint was shot on the rear gunner's box, the clear parts and the other sub-assemblies, as well as a lighter OD on the anti-RPG panels:
That is where we left that one, but there's more. While organizing my parts, I found a small machine gun turret for my T-28 kit. I had just put that kit up and so I found it again and was able to finally have the whole kit again! This tank had already been basecoated green before the turret got lost, and so now, I am finally able to finish this Shelf Queen after ten years! Silly Putty was added for the second color:
Then the tan was shot:
Finally the unmasking:
This one then got final details added and was then turned over to their crew for breaking in.
That's all for today. Nothing esoteric this time, but still hopefully some interesting items in the tour.
Thank you all for looking in, comments are welcome.
As always, we start in the Hangar.
We had a great opportunity to bring out the spray gun and so base paints were shot on all aircraft needing it topside.
First were the two Spitfires:
Then the Russian Be-4:
You can see the paint was a bit too diluted so we took another shot. The second shot was far better:
And the Be-4:
While we had the better paint in the sprayer, we also shot the Il-2M3:
While all that was drying, we switched and shot the final Navy blue onto the Avenger:
Later that masking came off that and now the Avenger is ready for clearcoat and decals:
Personally, I do not know why the turret frosted like it did. I was certain the masking was sealed properly so I have no idea what happened. I will try to buff it out and shine it as best I can, but I am not going to go to outlandish lengths to make it as perfect as possible.
So that is all that has been done in the Hangar so far. You can see everything has been set up for the remaining camouflage patterns before clearcoat and decals. There might be a few aircraft crossing the finish line this month!
Since nothing of note has been happening in the Shipyards, we'll move on to the Motor Pool.
Here in the Motor Pool quite a bit has been done. To start with, here in Bay One, we found an ancient ESCI kit of a Hetzer that we were trying to sell. The box was busted up, and the thing had no nibbles, even when priced at a buck. So, out it came and the basic first steps were made. You can see here the main lower hull was assembled, but when it came time for the front plate to be installed, it broke while we were cleaning it up. So this is where it stands now:
Moving on to the next bay, we have the first shot of green on the base of the Russian 280m tracked artillery piece. Like the aircraft, I didn't like it. Besides, certain pieces were left off so they had to be added before we shot it again. You can see it here with the gun dry-fit into place:
Later, the base part got it's second coat:
Meanwhile, I felt it was time for the second tracked artillery piece to be started so we pulled out that and assembled the main gun first:
Later the base part was started, but a semi-vital piece is missing. I might just say 'screw it!' and move on anyway....
That is as far as we got on that one. In this next bay, we shot the base coat on the French DCA anti-aircraft system. It does NOT look this blue in person:
Later came clearcoat, a wash, and decals:
This one was later driven out onto the parade ground for breaking in by it's crew.
In this next bay, we decided to move forward on the Sho't Kal Dalet by completing the basic turret. For some reason, this turret was far more rough than the Gimmel turret was:
Later after some cleanup, the main gun was added to the turret and the fenders were added to the sides:
Now this is more or less caught up with the Gimmel. Moving on to the next bay, we have the M48-A5 Patton. The base had already been shot on, so the masking went on and the second color was shot:
Additional Silly Putty was added to cover the second color when it was dry:
And the third color was shot:
When it was dry, I hand painted some black shapes on the edges for the fourth color. They may be a bit hard to see in this pic, they look like shadows:
Finally, everything came off when it was all dry:
Later a clearcoat and decals went on:
After that, some dullcoat was applied, and the final details were added and this was driven off by it's crew for familiarization....
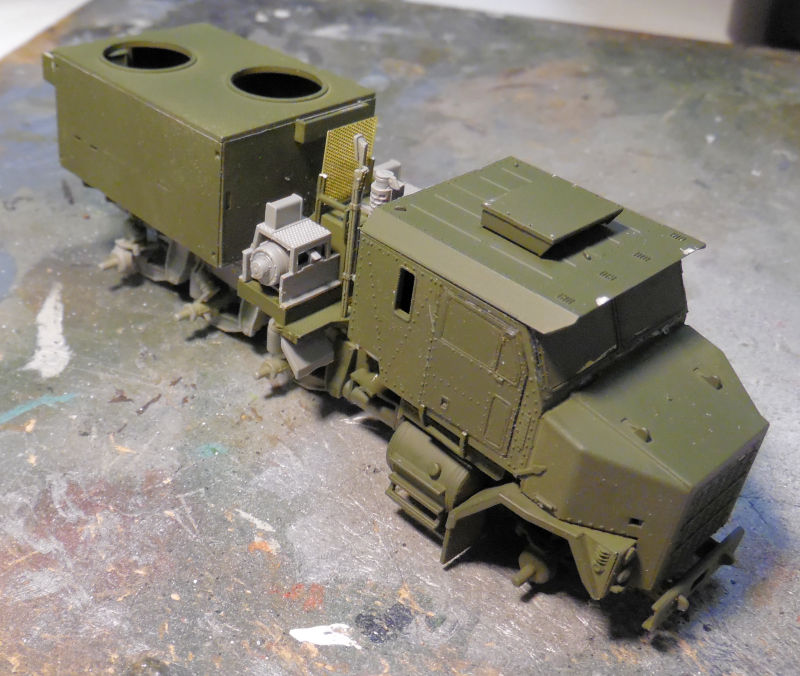
In another bay over here, the M1070 gun truck finally had some progress done. Base paint was applied to the inside of the cab and the outside:
The windscreen and side doors were masked off, both inside and out:
Finally, base paint was shot on the rear gunner's box, the clear parts and the other sub-assemblies, as well as a lighter OD on the anti-RPG panels:
That is where we left that one, but there's more. While organizing my parts, I found a small machine gun turret for my T-28 kit. I had just put that kit up and so I found it again and was able to finally have the whole kit again! This tank had already been basecoated green before the turret got lost, and so now, I am finally able to finish this Shelf Queen after ten years! Silly Putty was added for the second color:
Then the tan was shot:
Finally the unmasking:
This one then got final details added and was then turned over to their crew for breaking in.
That's all for today. Nothing esoteric this time, but still hopefully some interesting items in the tour.
Thank you all for looking in, comments are welcome.

That's crazy Mark, how you find the time.
Duke Maddog
Well-known member
Thank you Bob! I try to find it anywhere I can!
Duke Maddog
Well-known member
Here we are, two weeks later and I was able to get a lot done, more than expected. So much so that I will need to do two tours; one to the Hangar and then in the next post the tour will leave for the Motor Pool. So, all aboard the trams for the next tour through the Maddog Manufacturing Hangars....
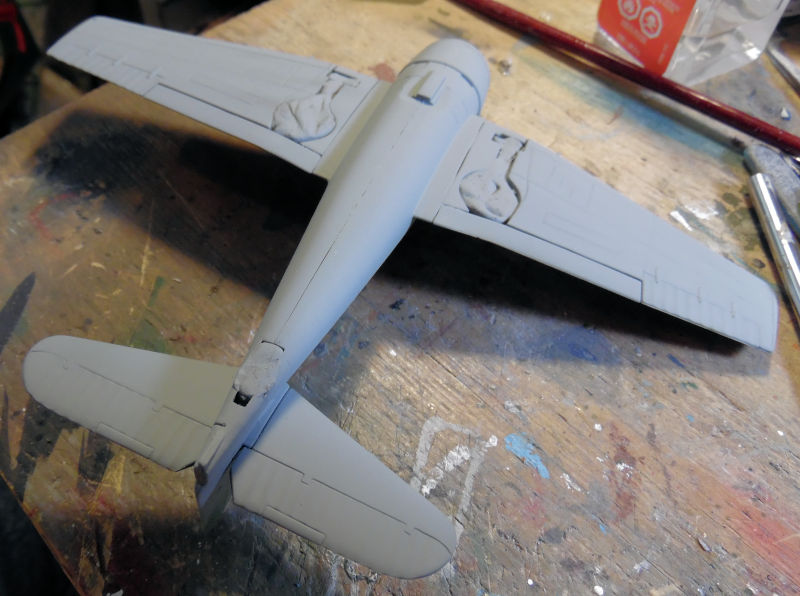
In the first bay we have a shelf queen coming out again. This is the 1/72 scale Concorde SST we started about four years ago. The fit is atrocious and the wings have massive gaps. More attempts were made to close and fill those gaps as best as possible:
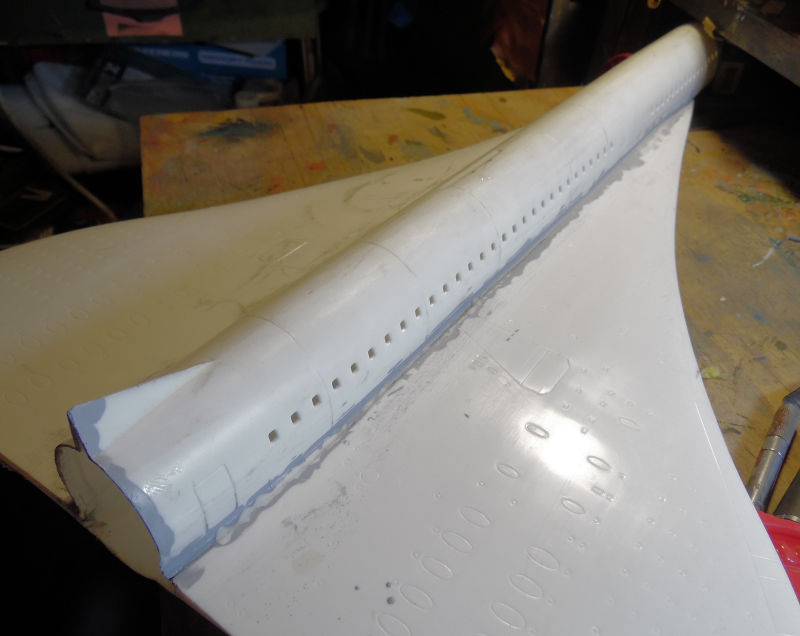

Even the bottom of this model had canyons to deal with:
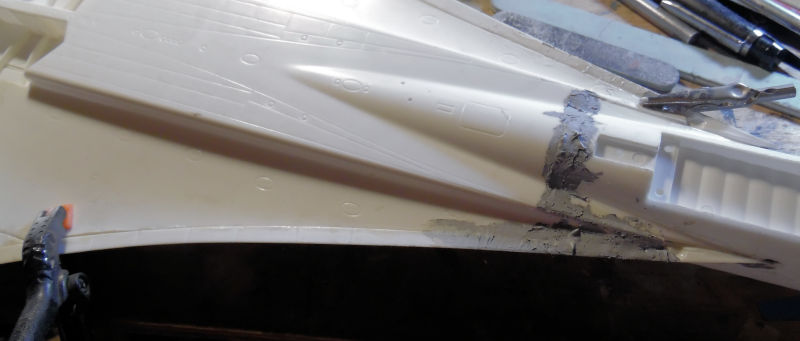
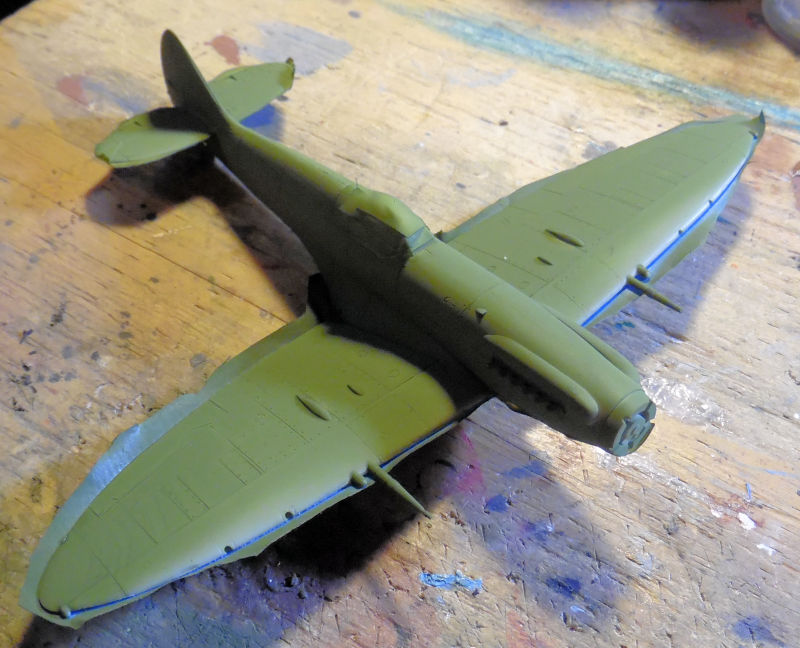
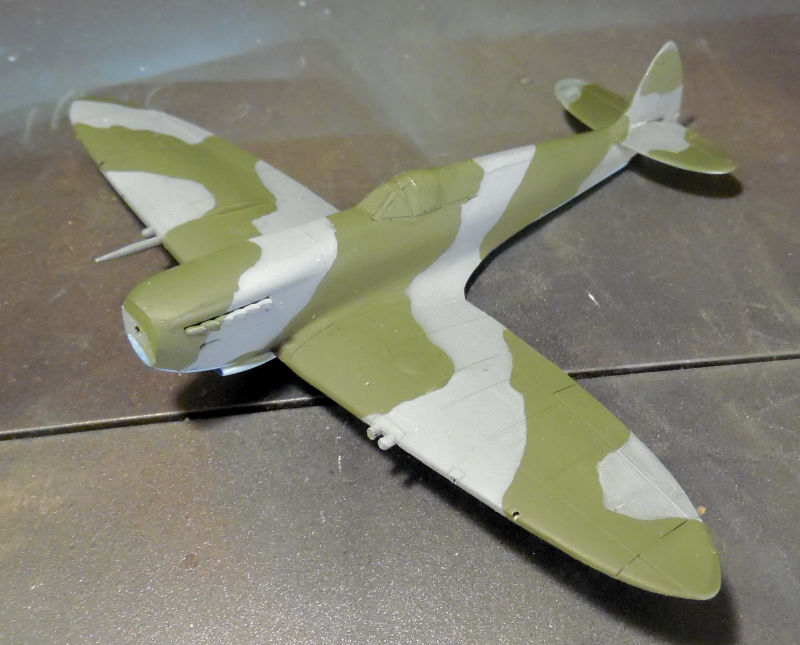
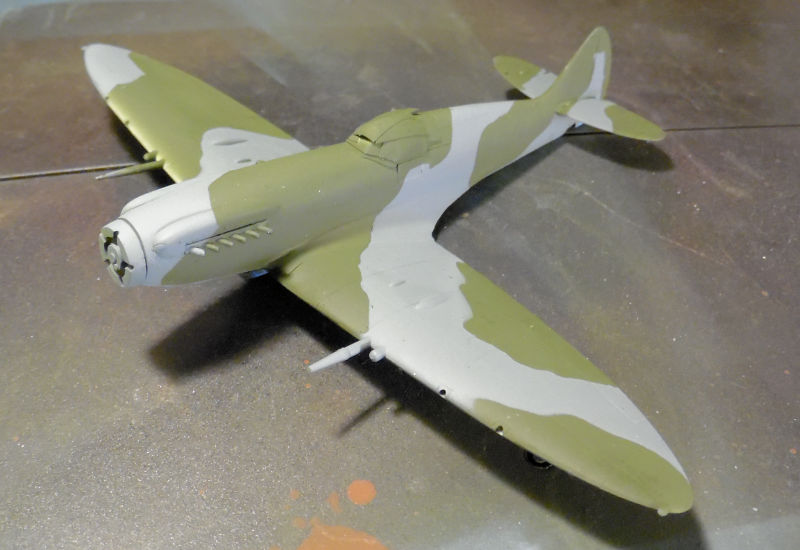
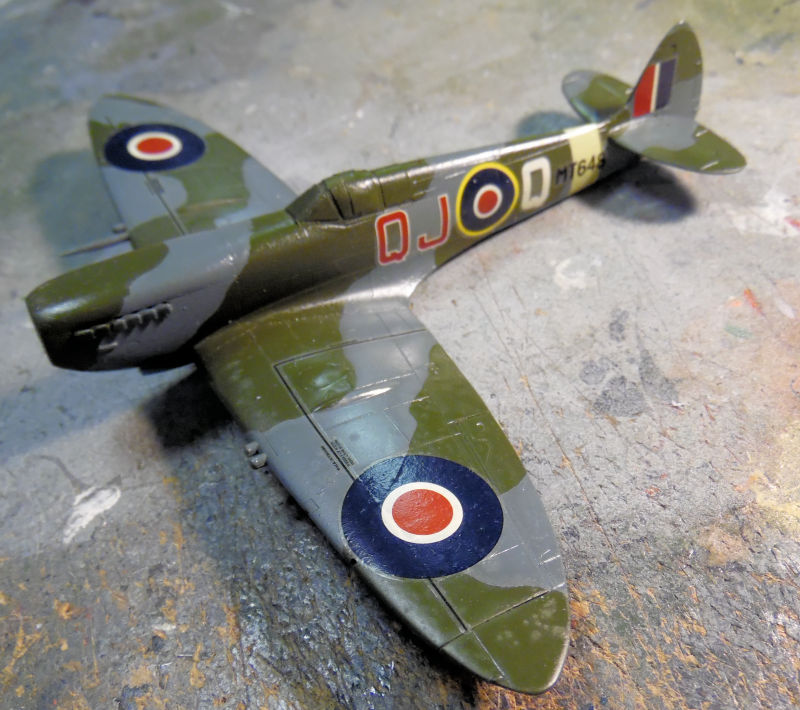
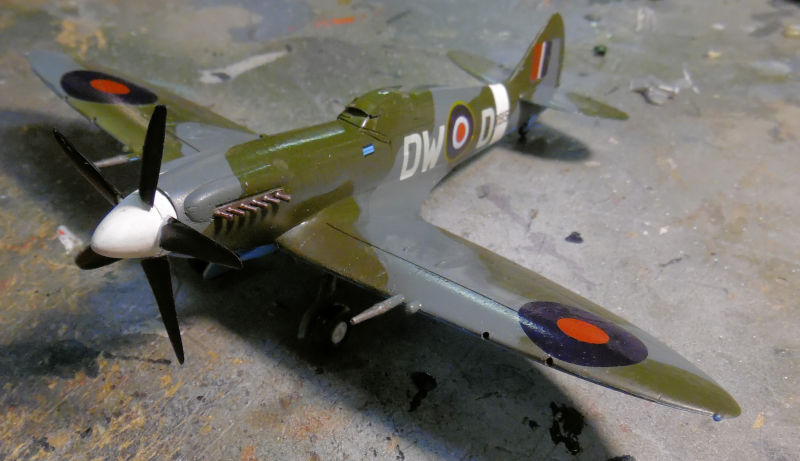
That's as far as we got on that so far. Next is the two Spitfires, both of them were masked with the Silly Putty and shot with the RAF Ocean Grey over the top:
Mark IX:
Mark XIV. I changed the pattern a little to allow me to cover that uneven splotch of green with the grey:

It was sprayed like the Mk.IX at the same time:
After awhile, the Silly Putty came off both of them. he Mk.IX is here:
...and the Mk.XIV is here:
Believe me, the paint is much darker than these pics show. You can see that here after I shot gloss clear over them to prepare for decals:


While all that was going on, we also masked off the Russia Il-2M3 Shtormovik with the Silly Putty and sprayed with the second color:

Later that Silly Putty came off and we were ready for clear coat:
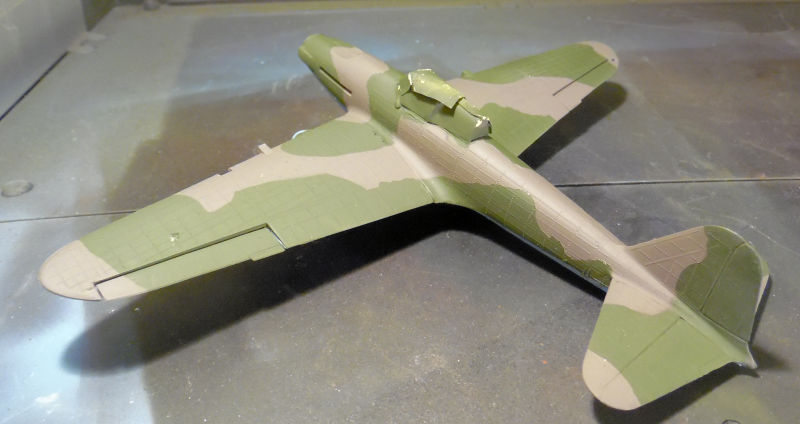
Here it is after the clear coat:
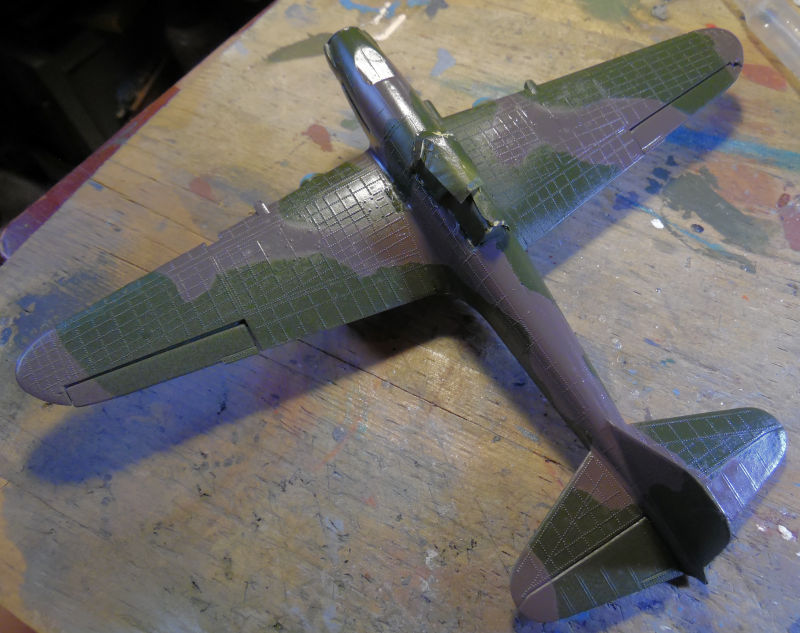
Again, that is more representative of the real colors we sprayed.
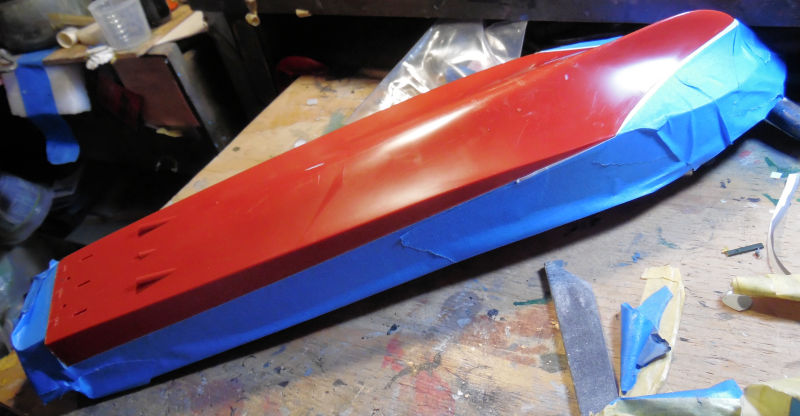
Moving on to the next bay, I was not happy with the main wing on the Russian Be-4. Therefore, we put about a quarter tube of Tamiya Putty on top and bottom where the discrepancies were:
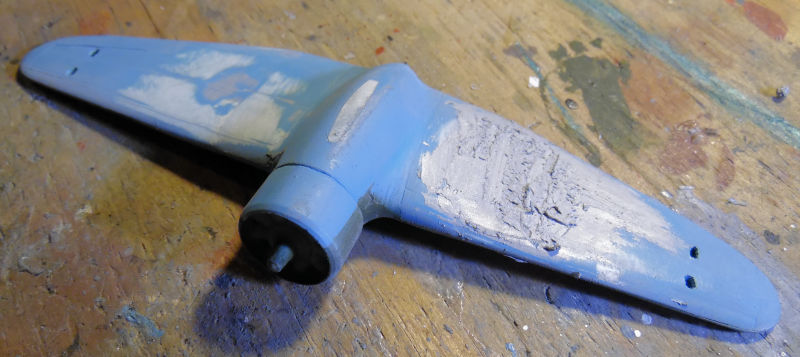
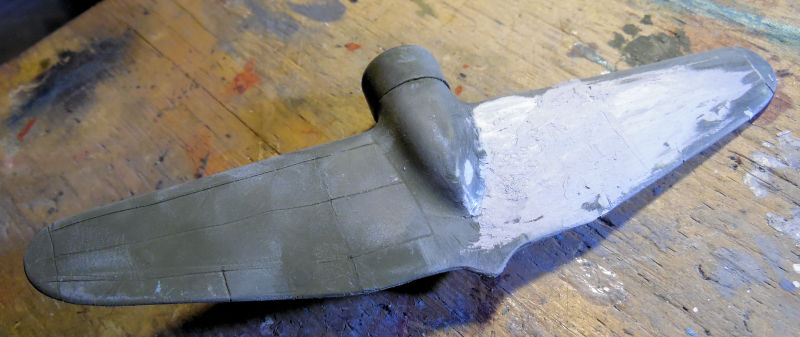
Later, this was sanded smooth, another coat of putty added and finally repainted:

That wing has since been clear coated and the decals have been added. That one should be done fairly soon.
Our next tour of the Motor Pool starts in a bit. Meanwhile, comments are welcome; thanks all for stopping in!
In the first bay we have a shelf queen coming out again. This is the 1/72 scale Concorde SST we started about four years ago. The fit is atrocious and the wings have massive gaps. More attempts were made to close and fill those gaps as best as possible:
Even the bottom of this model had canyons to deal with:
That's as far as we got on that so far. Next is the two Spitfires, both of them were masked with the Silly Putty and shot with the RAF Ocean Grey over the top:
Mark IX:
Mark XIV. I changed the pattern a little to allow me to cover that uneven splotch of green with the grey:
It was sprayed like the Mk.IX at the same time:
After awhile, the Silly Putty came off both of them. he Mk.IX is here:
...and the Mk.XIV is here:
Believe me, the paint is much darker than these pics show. You can see that here after I shot gloss clear over them to prepare for decals:
While all that was going on, we also masked off the Russia Il-2M3 Shtormovik with the Silly Putty and sprayed with the second color:
Later that Silly Putty came off and we were ready for clear coat:
Here it is after the clear coat:
Again, that is more representative of the real colors we sprayed.
Moving on to the next bay, I was not happy with the main wing on the Russian Be-4. Therefore, we put about a quarter tube of Tamiya Putty on top and bottom where the discrepancies were:
Later, this was sanded smooth, another coat of putty added and finally repainted:
That wing has since been clear coated and the decals have been added. That one should be done fairly soon.
Our next tour of the Motor Pool starts in a bit. Meanwhile, comments are welcome; thanks all for stopping in!
Duke Maddog
Well-known member
And now for our tour of the Motor Pool at Maddog Manufacturing. A considerable amount of progress has been made here.
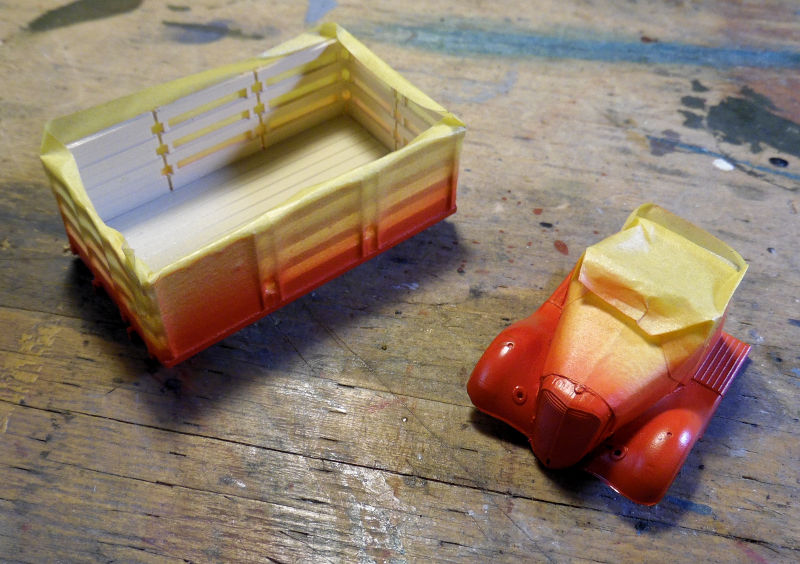
Let's start here with the civilian Ford Stakebed truck, which has been painted with the cream on the cab and truck bed:
Later the red trim was added after everything was masked off:
That is where we left this right now. Moving on to the next bay we have another Shelf Queen, started about six years ago. Finally found all the missing parts and got all the rest of the main parts installed:
Later this truck also got a coat of red, making this almost ready to be declared finished:
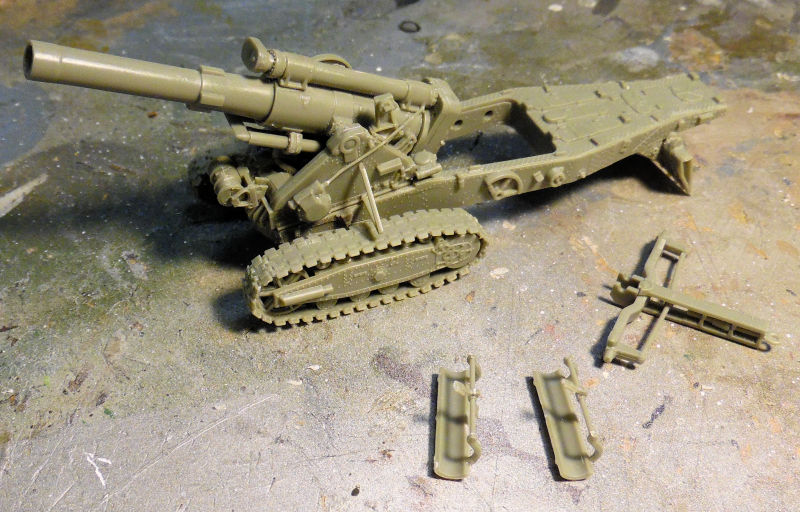
Moving to the next bay we find the Russian tracked 280mm gun. The main gun has been glued to the carriage and almost all the final details have been added. Some parts and sub assemblies have gone missing, but we're going to continue to work on this until all is found:

Later the photo etch was added, bringing this closer to being done:

Next to this is the Russian tracked 152mm gun. This was started later, but we now have it catching up to the 280mm gun. First we installed the main gun in the trunnions, and made the hydraulics that raise and lower the gun:
We added more details to the main carriage, cemented down the gun and also finished off most of the details on the trunnions, bringing this to the photo etch stage:
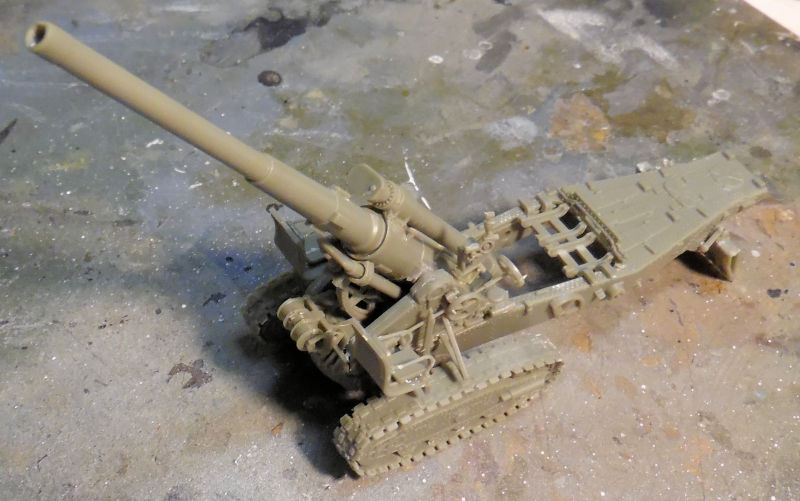
Photo etch and some final details added next and this was ready for paint:
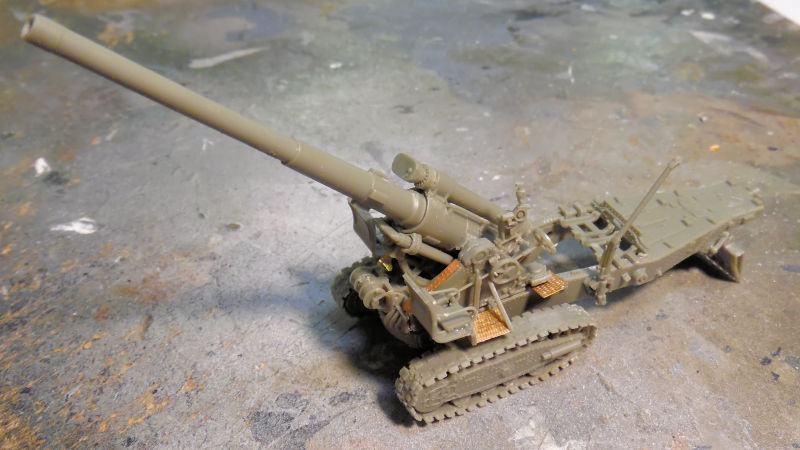
After everything had sufficiently dried, we shot a base of Russian Green on this. It shows much lighter in this pic than it does in real life:
The same had been shot on the 280mm gun but I apparently forgot to take pics of that.
Moving on, we found another Shelf Queen, this one only two years old. It's the Modelcollect SCUD D TEL that needed some more green paint on additional parts that had been added after it was painted:
'
I was going to camouflage this, but I don't want to hassle with re-masking all the windows again. We might hand brush the pattern on it, I'm still trying to decide. Meanwhile, this is ready for further progress....
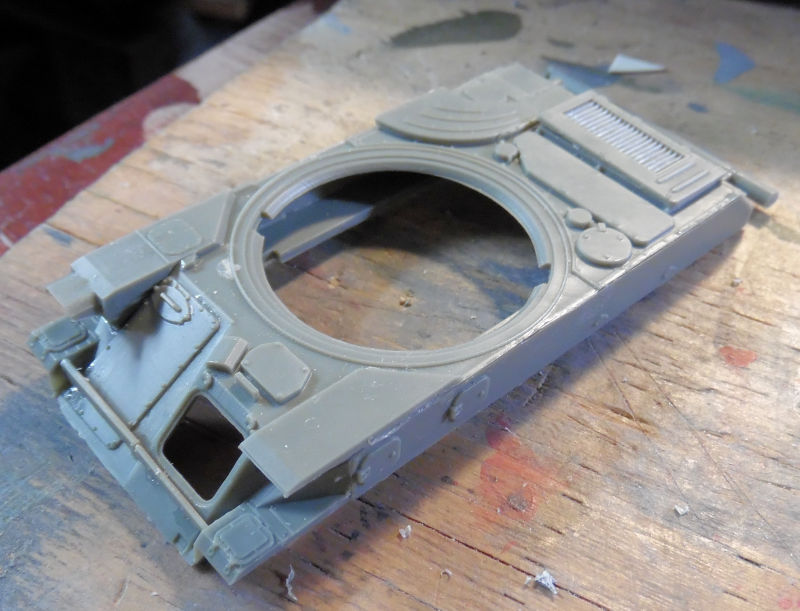
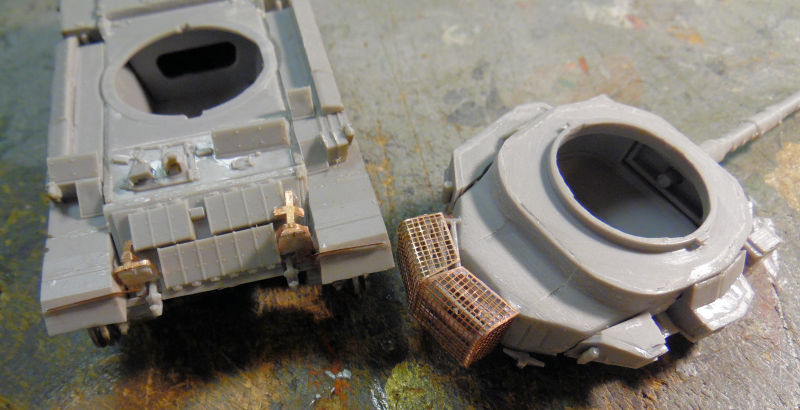
In the next bay, we have the two Israeli Centurions. This first one, the Sho't Kal Gimmel; got all the detail parts on the main hull and we started on some of the details on the turret:

Later we finished all the details on the turret. Here it is all set and ready for photo etch:
Interestingly enough; the photo etch sheet for this kit is missing. So, we continued to work on the Centurion Sho't Kal Dalet. Again, most of the turret and all of the hull details were added, just as with the Gimmel:
Later the turret was done completely:
That thing on the front of this tank is a battering ram. Some Dalets had them so I added this to mine to help differentiate between them.
We had the photo etch for this one so almost all the photo etch was added to this:
Once everything was dry, we shot a base of Green Drab on this tank. It is still wet in this picture:

After this completely dried, we applied a light coat of Israeli Sand Grey over the top, modulating the color for added ascetics. It is real hard to see in this picture, but I assure you it is there:
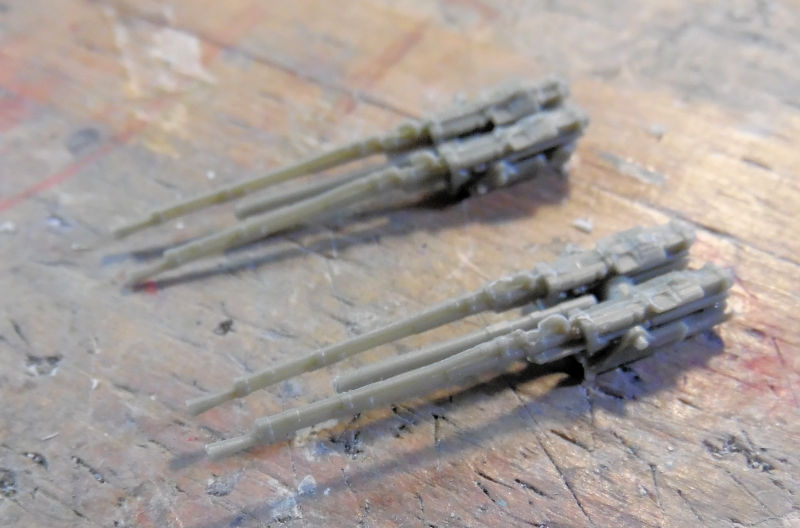
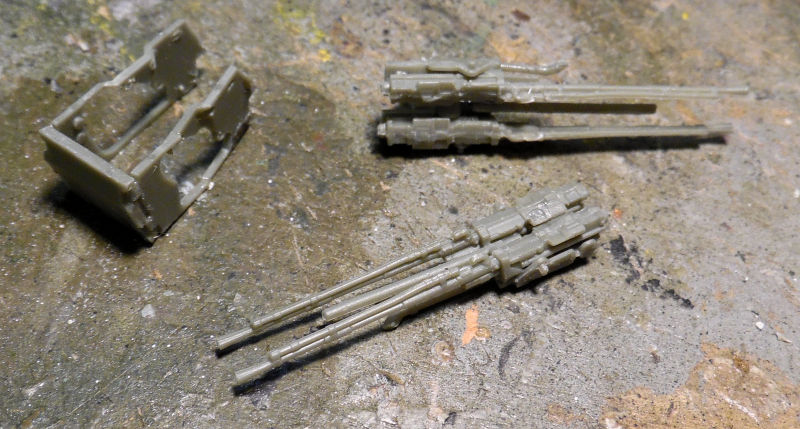
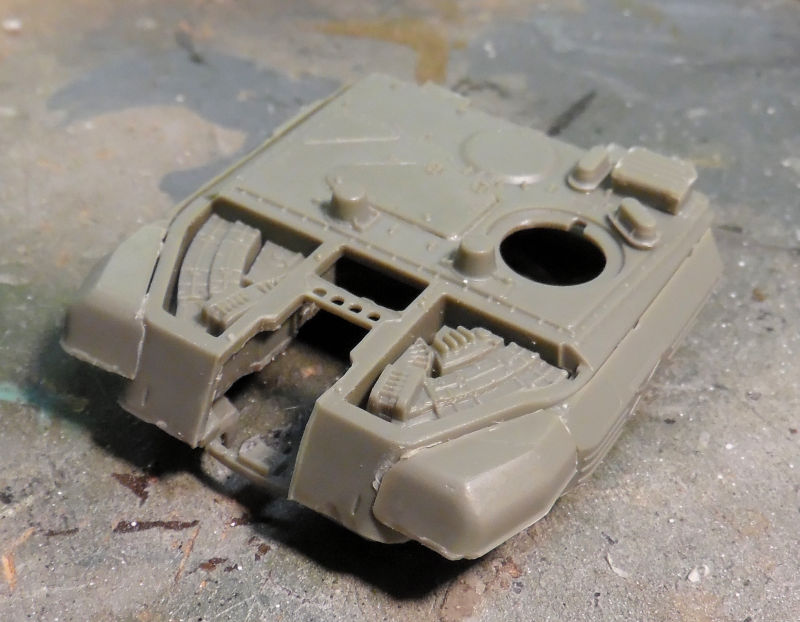
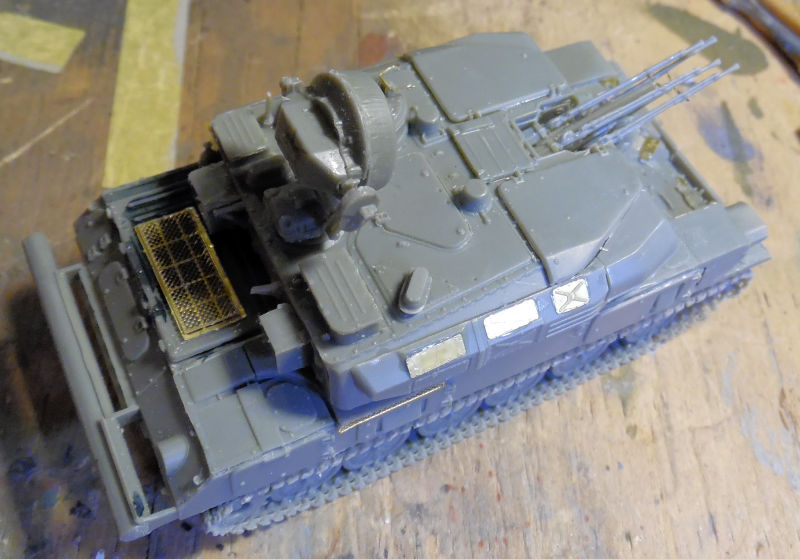
That is where we stopped on these, next up is the most difficult Armory ZSU-23-4 Shilka. First, we did the simple part; adding almost all the detail parts to the upper hull:
Then we built the quad guns. They were built on two carriages, two each per carriage:
Now, adding these to the turret was a nightmare. There were three parts that you needed to glue together that were so delicate that if you looked at them wrong, they broke....and they were the mounting plates for these guns! So, after three and a half hours of finagling and fighting with this, we finally had this done:
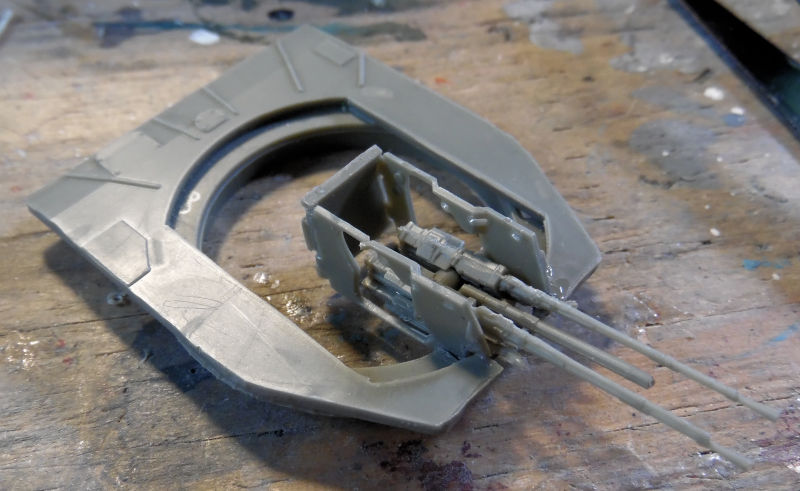
Note the one gun wasn't straight. We fixed that but when we went to add the second set of guns; we ended up with this:
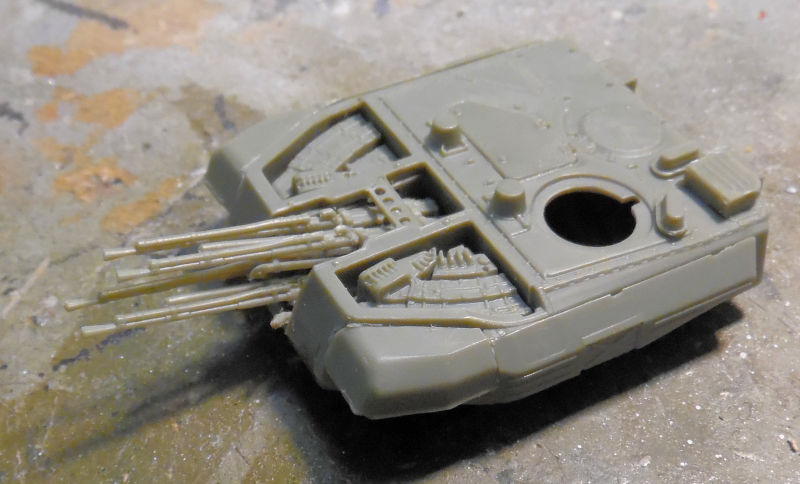
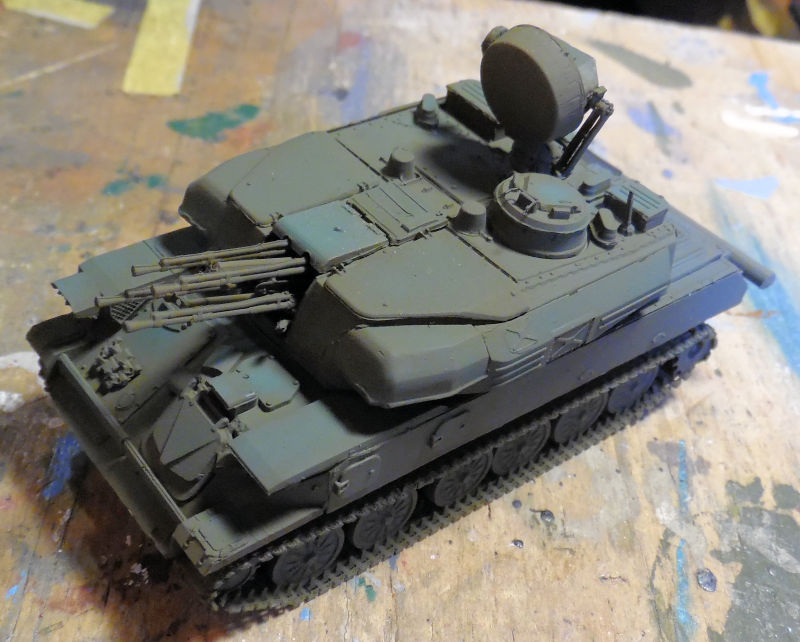
Yep! Everything fell apart, blowing away three and a half hours of work. While I fought to recover from that frustration, we finished off most of the details on the turret:
I figured it would be easier for us if these were added before the guns went on reducing the risk they break.
After about another hour and a half of work on the guns, we finally managed to get them installed.....and more importantly, looking correct!
Here's a final shot of the upper and lower hulls together (yes the lower hull is under there!) and the turret mounted on the top:
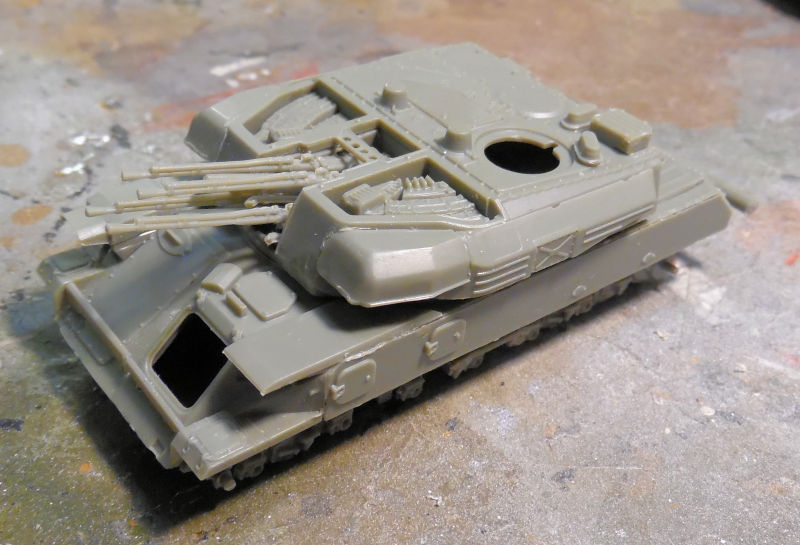
That was as far as I wanted to go with that one! It says cooling hoses are supposed to be added and shows a diagram, but after fighting this so hard; those will not be added.
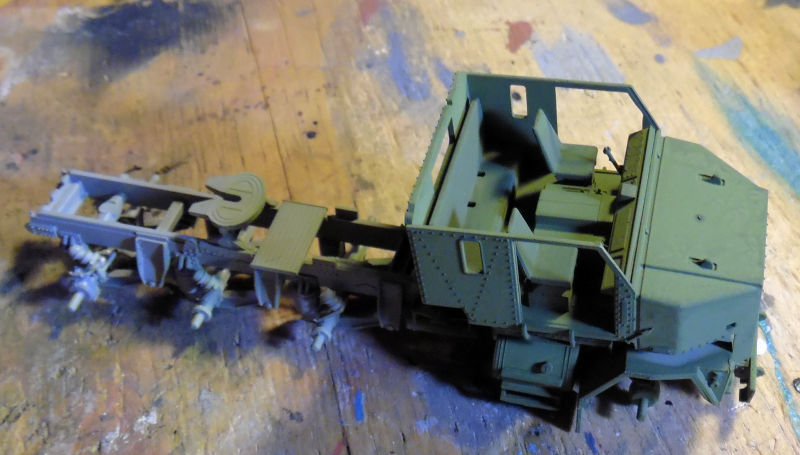
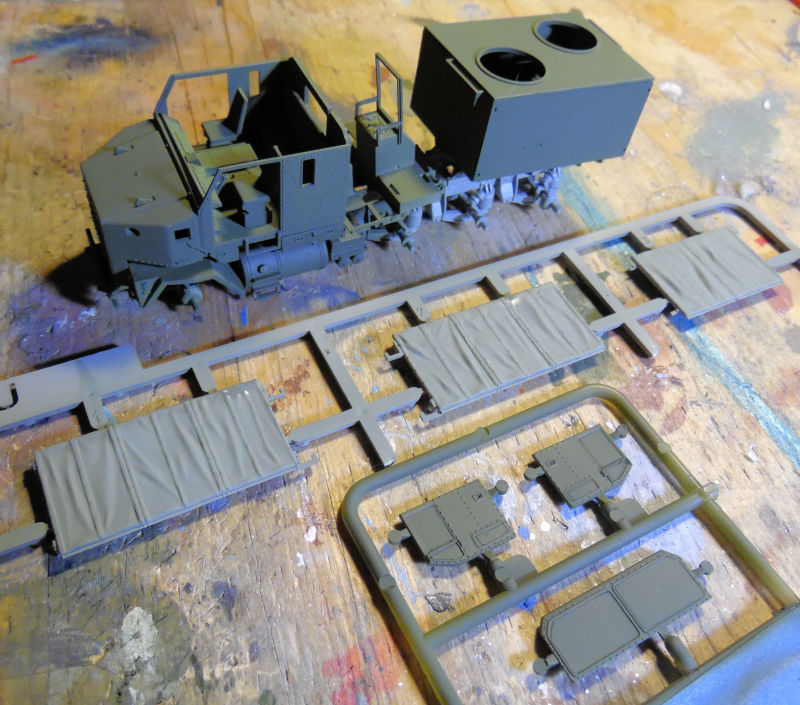
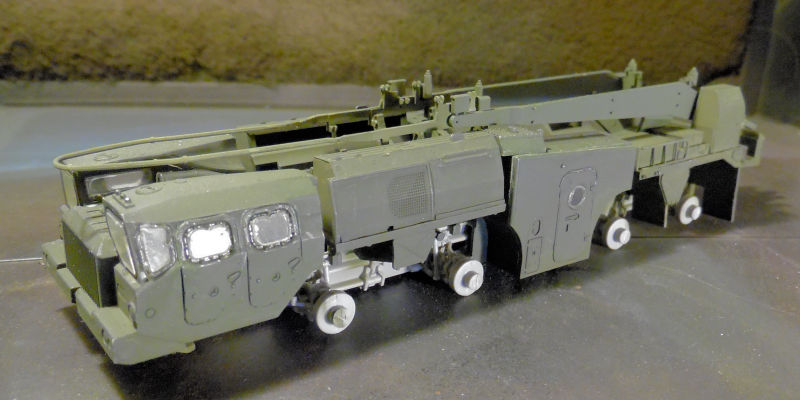
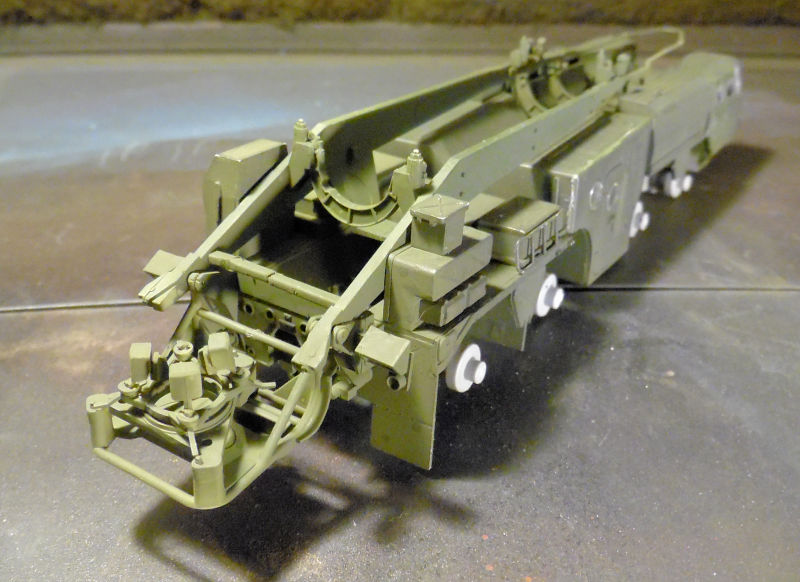
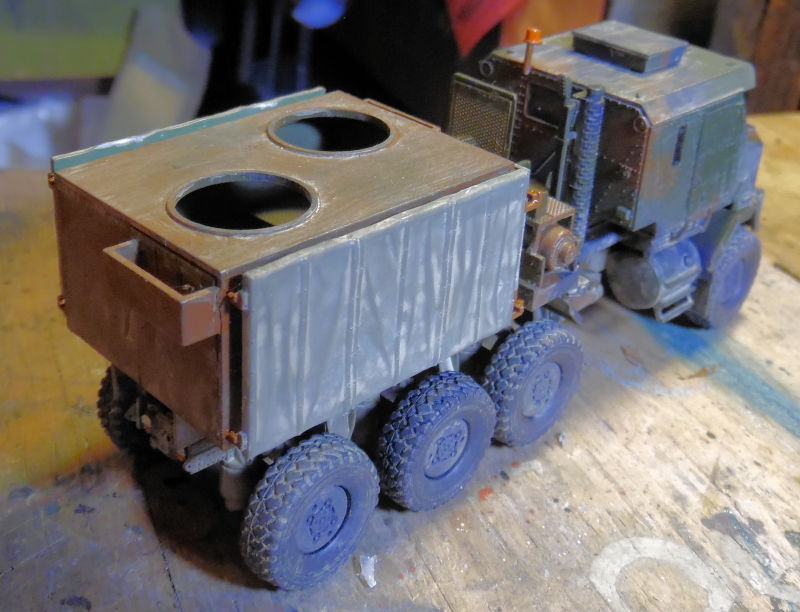
Finally in this last bay we have the M1070 gun truck. First off, the last details were assembled and everything was cemented down to the chassis:
Next another full shot of green was added:
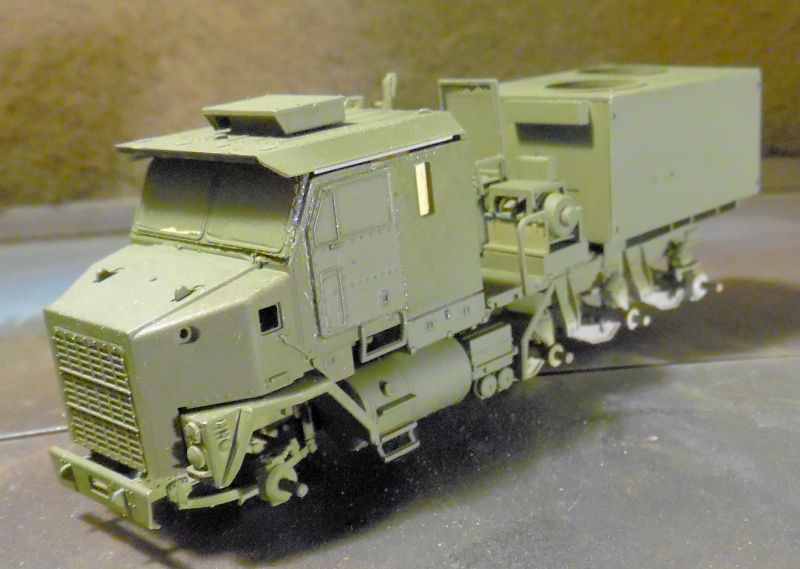
Afterward, we freehanded a camouflage pattern on this, and sprayed the gun box a rusted metal color:

We're gonna be clear coating this for decals soon, and then finish off the final details.
And that is the extended tour of Maddog Manufacturing Motor Pool. Thank you all for stopping in and remember that comments are welcome.
Let's start here with the civilian Ford Stakebed truck, which has been painted with the cream on the cab and truck bed:
Later the red trim was added after everything was masked off:
That is where we left this right now. Moving on to the next bay we have another Shelf Queen, started about six years ago. Finally found all the missing parts and got all the rest of the main parts installed:
Later this truck also got a coat of red, making this almost ready to be declared finished:
Moving to the next bay we find the Russian tracked 280mm gun. The main gun has been glued to the carriage and almost all the final details have been added. Some parts and sub assemblies have gone missing, but we're going to continue to work on this until all is found:
Later the photo etch was added, bringing this closer to being done:
Next to this is the Russian tracked 152mm gun. This was started later, but we now have it catching up to the 280mm gun. First we installed the main gun in the trunnions, and made the hydraulics that raise and lower the gun:
We added more details to the main carriage, cemented down the gun and also finished off most of the details on the trunnions, bringing this to the photo etch stage:
Photo etch and some final details added next and this was ready for paint:
After everything had sufficiently dried, we shot a base of Russian Green on this. It shows much lighter in this pic than it does in real life:
The same had been shot on the 280mm gun but I apparently forgot to take pics of that.
Moving on, we found another Shelf Queen, this one only two years old. It's the Modelcollect SCUD D TEL that needed some more green paint on additional parts that had been added after it was painted:
'
I was going to camouflage this, but I don't want to hassle with re-masking all the windows again. We might hand brush the pattern on it, I'm still trying to decide. Meanwhile, this is ready for further progress....
In the next bay, we have the two Israeli Centurions. This first one, the Sho't Kal Gimmel; got all the detail parts on the main hull and we started on some of the details on the turret:
Later we finished all the details on the turret. Here it is all set and ready for photo etch:
Interestingly enough; the photo etch sheet for this kit is missing. So, we continued to work on the Centurion Sho't Kal Dalet. Again, most of the turret and all of the hull details were added, just as with the Gimmel:
Later the turret was done completely:
That thing on the front of this tank is a battering ram. Some Dalets had them so I added this to mine to help differentiate between them.
We had the photo etch for this one so almost all the photo etch was added to this:
Once everything was dry, we shot a base of Green Drab on this tank. It is still wet in this picture:
After this completely dried, we applied a light coat of Israeli Sand Grey over the top, modulating the color for added ascetics. It is real hard to see in this picture, but I assure you it is there:
That is where we stopped on these, next up is the most difficult Armory ZSU-23-4 Shilka. First, we did the simple part; adding almost all the detail parts to the upper hull:
Then we built the quad guns. They were built on two carriages, two each per carriage:
Now, adding these to the turret was a nightmare. There were three parts that you needed to glue together that were so delicate that if you looked at them wrong, they broke....and they were the mounting plates for these guns! So, after three and a half hours of finagling and fighting with this, we finally had this done:
Note the one gun wasn't straight. We fixed that but when we went to add the second set of guns; we ended up with this:
Yep! Everything fell apart, blowing away three and a half hours of work. While I fought to recover from that frustration, we finished off most of the details on the turret:
I figured it would be easier for us if these were added before the guns went on reducing the risk they break.
After about another hour and a half of work on the guns, we finally managed to get them installed.....and more importantly, looking correct!
Here's a final shot of the upper and lower hulls together (yes the lower hull is under there!) and the turret mounted on the top:
That was as far as I wanted to go with that one! It says cooling hoses are supposed to be added and shows a diagram, but after fighting this so hard; those will not be added.
Finally in this last bay we have the M1070 gun truck. First off, the last details were assembled and everything was cemented down to the chassis:
Next another full shot of green was added:
Afterward, we freehanded a camouflage pattern on this, and sprayed the gun box a rusted metal color:
We're gonna be clear coating this for decals soon, and then finish off the final details.
And that is the extended tour of Maddog Manufacturing Motor Pool. Thank you all for stopping in and remember that comments are welcome.
Duke Maddog
Well-known member
Chris, yes we have. Soon (I hope!) some of these will be off the bench to make room for more!
Duke Maddog
Well-known member
I have a lot to be thankful for this past Thanksgiving Day week, some of which is the progress we made on some of these models that have been fighting me. So much has been done that it's time for another tour.
We have kept the Shipyards idle again, so this tour will start in the Hangar to show the progress made on a couple projects.
First, we got the decals on the Russian Shtormovik:
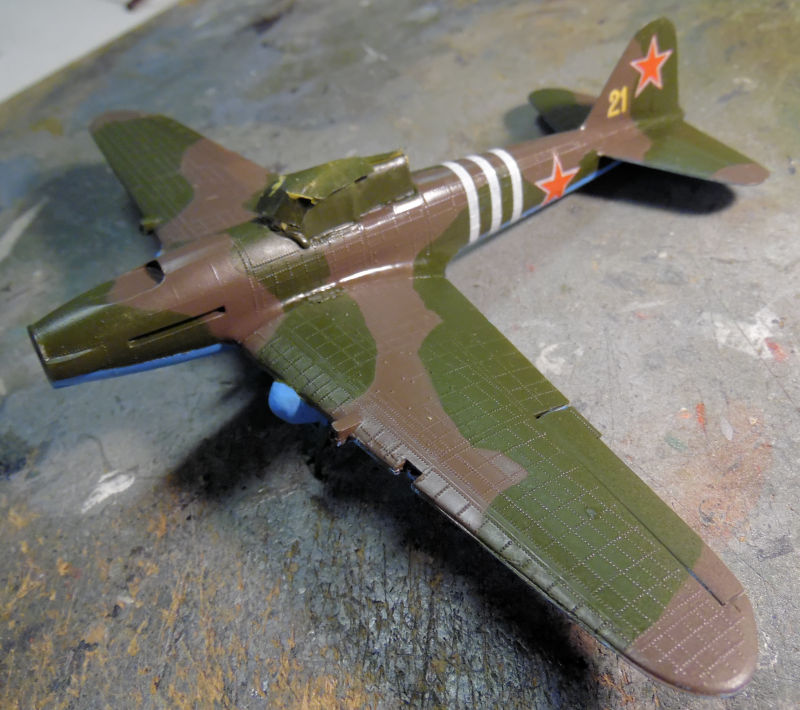
They went on surprisingly well considering the extensive age of the decals. Now all that is left is the final details before this can be called done.
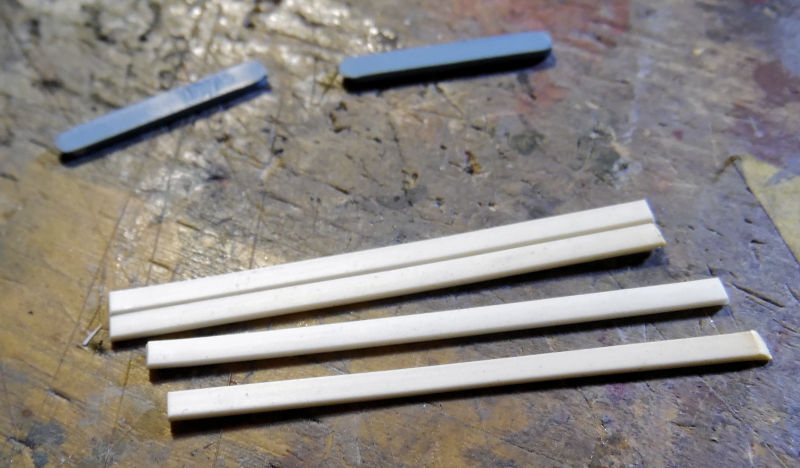
Next, we discovered that the support struts for the wing on the Russian Be-4 were far too short due to the fact that we had to raise the center pylon to keep the propeller from chopping off the nose. So we cut some new ones from strip styrene:
The originals are in blue above the four strips. Then; using Silly Putty to hold the fuselage in place upside down, we glued the wing to the fuselage and added the struts:

In retrospect, we should have done the same with the outrigger pontoons. I may still do that later....
Moving on, the Spitfire VIII got the decals applied as well:
Yes, they silvered quite badly, so that was addressed and the main landing gear and the tail wheel were installed:
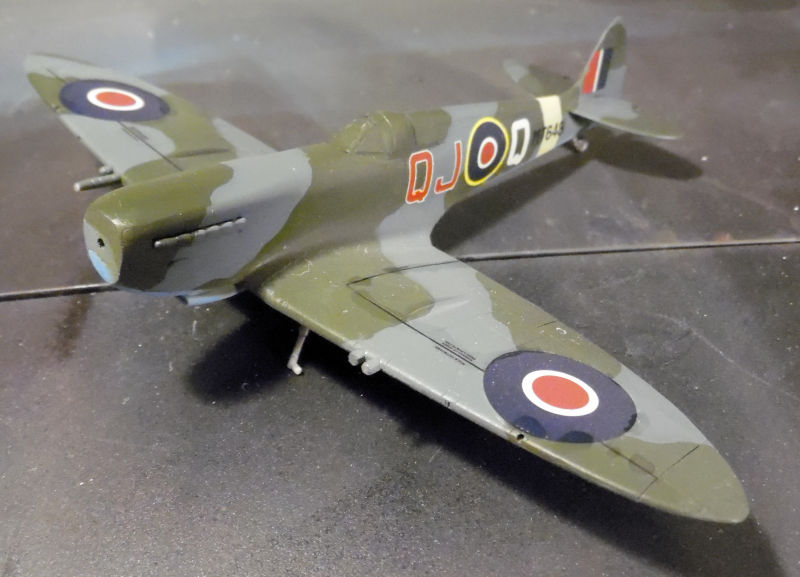
Getting close on that one.
That closes out the tour of the Hangar; as mentioned it was a short one. Now on to the Motor Pool where a lot has been happening.
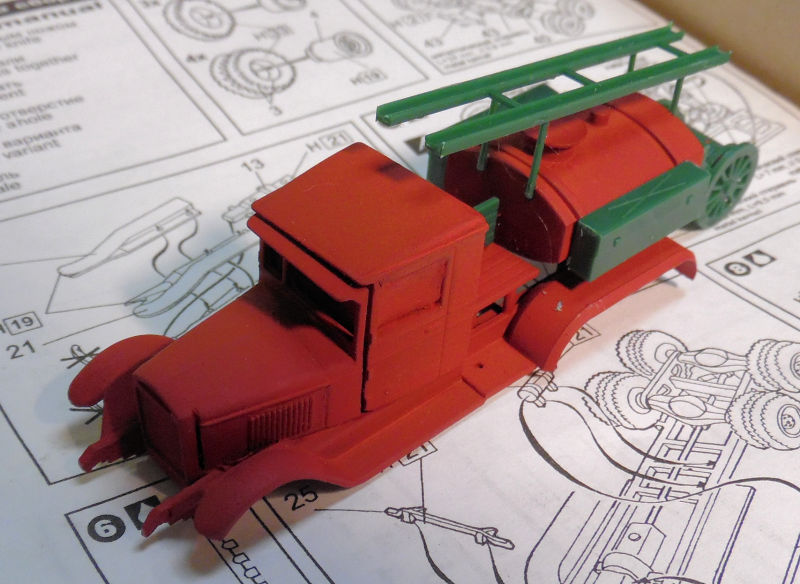
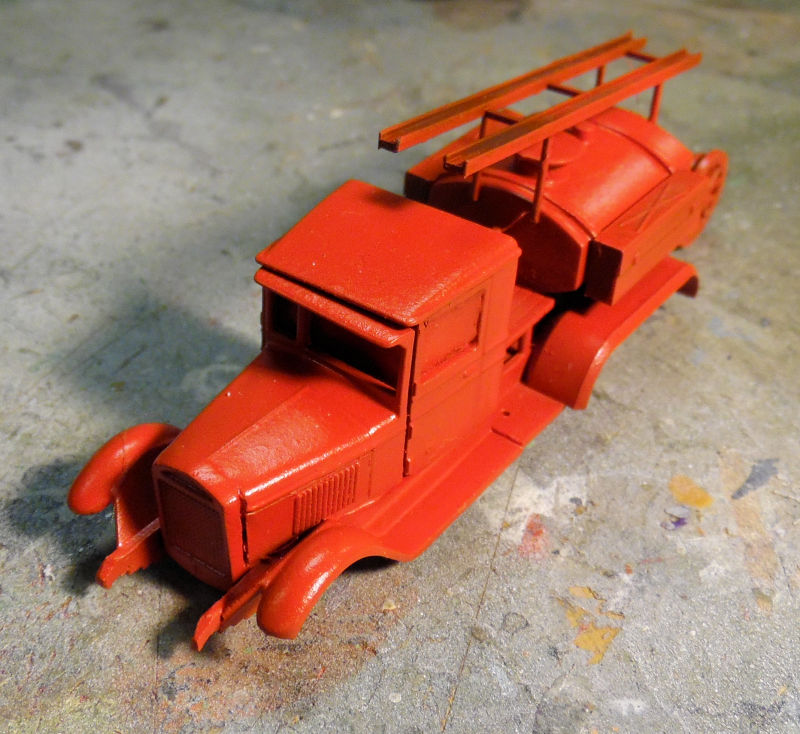
Here in the Motor Pool, we were rocking out getting things done. First, I decided we needed to get a couple of the Shelf Queens out if the Motor Pool and delivered to their respective forces. We started with the Russian fire truck that had been sitting for a couple years. It's an old PST kit which says a lot. It started out getting a new coat of red paint:
Next the wheels and some additional parts were added after which some more paint was done on some of the larger new additions:
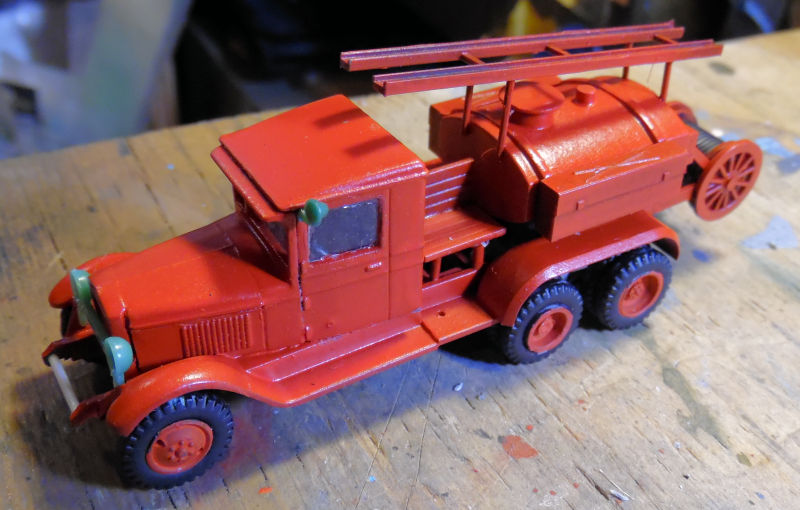
The new parts were painted and other details were painted up as well:
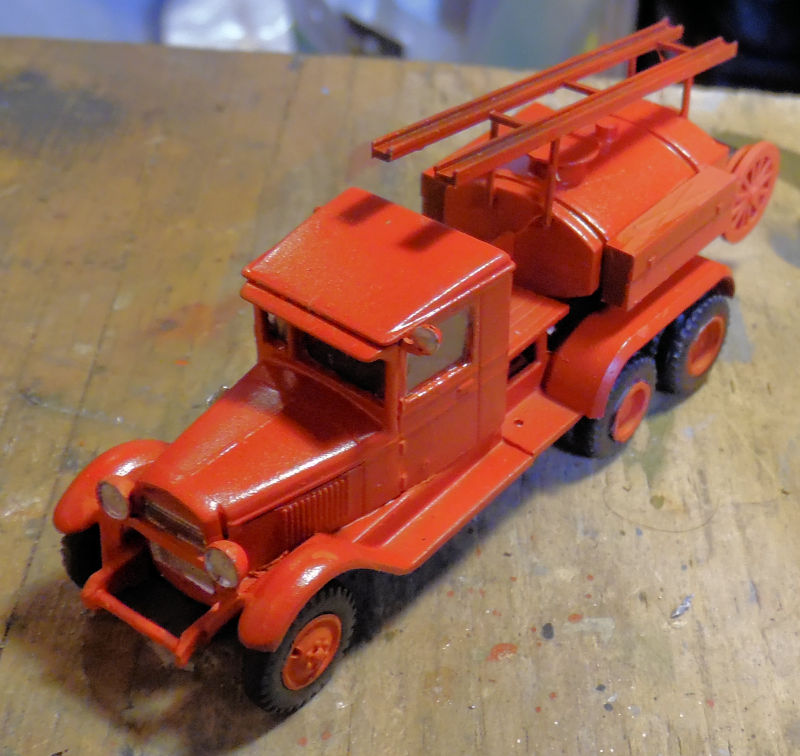
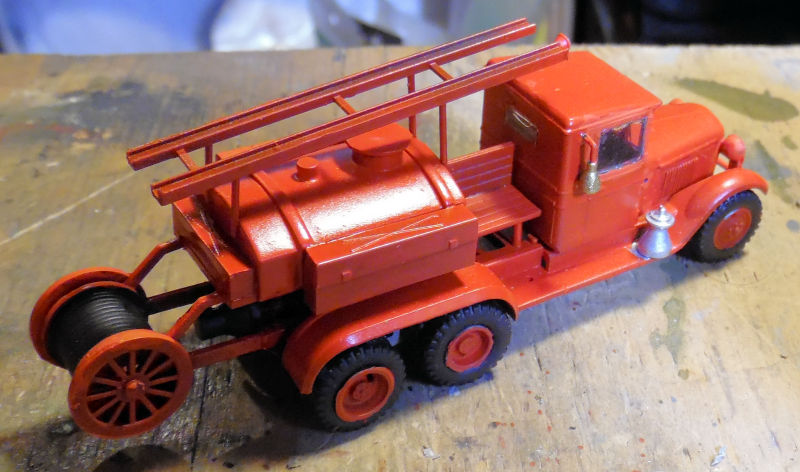
That one quickly arrived at the dispersal depot after that.
Another Shelf Queen that had sat for three or more years was my Russian SCUD D. I had wanted to finish it alongside the SCUD C I was building in conjunction with it, but the serious lack of the proper parts for the C means it will take too long and there was no reason the-D should sit in limbo with it. First, a couple additional colors were added for a three-tone camouflage pattern; it was hand brushed as I wanted this done quickly and there were too many delicate parts on the launcher arms for Silly Putty:
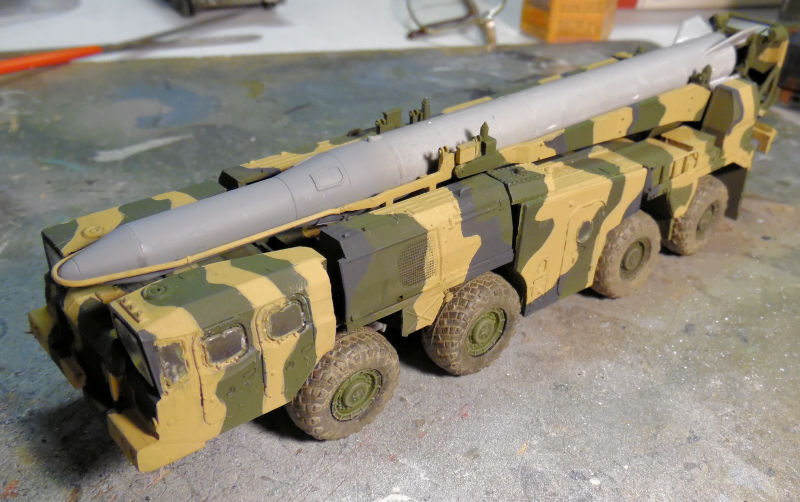
You can see wheels were added as well. The missile was just dry fit for looks.
Later the missile was painted, the vehicle was weathered and later some small decals were added after this next pic was taken:
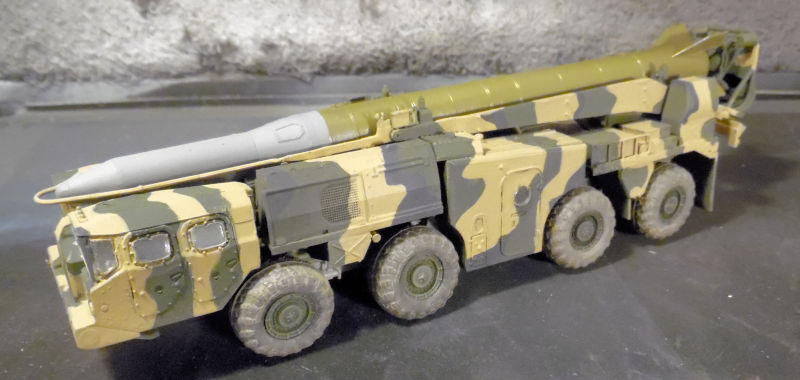
This one was sent to the dispersal depot after the last detail parts were added.
Concerning the two Russian tracked heavy guns; one was sent to the dispersal depot despite missing a few parts. They are not immediately noticeable, so until the missing parts turn up, it is being delivered. The second one, the 152mm gun was going to be delivered too, but the aiming scope was crooked. When we went to straighten it out, it broke off and disappeared. Since I was already so tired of these two guns taking up space, I scratched a new scope which is highly inaccurate, but screw it! It stays unless and until the right part reappears:
Moving on to the next bay, we found the photo etch for the Israeli Sho't Kal Gimel, so it was added to the turret and hull. Here you can see the basket part is partially glued and was glued the rest of the way after the glue dried:
The Gimel then got her side skirts on and a coat of paint:
The Dalet, meanwhile, had her tracks installed. Yes, I used the Pactra cement on the black vinyl tracks and it held them together perfectly, as if they were made of styrene:
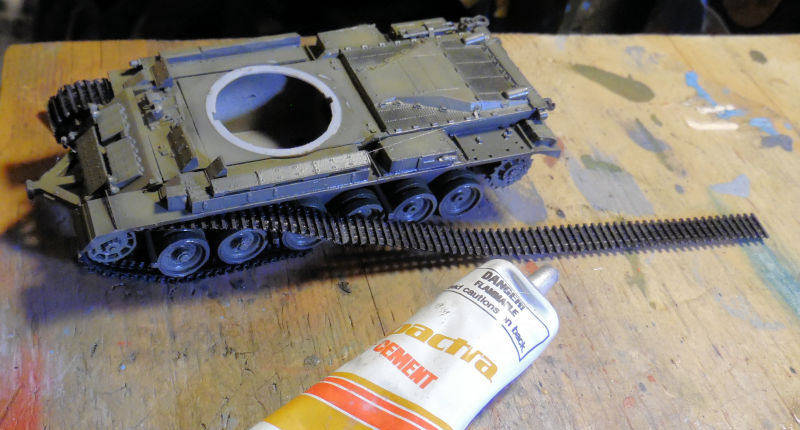
With that, it didn't take long to get both tracks on:
Later the Dalet got some additional photo etch added that had not been installed before:
Back to the Gimel, we installed the crew machine guns and added the barrel decals:
The decals were also applied to the rest of the tank and the detail parts painted. This allowed us to send the Gimel to the Dispersal Depot.
Finally, in this last bay, we assembled all the major components to the chassis and then painted the camouflage pattern on this cab for the M1070. It was freehanded with an airbrush because I was just getting lazy at this point and wanted this truck finished:
After a clearcoat, the decals were applied:

While they were drying, we went to work on the gun stations. They were fairly quick and easy to do, despite having a lot of parts:
Some of the last final details were added, including the anti-RPG sheets, the wheels and several additional detail parts:

After completing the rear view mirrors, this truck was also sent to the Dispersal Depot.
Thank you all for coming in and seeing the latest progress. Pics will be forthcoming of all the completed models, stay tuned for them later. Meanwhile, comments are welcome, thank you for joining this latest tour.
We have kept the Shipyards idle again, so this tour will start in the Hangar to show the progress made on a couple projects.
First, we got the decals on the Russian Shtormovik:
They went on surprisingly well considering the extensive age of the decals. Now all that is left is the final details before this can be called done.
Next, we discovered that the support struts for the wing on the Russian Be-4 were far too short due to the fact that we had to raise the center pylon to keep the propeller from chopping off the nose. So we cut some new ones from strip styrene:
The originals are in blue above the four strips. Then; using Silly Putty to hold the fuselage in place upside down, we glued the wing to the fuselage and added the struts:
In retrospect, we should have done the same with the outrigger pontoons. I may still do that later....
Moving on, the Spitfire VIII got the decals applied as well:
Yes, they silvered quite badly, so that was addressed and the main landing gear and the tail wheel were installed:
Getting close on that one.
That closes out the tour of the Hangar; as mentioned it was a short one. Now on to the Motor Pool where a lot has been happening.
Here in the Motor Pool, we were rocking out getting things done. First, I decided we needed to get a couple of the Shelf Queens out if the Motor Pool and delivered to their respective forces. We started with the Russian fire truck that had been sitting for a couple years. It's an old PST kit which says a lot. It started out getting a new coat of red paint:
Next the wheels and some additional parts were added after which some more paint was done on some of the larger new additions:
The new parts were painted and other details were painted up as well:
That one quickly arrived at the dispersal depot after that.
Another Shelf Queen that had sat for three or more years was my Russian SCUD D. I had wanted to finish it alongside the SCUD C I was building in conjunction with it, but the serious lack of the proper parts for the C means it will take too long and there was no reason the-D should sit in limbo with it. First, a couple additional colors were added for a three-tone camouflage pattern; it was hand brushed as I wanted this done quickly and there were too many delicate parts on the launcher arms for Silly Putty:
You can see wheels were added as well. The missile was just dry fit for looks.
Later the missile was painted, the vehicle was weathered and later some small decals were added after this next pic was taken:
This one was sent to the dispersal depot after the last detail parts were added.
Concerning the two Russian tracked heavy guns; one was sent to the dispersal depot despite missing a few parts. They are not immediately noticeable, so until the missing parts turn up, it is being delivered. The second one, the 152mm gun was going to be delivered too, but the aiming scope was crooked. When we went to straighten it out, it broke off and disappeared. Since I was already so tired of these two guns taking up space, I scratched a new scope which is highly inaccurate, but screw it! It stays unless and until the right part reappears:
Moving on to the next bay, we found the photo etch for the Israeli Sho't Kal Gimel, so it was added to the turret and hull. Here you can see the basket part is partially glued and was glued the rest of the way after the glue dried:
The Gimel then got her side skirts on and a coat of paint:
The Dalet, meanwhile, had her tracks installed. Yes, I used the Pactra cement on the black vinyl tracks and it held them together perfectly, as if they were made of styrene:
With that, it didn't take long to get both tracks on:
Later the Dalet got some additional photo etch added that had not been installed before:
Back to the Gimel, we installed the crew machine guns and added the barrel decals:
The decals were also applied to the rest of the tank and the detail parts painted. This allowed us to send the Gimel to the Dispersal Depot.
Finally, in this last bay, we assembled all the major components to the chassis and then painted the camouflage pattern on this cab for the M1070. It was freehanded with an airbrush because I was just getting lazy at this point and wanted this truck finished:
After a clearcoat, the decals were applied:
While they were drying, we went to work on the gun stations. They were fairly quick and easy to do, despite having a lot of parts:
Some of the last final details were added, including the anti-RPG sheets, the wheels and several additional detail parts:
After completing the rear view mirrors, this truck was also sent to the Dispersal Depot.
Thank you all for coming in and seeing the latest progress. Pics will be forthcoming of all the completed models, stay tuned for them later. Meanwhile, comments are welcome, thank you for joining this latest tour.
Duke Maddog
Well-known member
We've had three weeks of awesome productivity here, so it's time for another tour of Maddog Manufacturing. Once again this will be a bit of a long tour, so please remember all safety requirements and enjoy the tour!
Our first stop as always is the Hangar. We have a couple of started models, and a few Shelf Queens that are receiving attention too.
In the first bay here is the British Spitfire Mk. XIV. We got all the paint damage repaired from when the paint cracked under the gloss coat:
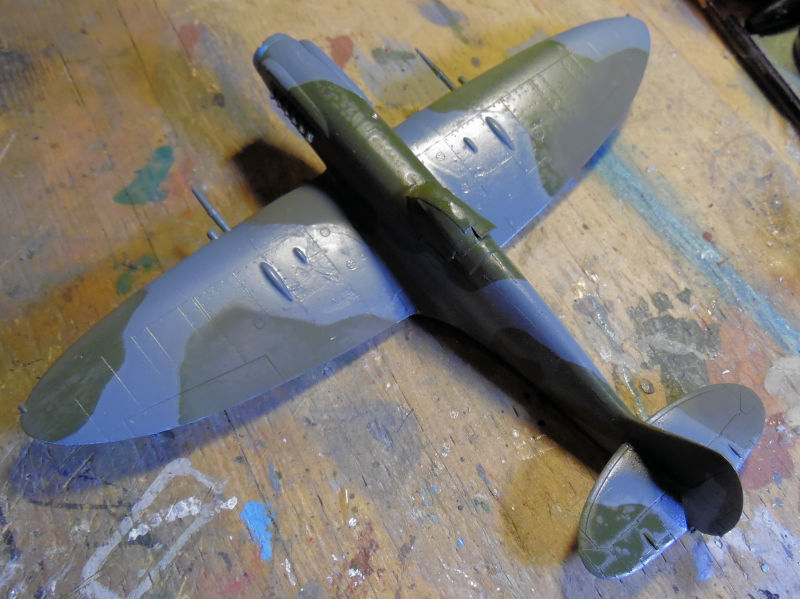
Later the white stripe had to be painted on, so that was done. Yes, I decided to do it by hand:
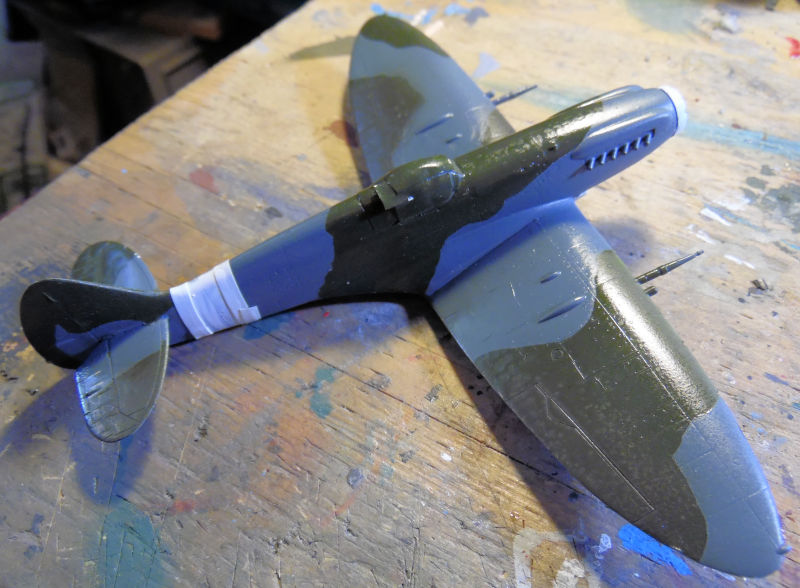
After that dried, we shot the whole thing with a gloss and added the decals:
Other details were painted and most final parts were added. Later the rockets were added and this was declared done and sent to the Dispersal Field.
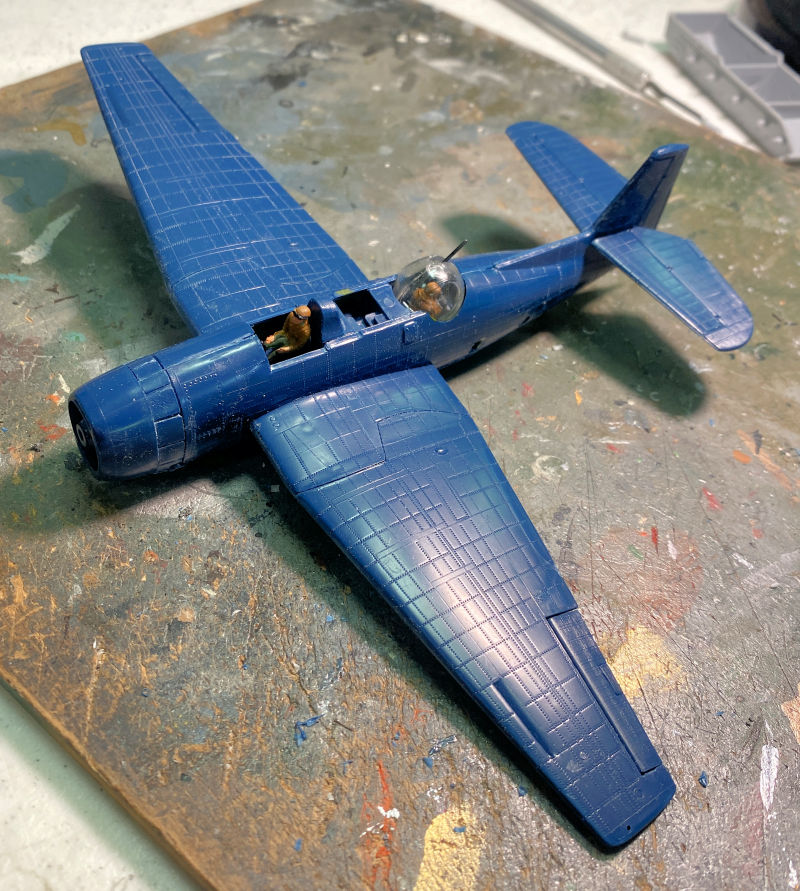
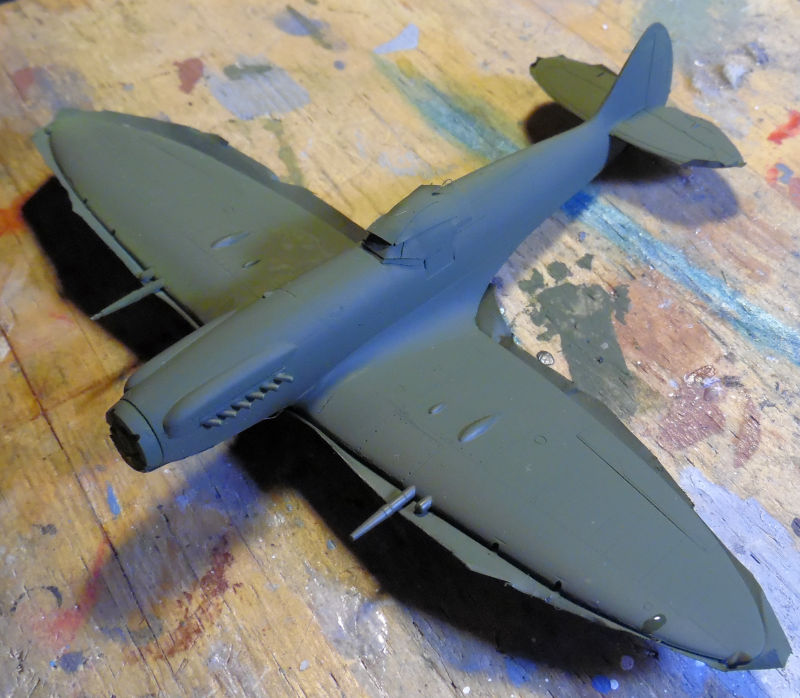
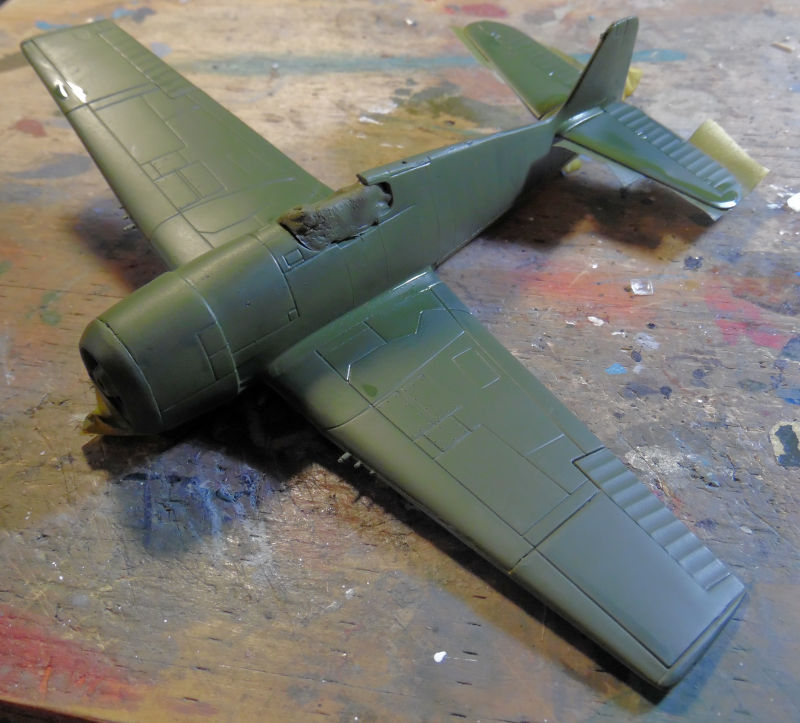
In this next bay we returned to the Fleet Air Arm F-6F Hellcat. This one got a shot of light RAF grey on the bottom:
Later, it was masked off and the upper green color was shot:
After some Silly Putty application we'll be able to shoot the second color. Looking forward to that!
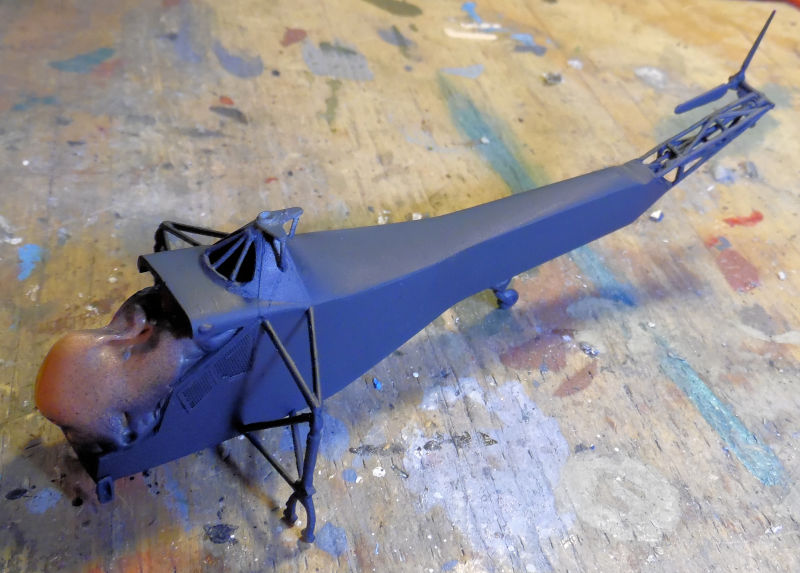
In this next bay we have a shelf queen that was started some five or six years ago, packed up in the box again and promptly lost. While organizing and going through boxes, it was found again and so work commenced in this to get it done. This is an R-4D helicopter used in the Korean War and we had it built up to the basic fuselage stage. When we brought it out to work on it, the first thing we did was use this model to teach a couple kids how to airbrush. Later, we went back and painted the interior and then sanded smooth the seams that showed up in the paint:
Next was the addition of photo-etch parts and the assembly of the tail rotor:
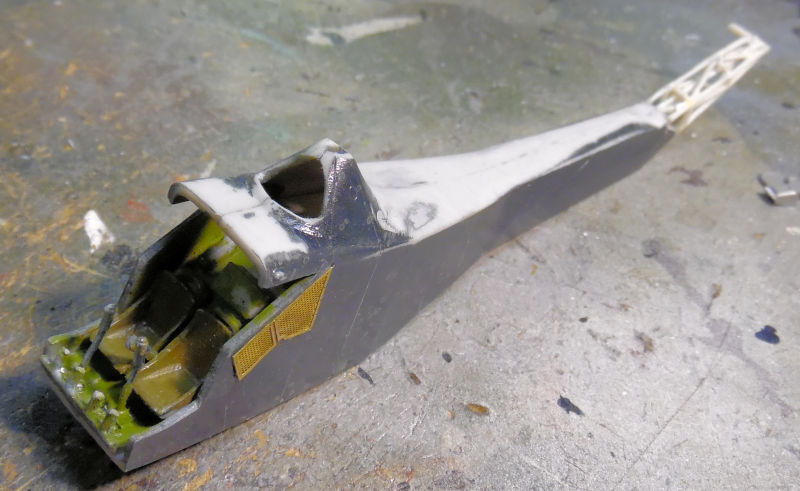
Following that, we got the main rotor assembled, which was quite the ordeal given the weak attachment points on the blades. We got it done though:
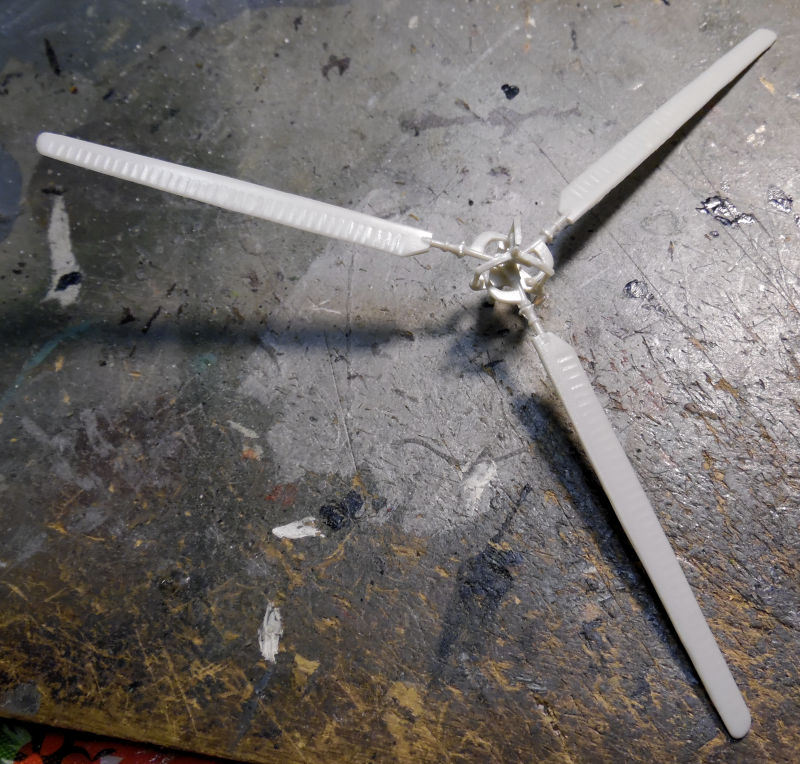
A little dry fit showed us what we were dealing with:
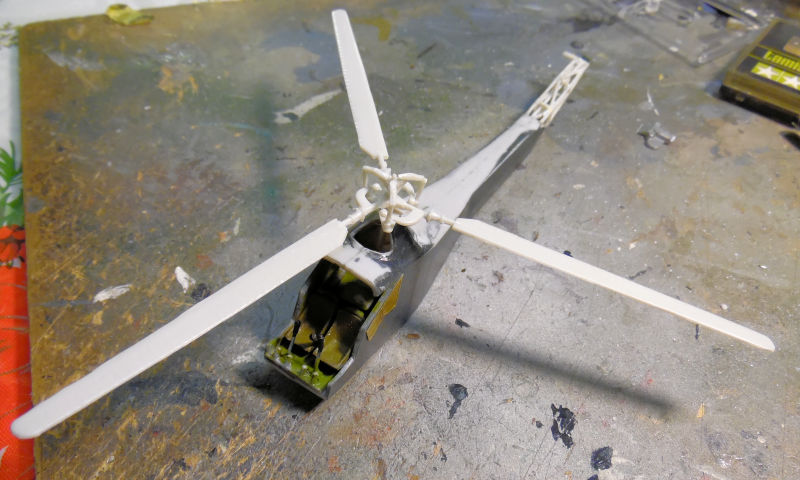
Later we started on the main landing gear. We got the main support struts installed, but had lost the main gear legs so this is where we left off at the time:
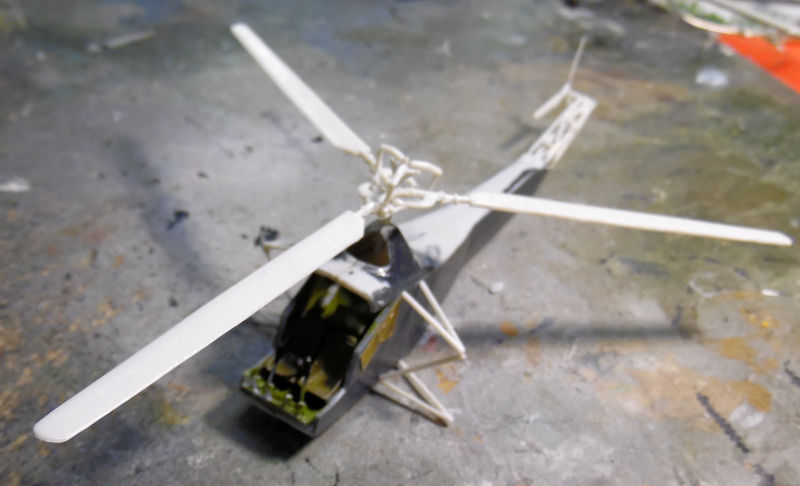
You can see the main rotor is still dry fit. Now a day later, we found the main gear legs and added them, then added the tail wheel and strut along with a couple more detail parts:
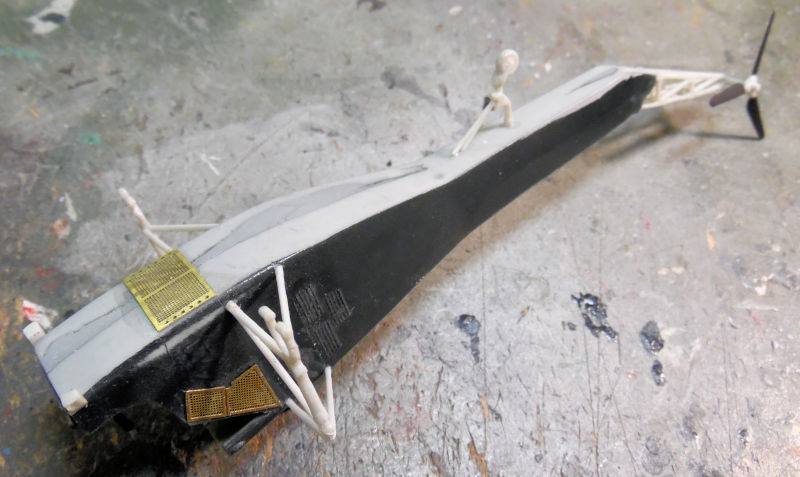
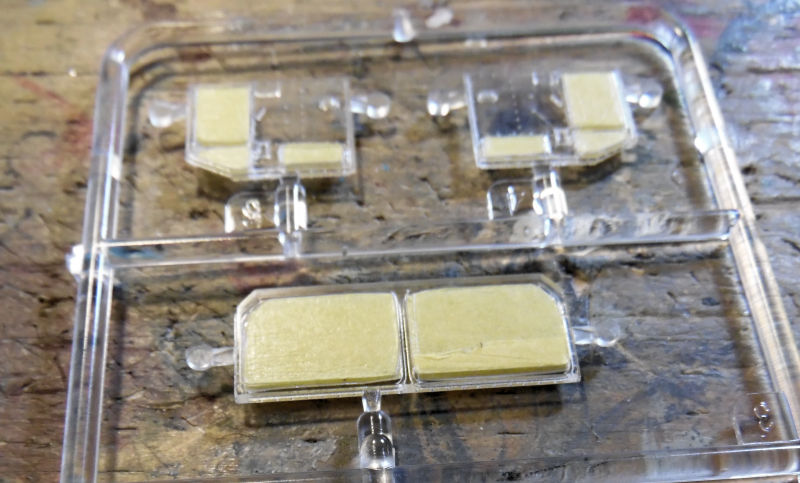
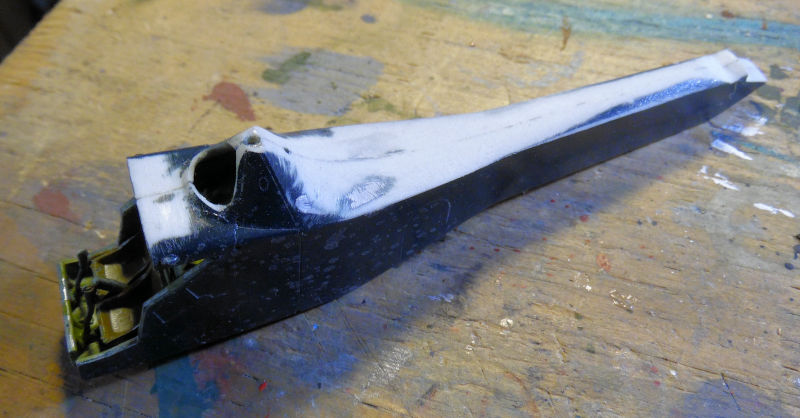
Here you can see why this was packed away in the first place: Vac-Formed canopy. Well, in for a penny, in for a pound, we got the frames painted first:
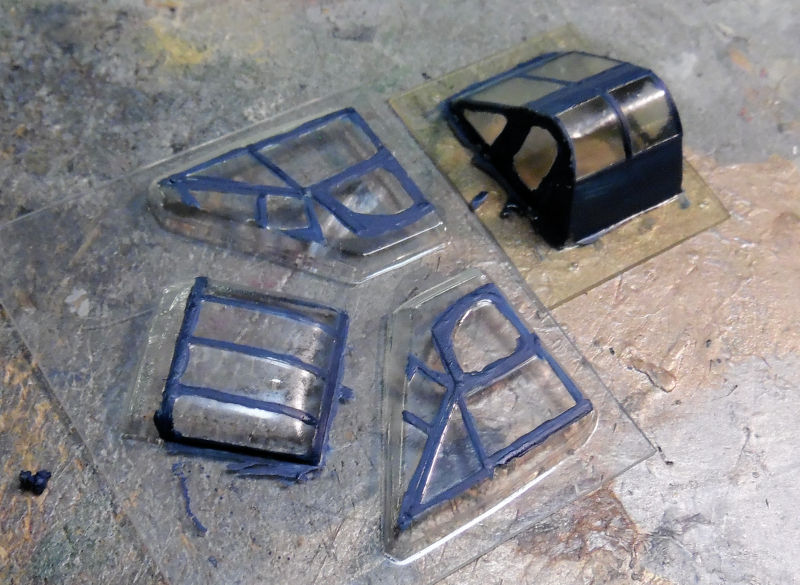
Any suggestions for installing those would be awesome. Meanwhile, we masked off the cockpit with more Silly Putty and got it ready for paint:

Which went on a short time later:
That was later shot with a gloss coat for decals which will go on later. This is where we stopped on that.
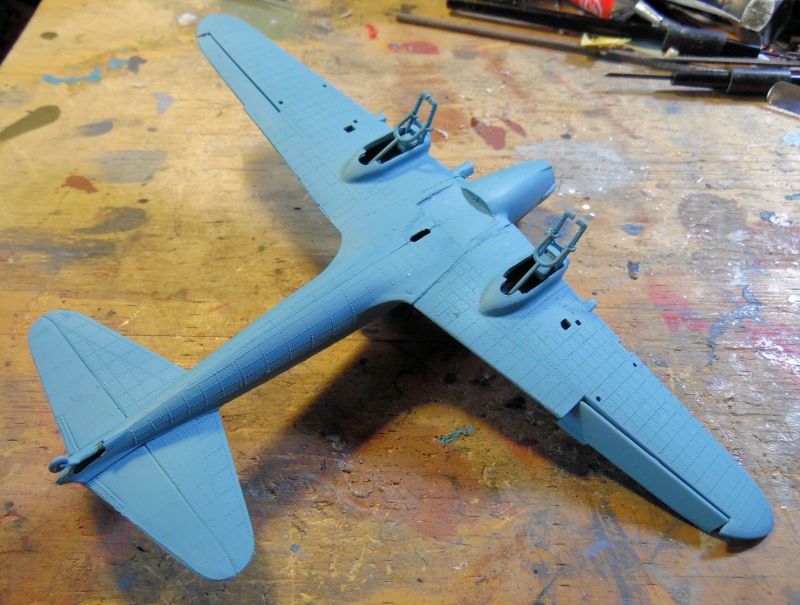
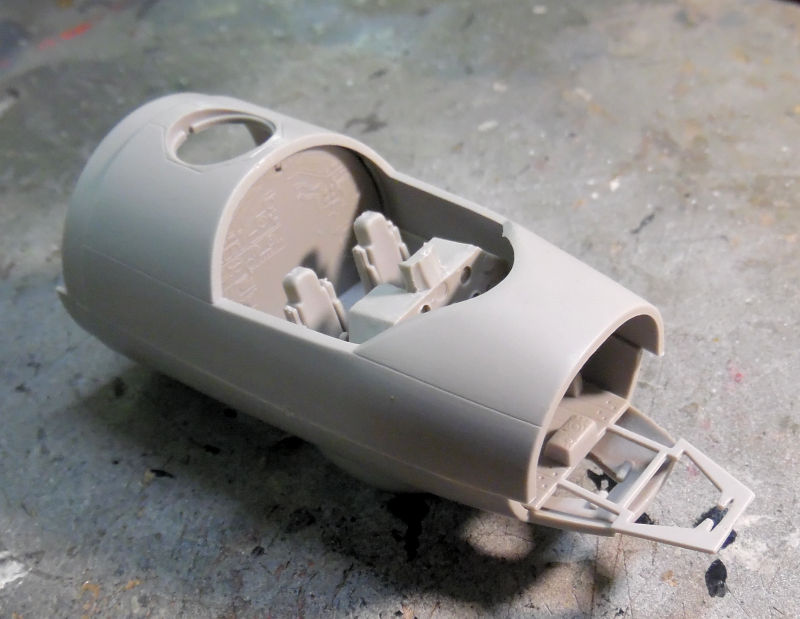
Moving on to the next bay, we have the start of an Egyptian Tu-16 Badger. I have a second one that will be done up in Iraqi Air Force markings too. For now, we got the cockpit assembled and dry-fit inside the cockpit module:
We then assembled the wings since they were so easy to do:
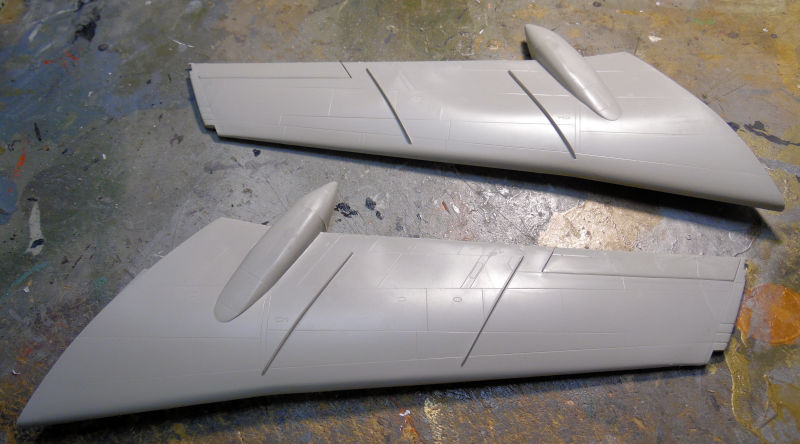
Further progress required paint that we did not have so we put this aside to start another fast and relatively easy kit; one I had never previously built before. This is the Heller F-94D in 1/72 scale and we started with the cockpit which was then cemented inside one half of the fuselage:
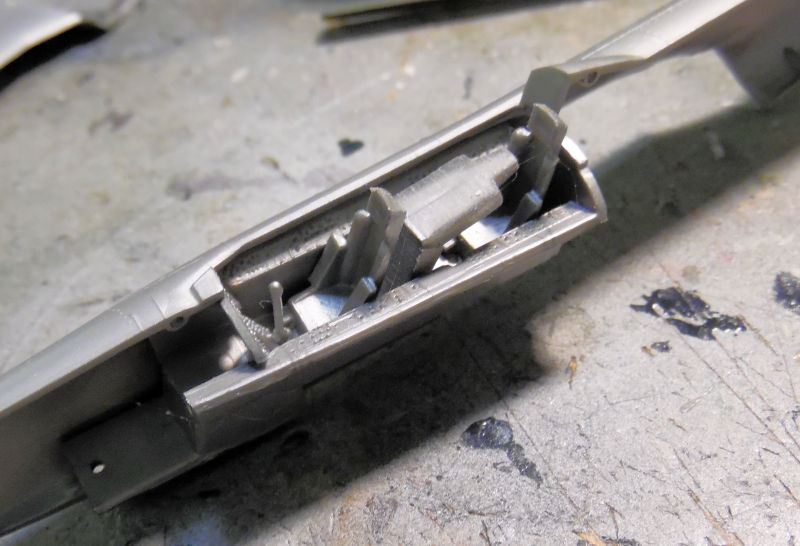
Later that cockpit was painted but before that, we built the main wings:
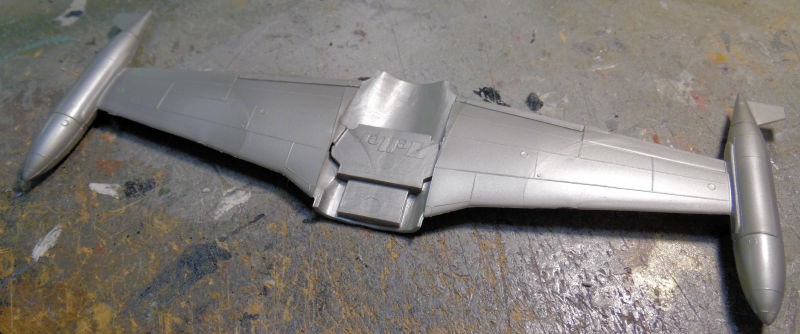
Later on, after adding the right amount of nose weight, this was all assembled together; puttied and sanded and readied for paint:
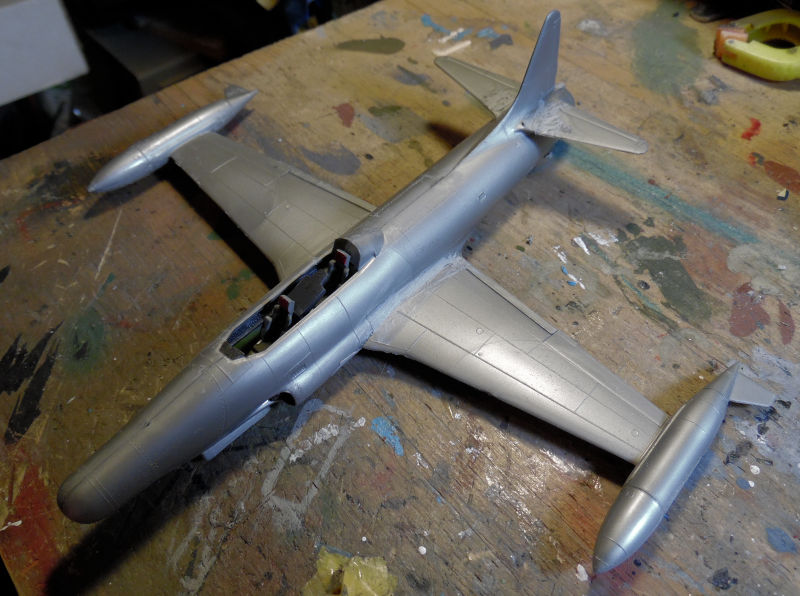
Later the cockpit canopy was masked and installed and this got a coat of flat black paint as a primer so we could see what issues this was going to have:
That's where we stand now with that. This completes the tour of the Hangar,now on to the Motor Pool.
Here in the Motor Pool, we have a number of things happening, some of which are new, and some are borderline shelf queens.
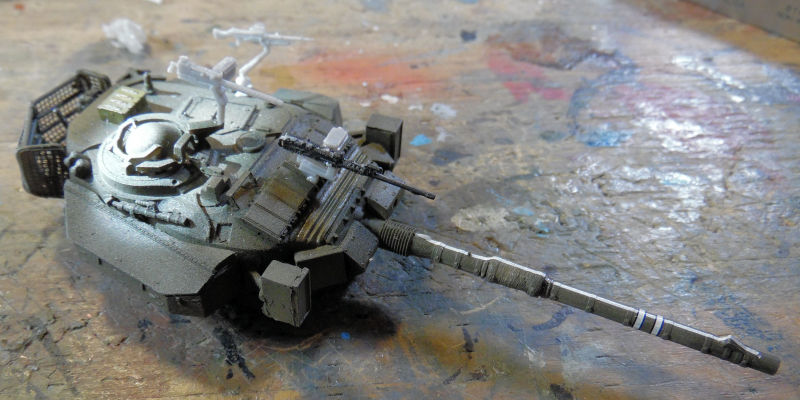
First up is this frustrating Armory ZSU-23-4 Shilka. Amazingly enough, we managed to get the torsion bars and wheels installed, followed by the individual link and length tracks. In fact one of the road wheels does not have a torsion bar because when I was trying to position it; the torsion bar sprang from the tweezers never to be seen again. So, I realized that the tracks touch this wheel top and bottom so it was cemented into place with the tracks themselves holding it into place.
Later photo etch parts were added to this:
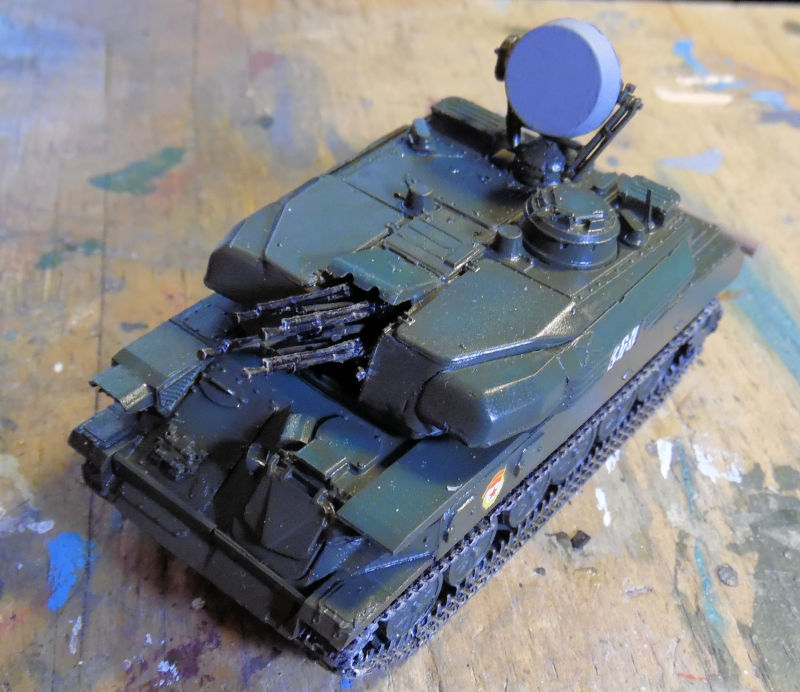
Once they were all dry, we sent this to the spray booth where the base coat was shot. Honestly, I never thought I'd ever get this model to this stage, but here it is, shot with a darker green than it's supposed to have due to me being out of the proper green:

In order to try and lighten it up, we took some Euro Dark Green and modulated the color over it. This is the first pass, later we did more and it improved a bit:
Once that was dry, we shot a gloss coat on this, gave it a wash, decals and other attention:
After this a dullcoat was applied and weathering done during it's shakedown run. Then it was sent to the Dispersal Yard.
In the next bay is another shelf queen, started some six years ago, packed up again in it's box and promptly lost. It was found in the same box as the helicopter so I figued it was time to move on this one. This is the Trumpeter SdKfz-9 with a crane. The basic chassis had been already done, so we continued to finish up that part, mostly adding the roadwheels, drive sprockets and idlers:
The main floor was then worked on, mostly assembling all the parts for the driver's and passenger's compartment. It's just dry fit on that chassis:
The base of the crane was then built as seen here:

That's as far as we got on that one. In the next bay we started another German truck, the Steyr 1500. The box was so messed up we just had to build it. Basic assembly was pretty good for a short run kit:
The remaining parts and some photo etch was then added:
Later this was shot with paint in the spray booth, but no pics of that.
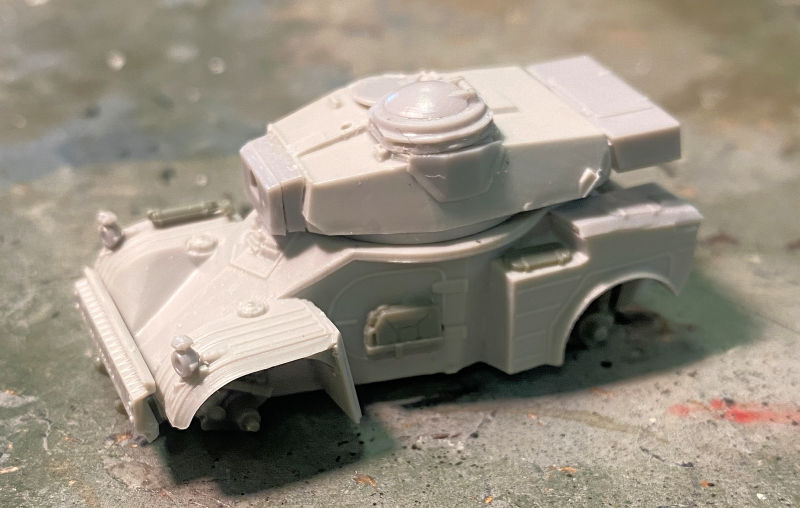
Moving to the next bay we have the start of another easy model; this time another german armored car (more modern this time) made by Revell of Germany. It was left behind at the hobby day hall, so I decided to build it. First was the chassis:
Next the whole body and interior was assembled. Then we added Silly Putty to the interior and added the roof so we can shoot the base paint on it:
That came later.
Finally in this last bay we went back to work on the little ACE Ford Stakebed truck. Some dry fitting was done to the chassis after we had painted the stakebed slats and the leather seats in the cab:
Later we finished the cab, except for the roof so we could get the windows in there later. The cab and stakebed were then glued to the chassis:
That's as far as we got with that, along with some touch up to the paint here and there. Hopefully this will be done soon!
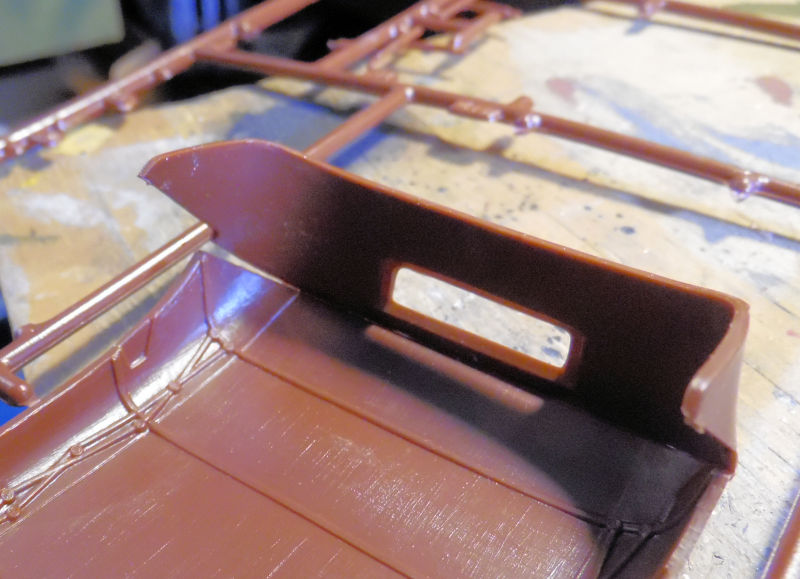
That completes the tour of the Motor Pool, but the tour isn't over. We're going to detour into the Shipyards briefly so you can see the start of a new project that I'd been wanting to do fora very long awhile. This is the ancient Pyro kit of the Robert E. Lee Paddle wheeled Riverboat. We started with painting the waterliine on the hull and then adding the main deck to it. While that was drying, we started the paddle wheels. These required us to cement every paddle to each if the wheel sides as such:
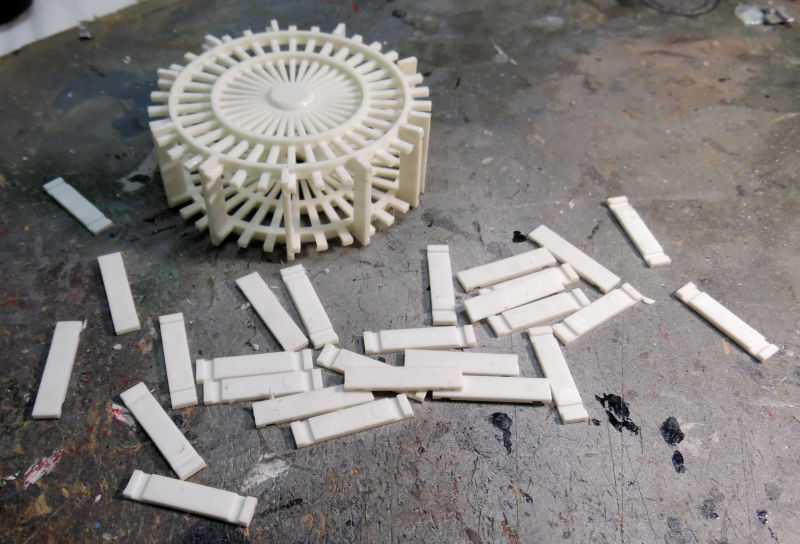
You can see where we started by adding a few paddles to certain quarters of the wheel to hold it together first. Then all the rest were cemented into place. That was the first one. The second one is here:
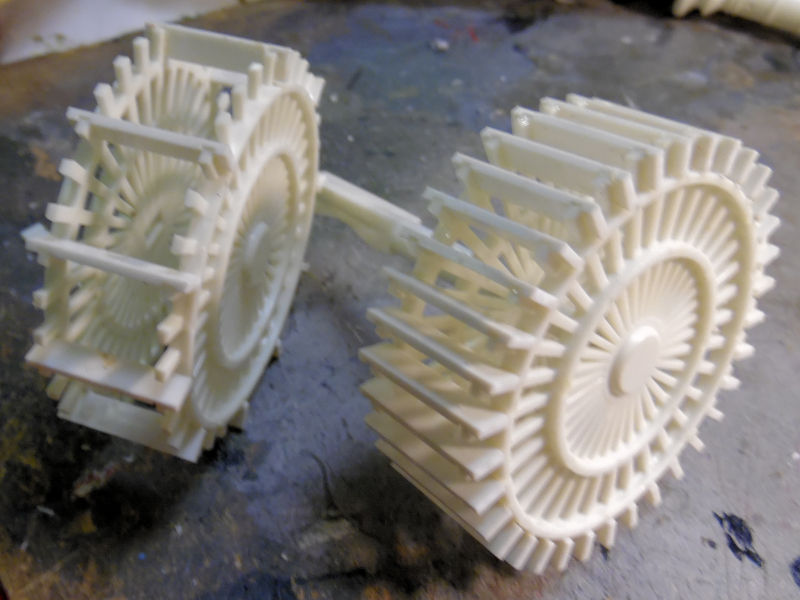
Both wheels eventually got done:

This final shot shows the paddle wheels and the boilers dry fit in place on the main hull:

By the way, that model is a little over two feet long. It has been and interesting and fun build so far.
And that completes this tour of Maddog Manufacturing for this second week of December. I hope you enjoyed it and remember comments are always welcome.
Our first stop as always is the Hangar. We have a couple of started models, and a few Shelf Queens that are receiving attention too.
In the first bay here is the British Spitfire Mk. XIV. We got all the paint damage repaired from when the paint cracked under the gloss coat:
Later the white stripe had to be painted on, so that was done. Yes, I decided to do it by hand:
After that dried, we shot the whole thing with a gloss and added the decals:
Other details were painted and most final parts were added. Later the rockets were added and this was declared done and sent to the Dispersal Field.
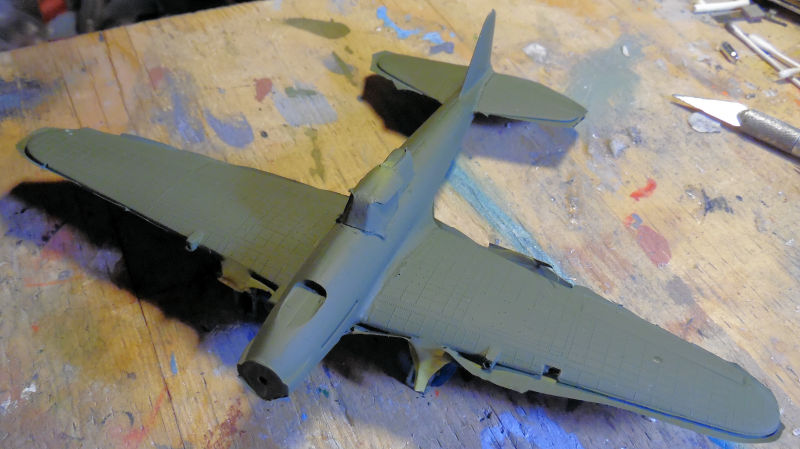
In this next bay we returned to the Fleet Air Arm F-6F Hellcat. This one got a shot of light RAF grey on the bottom:
Later, it was masked off and the upper green color was shot:
After some Silly Putty application we'll be able to shoot the second color. Looking forward to that!
In this next bay we have a shelf queen that was started some five or six years ago, packed up in the box again and promptly lost. While organizing and going through boxes, it was found again and so work commenced in this to get it done. This is an R-4D helicopter used in the Korean War and we had it built up to the basic fuselage stage. When we brought it out to work on it, the first thing we did was use this model to teach a couple kids how to airbrush. Later, we went back and painted the interior and then sanded smooth the seams that showed up in the paint:
Next was the addition of photo-etch parts and the assembly of the tail rotor:
Following that, we got the main rotor assembled, which was quite the ordeal given the weak attachment points on the blades. We got it done though:
A little dry fit showed us what we were dealing with:
Later we started on the main landing gear. We got the main support struts installed, but had lost the main gear legs so this is where we left off at the time:
You can see the main rotor is still dry fit. Now a day later, we found the main gear legs and added them, then added the tail wheel and strut along with a couple more detail parts:
Here you can see why this was packed away in the first place: Vac-Formed canopy. Well, in for a penny, in for a pound, we got the frames painted first:
Any suggestions for installing those would be awesome. Meanwhile, we masked off the cockpit with more Silly Putty and got it ready for paint:
Which went on a short time later:
That was later shot with a gloss coat for decals which will go on later. This is where we stopped on that.
Moving on to the next bay, we have the start of an Egyptian Tu-16 Badger. I have a second one that will be done up in Iraqi Air Force markings too. For now, we got the cockpit assembled and dry-fit inside the cockpit module:
We then assembled the wings since they were so easy to do:
Further progress required paint that we did not have so we put this aside to start another fast and relatively easy kit; one I had never previously built before. This is the Heller F-94D in 1/72 scale and we started with the cockpit which was then cemented inside one half of the fuselage:
Later that cockpit was painted but before that, we built the main wings:
Later on, after adding the right amount of nose weight, this was all assembled together; puttied and sanded and readied for paint:
Later the cockpit canopy was masked and installed and this got a coat of flat black paint as a primer so we could see what issues this was going to have:
That's where we stand now with that. This completes the tour of the Hangar,now on to the Motor Pool.
Here in the Motor Pool, we have a number of things happening, some of which are new, and some are borderline shelf queens.
First up is this frustrating Armory ZSU-23-4 Shilka. Amazingly enough, we managed to get the torsion bars and wheels installed, followed by the individual link and length tracks. In fact one of the road wheels does not have a torsion bar because when I was trying to position it; the torsion bar sprang from the tweezers never to be seen again. So, I realized that the tracks touch this wheel top and bottom so it was cemented into place with the tracks themselves holding it into place.
Later photo etch parts were added to this:
Once they were all dry, we sent this to the spray booth where the base coat was shot. Honestly, I never thought I'd ever get this model to this stage, but here it is, shot with a darker green than it's supposed to have due to me being out of the proper green:
In order to try and lighten it up, we took some Euro Dark Green and modulated the color over it. This is the first pass, later we did more and it improved a bit:
Once that was dry, we shot a gloss coat on this, gave it a wash, decals and other attention:
After this a dullcoat was applied and weathering done during it's shakedown run. Then it was sent to the Dispersal Yard.
In the next bay is another shelf queen, started some six years ago, packed up again in it's box and promptly lost. It was found in the same box as the helicopter so I figued it was time to move on this one. This is the Trumpeter SdKfz-9 with a crane. The basic chassis had been already done, so we continued to finish up that part, mostly adding the roadwheels, drive sprockets and idlers:
The main floor was then worked on, mostly assembling all the parts for the driver's and passenger's compartment. It's just dry fit on that chassis:
The base of the crane was then built as seen here:
That's as far as we got on that one. In the next bay we started another German truck, the Steyr 1500. The box was so messed up we just had to build it. Basic assembly was pretty good for a short run kit:
The remaining parts and some photo etch was then added:
Later this was shot with paint in the spray booth, but no pics of that.
Moving to the next bay we have the start of another easy model; this time another german armored car (more modern this time) made by Revell of Germany. It was left behind at the hobby day hall, so I decided to build it. First was the chassis:
Next the whole body and interior was assembled. Then we added Silly Putty to the interior and added the roof so we can shoot the base paint on it:
That came later.
Finally in this last bay we went back to work on the little ACE Ford Stakebed truck. Some dry fitting was done to the chassis after we had painted the stakebed slats and the leather seats in the cab:
Later we finished the cab, except for the roof so we could get the windows in there later. The cab and stakebed were then glued to the chassis:
That's as far as we got with that, along with some touch up to the paint here and there. Hopefully this will be done soon!
That completes the tour of the Motor Pool, but the tour isn't over. We're going to detour into the Shipyards briefly so you can see the start of a new project that I'd been wanting to do fora very long awhile. This is the ancient Pyro kit of the Robert E. Lee Paddle wheeled Riverboat. We started with painting the waterliine on the hull and then adding the main deck to it. While that was drying, we started the paddle wheels. These required us to cement every paddle to each if the wheel sides as such:
You can see where we started by adding a few paddles to certain quarters of the wheel to hold it together first. Then all the rest were cemented into place. That was the first one. The second one is here:
Both wheels eventually got done:
This final shot shows the paddle wheels and the boilers dry fit in place on the main hull:
By the way, that model is a little over two feet long. It has been and interesting and fun build so far.
And that completes this tour of Maddog Manufacturing for this second week of December. I hope you enjoyed it and remember comments are always welcome.
Mark that wood deck is begging for a oil paint wood treatment. 
fledermaus
Master at Arms
Woow, Mark thats a real factory, wish I had the time to do my models as fast as you do. 
Duke Maddog
Well-known member
Thank you Bob, and I agree about that deck. That is why I did it all today. Pics forthcoming!
Thank you 'Maus! I don't really have the time either; maybe that is why I do them so fast. Still, my stuff is toys compared to the massively incredible Masterpieces you put out!
Thank you 'Maus! I don't really have the time either; maybe that is why I do them so fast. Still, my stuff is toys compared to the massively incredible Masterpieces you put out!