
-
Modelers Alliance has updated the forum software on our website. We have migrated all post, content and user accounts but we could not migrate the passwords.
This requires that you manually reset your password.
Please click here, http://modelersalliance.org/forums/login to go to logon page and use the "Forgot your Password" option.
You are using an out of date browser. It may not display this or other websites correctly.
You should upgrade or use an alternative browser.
You should upgrade or use an alternative browser.
Revell's 1/72 U-Boot VII C "Wolf Pack"
- Thread starter White_Wolf
- Start date
White_Wolf
Master at Arms
Wow that weathering is spot on Laurence, the tower is just amazing
")
think i will be picking your brains when i get the the stage of painting. :frantic :frantic
I'd be happy to help, thank you for your kind words.
Laurence
Brokeneagle
Master at Arms
B)
the sub has come up great Laurence. Your weathering is excellent..........sorry for not looking into this earlier but I have been busy all June and have not been around.
Regards
Ian.
the sub has come up great Laurence. Your weathering is excellent..........sorry for not looking into this earlier but I have been busy all June and have not been around.
Regards
Ian.
White_Wolf
Master at Arms
Thanks Ian, much appreciated.
Don't worry about not looking, we all know how busy life can be
Cheers,
Laurence
Don't worry about not looking, we all know how busy life can be
Cheers,
Laurence
centaur567
Well-known member
I bet it even smells like salt, rust and diesel fuel. Very nice. I built this kit a while ago and love every minute of it. Gary :skipper
White_Wolf
Master at Arms
I bet it even smells like salt, rust and diesel fuel. Very nice. I built this kit a while ago and love every minute of it. Gary :skipper
Thanks Gary
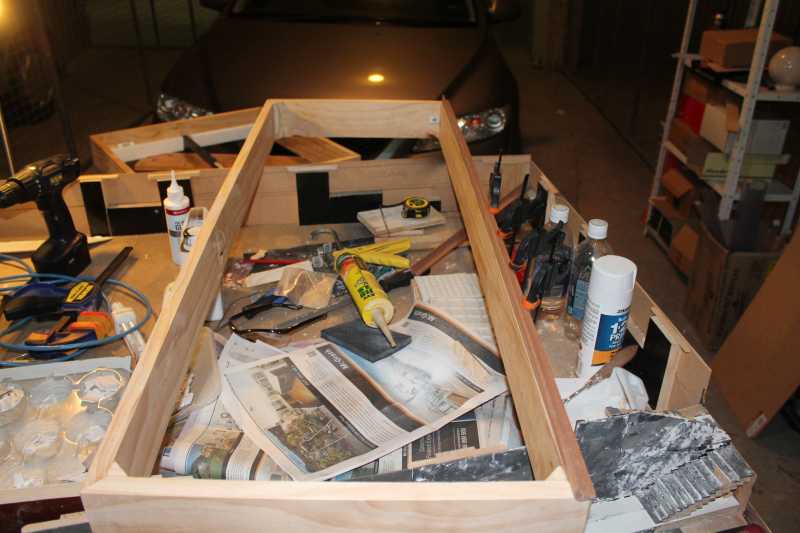
Working on the base - 1.2m long, 400 mm wide, the frame is done, adding the wood trim, bit by bit....takes a while, hope the result is worth it.
Laurence
Duke Maddog
Well-known member
Looking good so far. I think You're right on target.
White_Wolf
Master at Arms
Looking good so far. I think You're right on target.
Thanks Mark
Base is almost done, no water yet, just the frame.
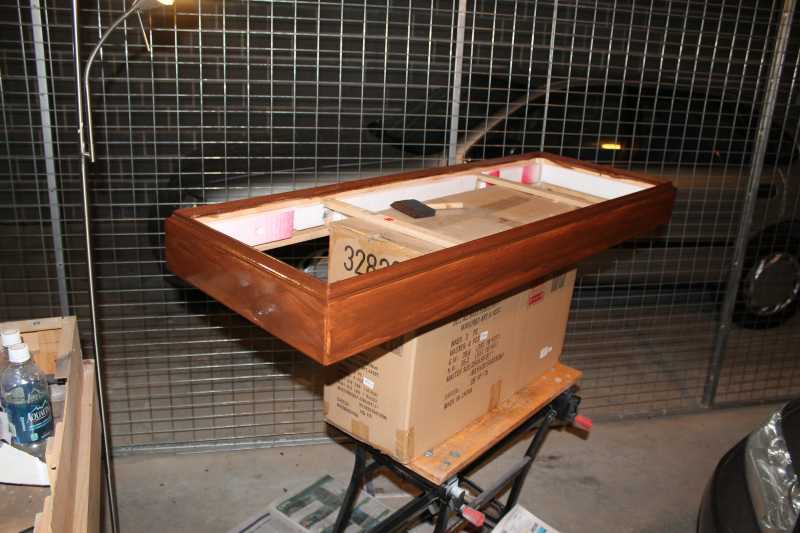
Prior to staining, just a coat of sealing agent as this is pine and staining would look horrible without one.

Stained.

Wiped off.
At least one coat of gloss finish will follow.
Thanks for watching,
Laurence
Skinny_Mike
Well-known member
Nice work on the base!

White_Wolf
Master at Arms
Bit of an update on this build.
Decision was made to change course sort of speak. Rather than a full sub, decided to do the waterline version. So, here it is, cut and placed on the base for a viewing, proportions, angles and all.
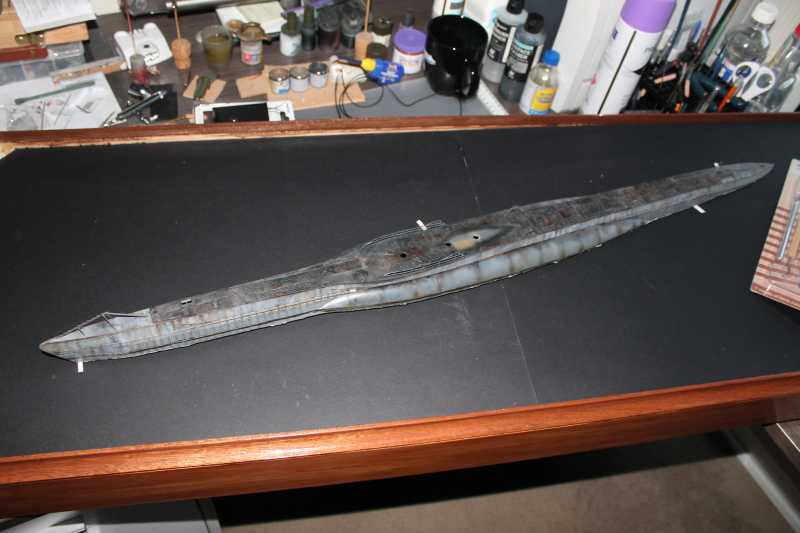
The small protruding pieces of white thingy are strips styrene that I glued to the hull and will be covered with celluclay so the sub is firmly fixed to the base.
The material of choice for the water is Celluclay, the paper mache of champions . What did NOT make me happy was the pricetag. It could not be sourced here in Oz, nobody seems to sell that stuff. :vmad :vmad :vmad
A thin layer of around 2 mm was applied initially, to cover the base and start building from there.

The small black patch demonstrates how good I am with calculating the amount needed. Well, that has been fixed. I applied the celluclay in several rounds sort of speak, simply did not have the time to do it all in one go.
Onto building some water effects. I want to show a rather choppy sea, without going full tropical storm.
I did my research, and I gathered it should look something similar to these images below. Only the bow section for now.
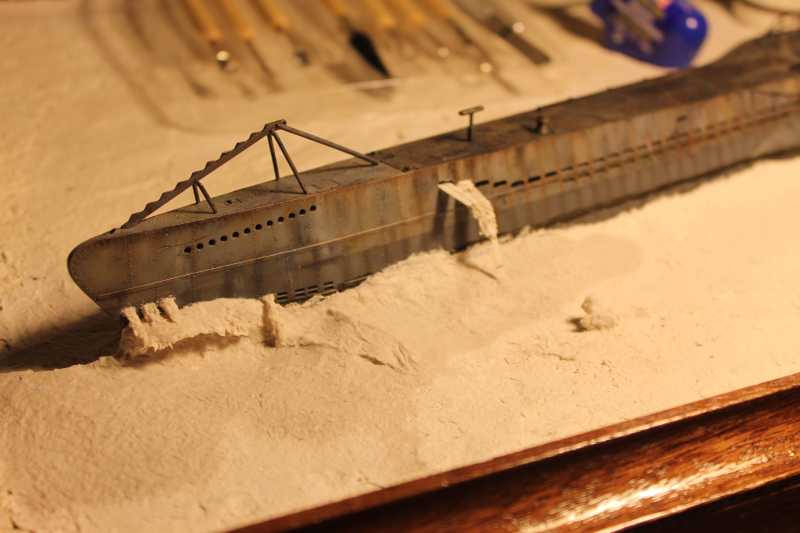

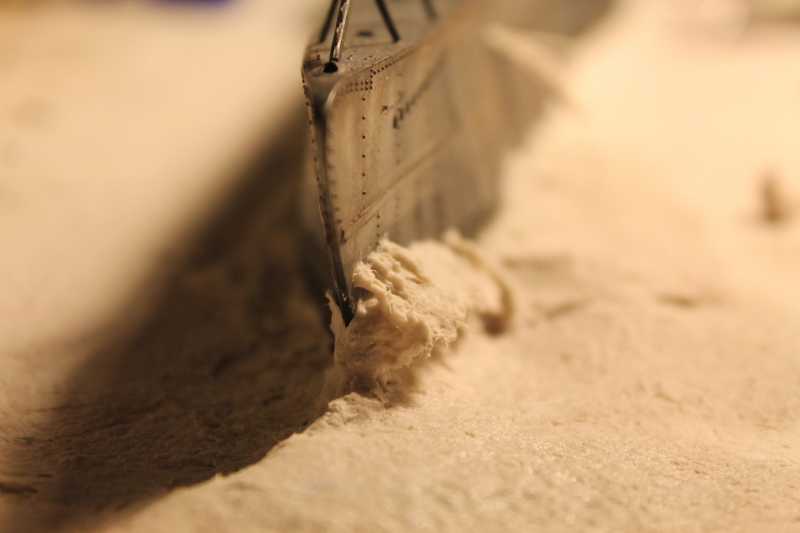
I placed a very thin strip styrene to help build the water coming out the ballast tanks, I want that curved surface, this is the best I could come up with. Plenty more to do, so thank you for looking, as always, comments and advice please, certainly welcome.
Laurence
Decision was made to change course sort of speak. Rather than a full sub, decided to do the waterline version. So, here it is, cut and placed on the base for a viewing, proportions, angles and all.
The small protruding pieces of white thingy are strips styrene that I glued to the hull and will be covered with celluclay so the sub is firmly fixed to the base.
The material of choice for the water is Celluclay, the paper mache of champions
. What did NOT make me happy was the pricetag. It could not be sourced here in Oz, nobody seems to sell that stuff. :vmad :vmad :vmad A thin layer of around 2 mm was applied initially, to cover the base and start building from there.
The small black patch demonstrates how good I am with calculating the amount needed. Well, that has been fixed. I applied the celluclay in several rounds sort of speak, simply did not have the time to do it all in one go.
Onto building some water effects. I want to show a rather choppy sea, without going full tropical storm.
I did my research, and I gathered it should look something similar to these images below. Only the bow section for now.
I placed a very thin strip styrene to help build the water coming out the ballast tanks, I want that curved surface, this is the best I could come up with. Plenty more to do, so thank you for looking, as always, comments and advice please, certainly welcome.
Laurence
Bit of an update on this build.
Decision was made to change course sort of speak. Rather than a full sub, decided to do the waterline version. So, here it is, cut and placed on the base for a viewing, proportions, angles and all.
The small protruding pieces of white thingy are strips styrene that I glued to the hull and will be covered with celluclay so the sub is firmly fixed to the base.
The material of choice for the water is Celluclay, the paper mache of champions
A thin layer of around 2 mm was applied initially, to cover the base and start building from there.
The small black patch demonstrates how good I am with calculating the amount needed. Well, that has been fixed. I applied the celluclay in several rounds sort of speak, simply did not have the time to do it all in one go.
Onto building some water effects. I want to show a rather choppy sea, without going full tropical storm.
I did my research, and I gathered it should look something similar to these images below. Only the bow section for now.
I placed a very thin strip styrene to help build the water coming out the ballast tanks, I want that curved surface, this is the best I could come up with. Plenty more to do, so thank you for looking, as always, comments and advice please, certainly welcome.
Laurence
Oh that's fascinating!

White_Wolf
Master at Arms
Gentlemen, as always, much appreciated.
I would have loved for this to be finished in time for the campaign, but, it's pretty obvious that it will not. I am still waiting for my rigging wire and that won't arrive today (already 11.53 pm here in Oz).
I will carry on with this build, but I am not sure whether or not this is the right place for the thread - I will leave that to our gracious host, MP to decide.
I would have loved to earn a ribbon this year , maybe the ship builders' one? Not sure, MP, your call.
:captain
Laurence
I would have loved for this to be finished in time for the campaign, but, it's pretty obvious that it will not. I am still waiting for my rigging wire and that won't arrive today (already 11.53 pm here in Oz).
I will carry on with this build, but I am not sure whether or not this is the right place for the thread - I will leave that to our gracious host, MP to decide.
I would have loved to earn a ribbon this year
, maybe the ship builders' one? Not sure, MP, your call.:captain
Laurence
White_Wolf
Master at Arms
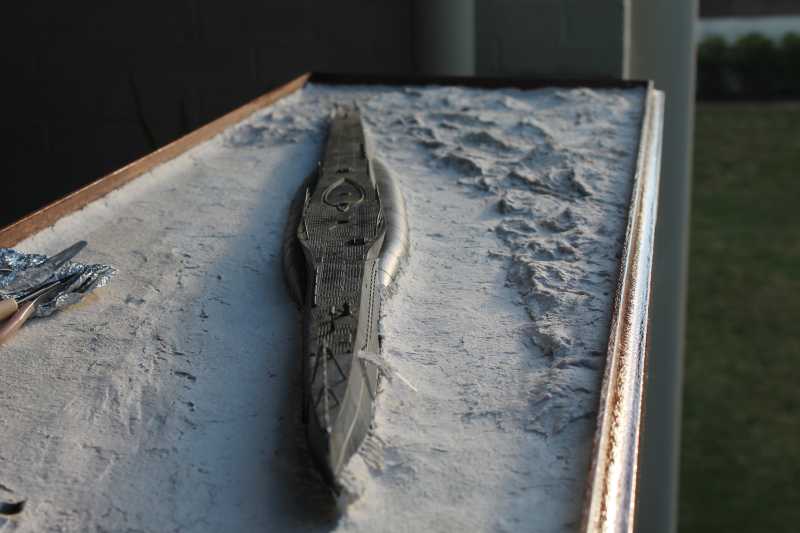
Ribbon or no ribbon, work continues. Managed to do some waves today, had to take the whole thing on the balcony. Sun, wind and easier to work with. Results below, only 1/3 of the sea done, roughly.


Thanks for watching,
Laurence
Thanks for watching,
Laurence
sharkman
Master at Arms
I've seen folks use a lot of different things for water but never celluclay but I must admit that is the best representation I think I have ever seen, I can't wait to see this finished !
I agree with Gary, it is looking really good so far!